การทำงานร่วมกัน
ศิลปะ
ความงามและสุขภาพ
งานฝีมือ
วัฒนธรรมและประวัติศาสตร์
ความบันเทิง
สิ่งแวดล้อม
อาหารและเครื่องดื่ม
วิศวกรรมย้อนรอย
วิทยาศาสตร์
กีฬา
เทคโนโลยี
อุปกรณ์สวมใส่
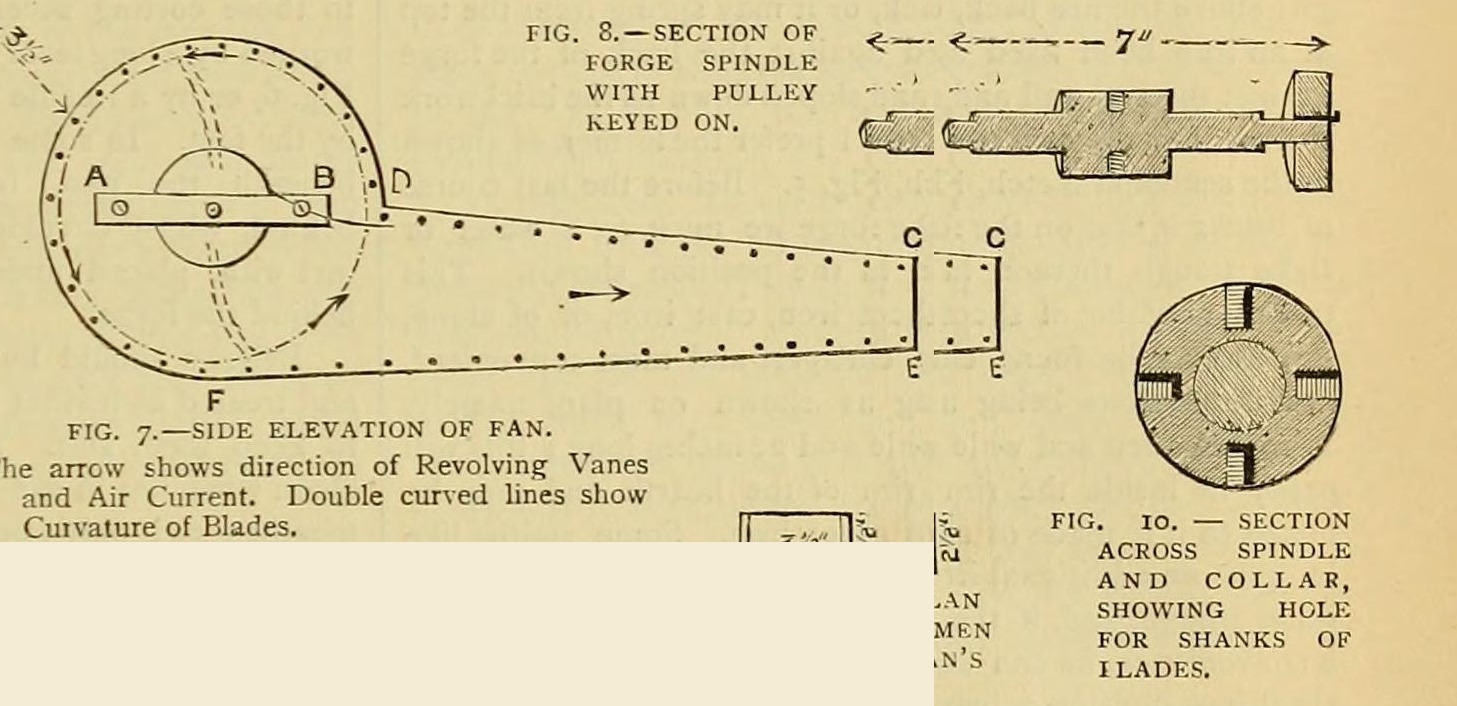


Forge Blast Fan: Riveted Sheet-Iron Drum, Shrunk-Collar Spindle and Four Screwed Blades, Belt-Driven at 360 rpm (Edwinson, 1886)
George Edwinson's home-made forge fan (Amateur Work, 1886), which he preferred to bellows: two 1/8 in. sheet-iron sides with a 3 1/2 in. intake, a riveted 1/16 in. casing, a turned 3/4 in. spindle with a shrunk-on collar holding four forged, slightly scooped blades, brass bearings, and a 2 in. pulley driven from a 2 ft hand wheel at 30 rpm for 360 rpm.
ขั้นสูง
Three to four days
คำแนะนำ
1
1
His sizes
His sizes
กำลังโหลดสมุด Jupyter…
2
2
Read Edwinson
Read Edwinson
"Under no circumstances should I advise an amateur to make his own bellows, but he may be able to make a fan."
3
3
Cut the sides
Cut the sides
Cut two sides from 1/8 in. sheet iron to his fig. 7: 9 in. across at the widest, 2 1/2 in. at the narrowest, 2 ft long. Cut a 3 1/2 in. hole in each for the spindle and air intake, drill two 3/8 in. holes for bolts A and B (filed square), and drill the rivet holes round the edge.
วัสดุสำหรับขั้นตอนนี้:
 แผ่นเหล็กกล้าละมุน1 ชิ้น
เครื่องมือที่ต้องใช้:
 กรรไกรตัดแผ่นโลหะ
 สว่านแท่น
 ตะไบ (ตะไบมือ)
 เหล็กตอกนำศูนย์
4
4
Rivet the casing
Rivet the casing
Cut 5 in. strips of 1/16 in. sheet with 3/4 in. margins bent down (4 in. clear): 14 in. from C to D, 20 in. from E to F, and about 22 in. round the drum from D to F (measure it). Mark the rivet holes through the side holes, nick between holes so the drum strip bends without buckling, and rivet, backing each head with stout iron. Leave a foot of the drum strip open. (Easier: make the sides 2 in. larger with outward flanges and rivet the strips to them.)
วัสดุสำหรับขั้นตอนนี้:
แผ่นเหล็กกล้าละมุน1 ชิ้น หมุดย้ำเหล็ก1 ชิ้น
เครื่องมือที่ต้องใช้:
กรรไกรตัดแผ่นโลหะสว่านแท่น ชุดย้ำหมุด
 ค้อน
 ตลับเมตร
5
5
Turn the spindle
Turn the spindle
Turn 7 in. of 3/4 in. round iron smooth. Turn one end to 1/2 in. for 5/8 in. and the other to 1/2 in. for 2 1/8 in., with sharp shoulders. Bore a 2 x 2 in. collar a shade under size, heat it red and slip it on 1 in. in from a shoulder, then cool it in water to shrink it tight.
วัสดุสำหรับขั้นตอนนี้:
 แท่งเหล็กดัด1 ชิ้น
 น้ำ1 ชิ้น
เครื่องมือที่ต้องใช้:
 เครื่องกลึงโลหะ
 เตาตีเหล็กของช่างตีเหล็ก
 คีมช่างตีเหล็ก
6
6
Drill the collar
Drill the collar
Drill four 5/16 in. holes 5/8 in. deep at quarters round the middle of the collar and tap them 3/8 in. (fig. 10).
เครื่องมือที่ต้องใช้:
สว่านแท่น ดอกต๊าปมือ
 ด้ามจับต๊าปเกลียว
7
7
Forge the blades
Forge the blades
Forge four blades (fig. 9) from 5/8 or 3/4 in. round iron, upsetting and flattening the ends to 1/16 in. thick (or weld 1/4 in. plate to 5/8 in. arms and thin it). Thread the arm ends to fit the collar, curve the blades slightly into a scoop, and bend the arms a little off concentric for a steadier blast.
วัสดุสำหรับขั้นตอนนี้:
แท่งเหล็กดัด1 ชิ้นเครื่องมือที่ต้องใช้:
เตาตีเหล็กของช่างตีเหล็ก ทั่งค้อนดอกต๊าปมือ
8
8
Bearings and assembly
Bearings and assembly
Bolt a 1/2 in. brass bar at least 1 1/4 in. wide across each intake hole (A-B) and bore it true for the spindle. Fit one bearing, pass the spindle in, fit the other and bolt up. Screw the blades in through the open part of the drum, each slightly askew, check they turn without touching, and close the drum with thin-headed bolts, nuts outside.
วัสดุสำหรับขั้นตอนนี้:
 แท่งทองเหลือง1 ชิ้น
 ชุดสลักเกลียวหกเหลี่ยมคละขนาด1 ชิ้น
เครื่องมือที่ต้องใช้:
สว่านแท่นเครื่องกลึงโลหะตะไบ (ตะไบมือ)9
9
Drive it
Drive it
File a flat on the 1 1/2 in. of spindle that stands out on the pulley side and key a 2 in. pulley with a 1 1/2 in. face to it. Belt it from a 2 ft wheel turned at 30 rpm: the fan runs at 360 rpm. Put the crank by the forge head, worked by hand or a foot lever (ours: details left to the reader in the source), and pipe the 3 1/2 x 2 1/2 in. mouth to the tuyere.
วัสดุสำหรับขั้นตอนนี้:
 รอก1 ชิ้น
 สายพานขับ1 ชิ้น
เครื่องมือที่ต้องใช้:
ตะไบ (ตะไบมือ)ค้อน10
10
Troubleshooting
Troubleshooting
Fan troubleshooting.
Flow
Loading...
11
11
History and honest limits
History and honest limits
From George Edwinson, "Smithing and Forging" I, **Amateur Work, Illustrated**, vol. V (1886), pp. 162-164 and figs. 7-11 (checked on the archive.org scan amateurworkillus05lond). He leaves the crank, wheel frame and pipe to the reader; the metric figures and tools are ours.
วัสดุ
8- 1 ชิ้นตัวยึดตำแหน่ง
- 1 ชิ้นตัวยึดตำแหน่ง
- 1 ชิ้นตัวยึดตำแหน่ง
- 1 ชิ้นตัวยึดตำแหน่ง
- 1 ชิ้นตัวยึดตำแหน่ง
- ตัวยึดตำแหน่ง
- 1 ชิ้นตัวยึดตำแหน่ง
- 1 ชิ้นตัวยึดตำแหน่ง
เครื่องมือที่จำเป็น
13- ตัวยึดตำแหน่ง
- ตัวยึดตำแหน่ง
- ตัวยึดตำแหน่ง
- ตัวยึดตำแหน่ง
- ตัวยึดตำแหน่ง
- ตัวยึดตำแหน่ง
- 1 vendor sell this, none ship to you yetตัวยึดตำแหน่ง
- ตัวยึดตำแหน่ง
- ตัวยึดตำแหน่ง
- ตัวยึดตำแหน่ง
- ตัวยึดตำแหน่ง
- ตัวยึดตำแหน่ง
- ตัวยึดตำแหน่ง
พิมพ์เขียวนี้สร้าง

บลูพริ้นท์ที่เกี่ยวข้อง
บลูพริ้นท์เหล่านี้แบ่งปันความรู้ — เทคนิค วัสดุ หรือหลักการ
CC0 สาธารณสมบัติ
พิมพ์เขียวนี้เผยแพร่ภายใต้ CC0 คุณสามารถคัดลอก แก้ไข แจกจ่าย และใช้งานผลงานนี้เพื่อวัตถุประสงค์ใดก็ได้ โดยไม่ต้องขออนุญาต
สนับสนุนเมกเกอร์โดยซื้อสินค้าผ่านพิมพ์เขียวของพวกเขา ซึ่งพวกเขาจะได้รับ ค่าคอมมิชชันเมกเกอร์ ที่ผู้ขายกำหนด หรือสร้างเวอร์ชันใหม่ของพิมพ์เขียวนี้และรวมเป็นการเชื่อมต่อในพิมพ์เขียวของคุณเพื่อแบ่งรายได้