การทำงานร่วมกัน
ศิลปะ
ความงามและสุขภาพ
งานฝีมือ
วัฒนธรรมและประวัติศาสตร์
ความบันเทิง
สิ่งแวดล้อม
อาหารและเครื่องดื่ม
วิศวกรรมย้อนรอย
วิทยาศาสตร์
กีฬา
เทคโนโลยี
อุปกรณ์สวมใส่
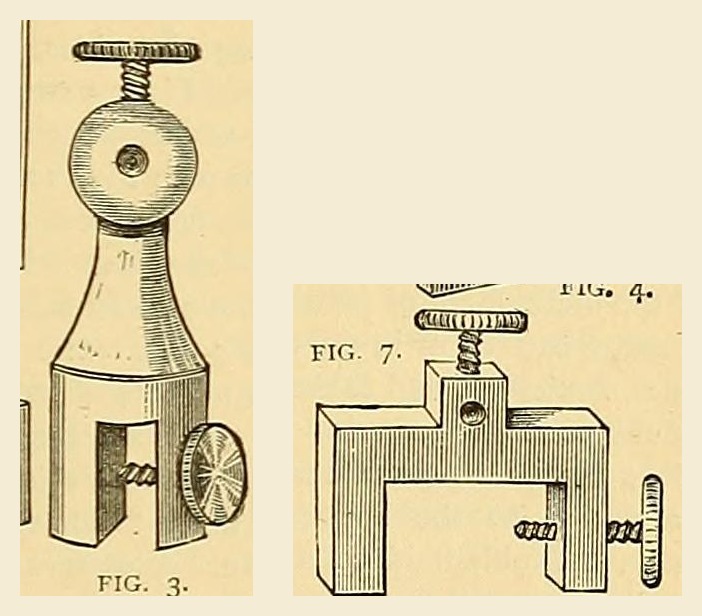


Brass Binding-Screw: Body Turned from 5/8 in. Rod, Thumb Screws from 3/8 in. Rod, and a Bent Brass Clamp (Edwinson, 1881)
The Victorian battery terminal, from George Edwinson's Electro-plating at Home (Amateur Work, 1881): a brass body turned from 1 1/2 in. of 5/8 in. rod, slotted for the plate and bored for the wire, with thumb screws turned from 3/8 in. rod; or a clamp bent hot from a brass strip with a soldered-on wire piece.
ระดับกลาง
Two hours at the lathe
คำแนะนำ
1
1
His sizes
His sizes
กำลังโหลดสมุด Jupyter…
2
2
Read Edwinson
Read Edwinson
"Those who may have lathes ... may easily turn up a binding-screw ... out of a 1 1/2 in. length of 5/8 in. brass rod."
3
3
Turn the body
Turn the body
Cut 1 1/2 in. (38 mm) of 5/8 in. (16 mm) brass rod and turn the body to shape first (his fig. 3: a round head on a tapering neck over a forked foot).
วัสดุสำหรับขั้นตอนนี้:
 แท่งทองเหลือง1 ชิ้น
เครื่องมือที่ต้องใช้:
 เลื่อยตัดเหล็ก
 เครื่องกลึงโลหะ
 มีดตัดงานกลึง
4
4
Slot and bore
Slot and bore
Cut the slot that grips the plate. Bore a hole for the wire through the head, then bore the holes for the screws.
เครื่องมือที่ต้องใช้:
 ปากกาจับชิ้นงานหน้าโต๊ะเลื่อยตัดเหล็ก
 ตะไบ (ตะไบมือ)
 สว่านมือ
5
5
Turn the thumb screws
Turn the thumb screws
Turn the screws from 3/8 in. (9.5 mm) brass rod with plain thumb-screw heads (he says milled heads are a mistake). Cut a fine thread on them and tap the holes to match.
วัสดุสำหรับขั้นตอนนี้:
แท่งทองเหลือง1 ชิ้นเครื่องมือที่ต้องใช้:
เครื่องกลึงโลหะมีดตัดงานกลึง ชุดต๊าปและดายทำเกลียว
6
6
Bent clamp (variant)
Bent clamp (variant)
From good malleable brass take a strip 3 in. long, 1/2 in. wide and 1/4 in. thick (76 x 13 x 6 mm). Heat it to a dull red and bend it over a former of hot iron. Cut the piece for the wire and centre screw separately, hard-solder it on and trim it. Fit thumb screws as above. (A clamp may also be cast from a wooden pattern.)
วัสดุสำหรับขั้นตอนนี้:
 แถบทองเหลือง1 ชิ้น
 โลหะบัดกรีเงิน1 ชิ้น
เครื่องมือที่ต้องใช้:
 เตาตีเหล็กของช่างตีเหล็ก
 คีมช่างตีเหล็ก
 ค้อน
 หัวเป่าเชื่อมทองเหลืองตะไบ (ตะไบมือ)สว่านมือชุดต๊าปและดายทำเกลียว
7
7
Clean and keep it working
Clean and keep it working
Clean the slot with folded emery cloth and the wire hole with the tang of a file. Now and then oil the screw, work it in and out, and wipe the oil off. Do not screw up too tight.
เครื่องมือที่ต้องใช้:
ตะไบ (ตะไบมือ)8
8
Troubleshooting
Troubleshooting
Binding-screw troubleshooting.
Flow
Loading...
9
9
History and honest limits
History and honest limits
From George Edwinson, "Electro-plating at Home", **Amateur Work, Illustrated**, vol. I (1881), p. 81 figs. 3 and 7 and p. 99 (checked on the archive.org scan amateurworkillus11881lond). He gives no thread size. Modern panel binding posts add an insulating bush and a banana-plug socket; this is the 1881 brass terminal. The metric figures and the tools are ours.
วัสดุ
3- 1 ชิ้นตัวยึดตำแหน่ง
- 1 ชิ้นตัวยึดตำแหน่ง
- 1 ชิ้นตัวยึดตำแหน่ง
เครื่องมือที่จำเป็น
11- ตัวยึดตำแหน่ง
- ตัวยึดตำแหน่ง
- ตัวยึดตำแหน่ง
- ตัวยึดตำแหน่ง
- ตัวยึดตำแหน่ง
- ตัวยึดตำแหน่ง
- ตัวยึดตำแหน่ง
- ตัวยึดตำแหน่ง
- ตัวยึดตำแหน่ง
- ตัวยึดตำแหน่ง
- ตัวยึดตำแหน่ง
พิมพ์เขียวนี้สร้าง

บลูพริ้นท์ที่เกี่ยวข้อง
บลูพริ้นท์เหล่านี้แบ่งปันความรู้ — เทคนิค วัสดุ หรือหลักการ


CC0 สาธารณสมบัติ
พิมพ์เขียวนี้เผยแพร่ภายใต้ CC0 คุณสามารถคัดลอก แก้ไข แจกจ่าย และใช้งานผลงานนี้เพื่อวัตถุประสงค์ใดก็ได้ โดยไม่ต้องขออนุญาต
สนับสนุนเมกเกอร์โดยซื้อสินค้าผ่านพิมพ์เขียวของพวกเขา ซึ่งพวกเขาจะได้รับ ค่าคอมมิชชันเมกเกอร์ ที่ผู้ขายกำหนด หรือสร้างเวอร์ชันใหม่ของพิมพ์เขียวนี้และรวมเป็นการเชื่อมต่อในพิมพ์เขียวของคุณเพื่อแบ่งรายได้