การทำงานร่วมกัน
ศิลปะ
ความงามและสุขภาพ
งานฝีมือ
วัฒนธรรมและประวัติศาสตร์
ความบันเทิง
สิ่งแวดล้อม
อาหารและเครื่องดื่ม
วิศวกรรมย้อนรอย
วิทยาศาสตร์
กีฬา
เทคโนโลยี
อุปกรณ์สวมใส่
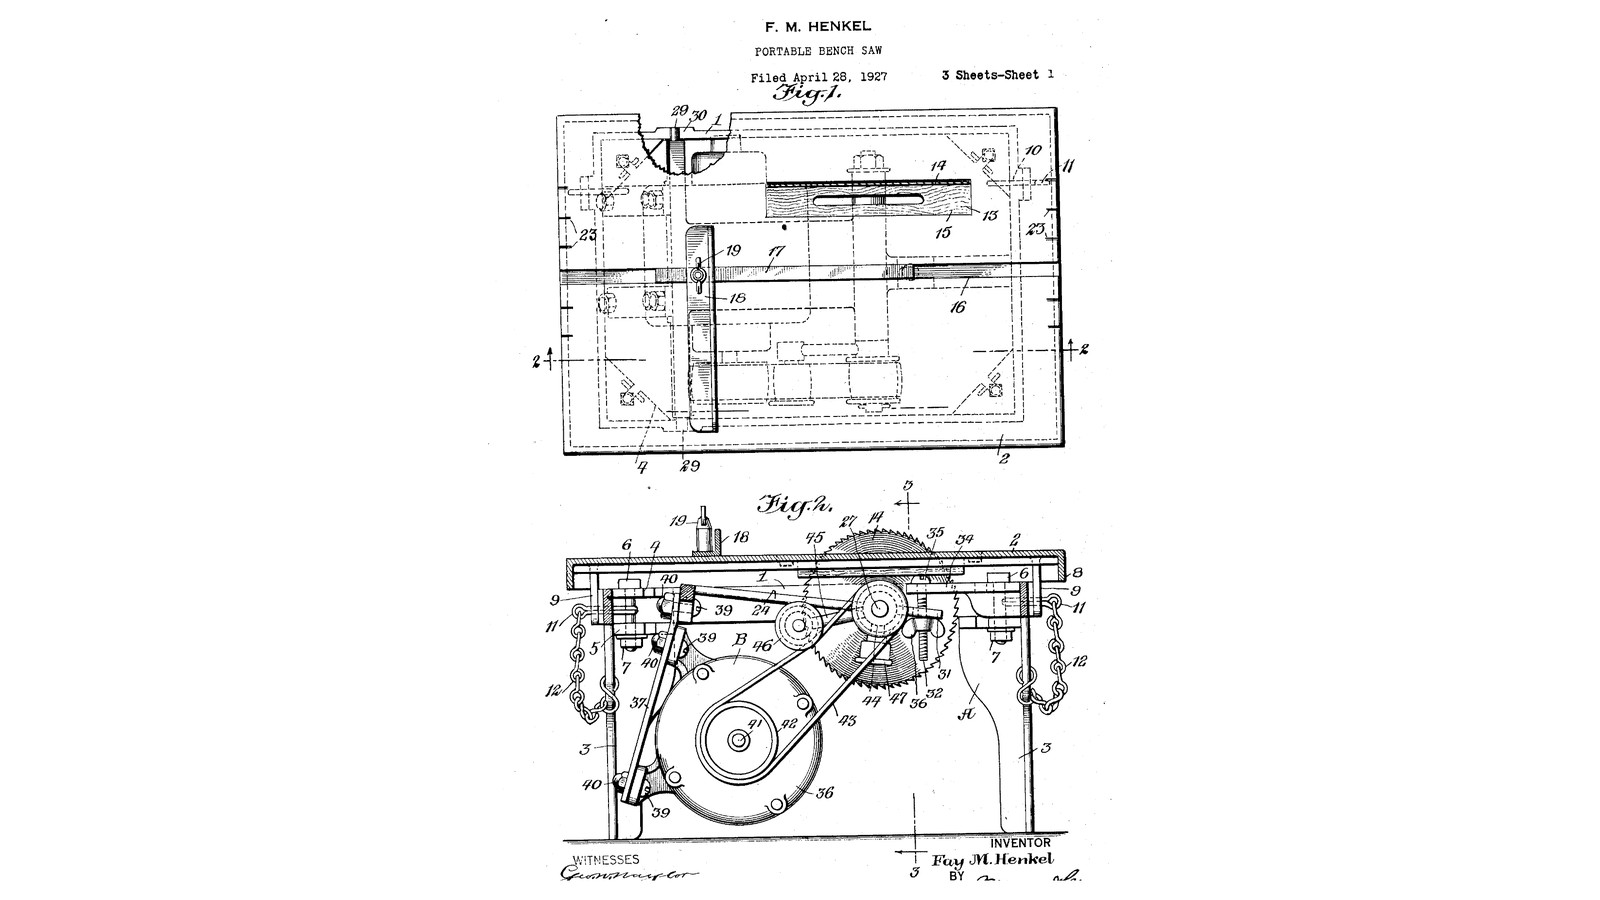


Portable Bench Saw: A Lift-Out Power Unit on Trunnions, Its Motor on Spring Bars, Under a Tilting Platform (Henkel, 1928)
Fay M. Henkel of New Rochelle, New York, received US 1,695,188, dated 11 December 1928, for a cheap, compact bench saw in two parts. The stand has a platform that tilts on hinge pins for angled cuts, with a sliding angle follower and a rip guide. The power unit drops into it on trunnions, and a wing nut on a hanging screw raises or lowers the saw. The motor sits on two spring bars that soak up its vibration and keep the belt tight. Lifted out, the power unit stands on the bars' cap nuts and runs an emery wheel.
The patent gives no sizes; every size here is ours, and our stand is wood and steel where his is cast.
ขั้นสูง
About 4 days
คำแนะนำ
1
1
Raising the saw and tilting the platform
Raising the saw and tilting the platform
กำลังโหลดสมุด Jupyter…
2
2
Read US 1,695,188
Read US 1,695,188
"It will thus be seen that the power unit has a three-point bearing which maintains it against accidental displacement, or, in other words, prevents it from getting out of proper alinement."
3
3
The stand: frame 1 and legs 3
The stand: frame 1 and legs 3
Make a rectangular frame 460 x 360 mm of 25 x 90 mm hardwood, glued and screwed at the corners. Bolt a 250 mm pine leg 45 x 45 mm in each corner through a short length of steel angle screwed to frame and leg, as his corner plates 4 and lugs 5. Cut a notch 30 in the top of each long side, 60 mm from one end, 21 mm wide and 25 deep, for the trunnions. Screw a steel arm 34 across the other end with a 10.5 mm hole, and a lug 50 with an M10 tapped hole on the side away from the hinges.
วัสดุสำหรับขั้นตอนนี้:
 แผ่นไม้เนื้อแข็ง2 ชิ้น
 ไม้สนแปรรูป1 ชิ้น
 เหล็กฉากเหล็กกล้าละมุน1 ชิ้น
 เหล็กแบนกล้าละมุน1 ชิ้น
 ชุดสลักเกลียวหกเหลี่ยมคละขนาด8 ชิ้น
 สกรูไม้24 ชิ้น
 กาวไม้1 ชิ้น
เครื่องมือที่ต้องใช้:
 เลื่อยจิ๊กซอว์
 สว่านไร้สาย
 ชุดดอกสว่าน
 แคลมป์แบบบาร์
 ฉากรวมอเนกประสงค์
 ตลับเมตร
 เลื่อยตัดเหล็ก
 ชุดต๊าปและดายทำเกลียว
 ด้ามจับต๊าปเกลียว
4
4
The platform 2
The platform 2
Cut 18 mm plywood 500 x 400 mm and glue a hardwood strip round its underside edges as the flange 8. Cut the opening 13 for the saw, 230 x 30 mm, and a hardwood block 15 to fill it. Rout a square groove 16 the length of the platform for the follower's bar. Screw two steel lugs 9 under one long edge, drilled to line up with holes 10 in the frame, and hinge it with steel pins held by split pins. Run an M10 tilt screw 49 up through lug 50, with a wing nut on its lower end as a handle, its top bearing under the platform.
วัสดุสำหรับขั้นตอนนี้:
 แผ่นไม้อัด1 ชิ้นแผ่นไม้เนื้อแข็ง1 ชิ้นเหล็กแบนกล้าละมุน1 ชิ้น
 เหล็กเส้นกลมเหล็กกล้าละมุน1 ชิ้น
 สลักผ่า2 ชิ้น
 เพลาเกลียว1 ชิ้น
 น็อตปีกผีเสื้อ1 ชิ้นสกรูไม้16 ชิ้นกาวไม้1 ชิ้น
เครื่องมือที่ต้องใช้:
เลื่อยจิ๊กซอว์ เราเตอร์
 ชุดดอกเราเตอร์สว่านไร้สายชุดดอกสว่านเลื่อยตัดเหล็กแคลมป์แบบบาร์
5
5
The power unit's frame, arbor and trunnions
The power unit's frame, arbor and trunnions
Bolt two 40 x 6 mm steel flat bars 340 mm long into a frame 24 with spacers. Across one end fix a 20 mm round bar 28 whose ends stand out 25 mm each side as the trunnions 29. At the other end bolt two 30 mm flange bearings for the arbor 26, turned from 30 mm bar like the twin-saw table's, with a collar, a loose flange and an M20 thread for the blade's nut. Bolt a forked steel lug 31 on that end, its slot straddling the hanging screw.
วัสดุสำหรับขั้นตอนนี้:
เหล็กแบนกล้าละมุน1 ชิ้นเหล็กเส้นกลมเหล็กกล้าละมุน2 ชิ้น ตลับลูกปืนหน้าแปลน2 ชิ้นชุดสลักเกลียวหกเหลี่ยมคละขนาด10 ชิ้น
 น็อตหกเหลี่ยม3 ชิ้น
เครื่องมือที่ต้องใช้:
เลื่อยตัดเหล็ก สว่านแท่นชุดดอกสว่าน
 ชุดตะไบ
 ปากกาจับชิ้นงานหน้าโต๊ะ
 เครื่องกลึงโลหะ
 หัวจับกลึงสามจับ
 มีดกลึง
 เวอร์เนียร์ดิจิทัล 6 นิ้ว
 ประแจเลื่อน
 แว่นนิรภัย
6
6
Spring bars, motor and belt
Spring bars, motor and belt
Bend two strips of spring steel 37, 30 x 3 mm, with a slight bend near one end, and bolt them under the cross bar 28 so they reach out beyond the trunnions. Bolt the motor 36 to them, with cap nuts 40 on the bolts' ends: these are its feet when the unit stands alone. Fit a V-belt pulley 42 on the motor and one 44 on the arbor, and the A-section belt 43. Pivot an arm 45 on the arbor's bearing with a weighted pulley 46 at its free end resting on the belt to take up the slack. Have the motor wired to a switch.
วัสดุสำหรับขั้นตอนนี้:
 แถบเหล็กสปริง1 ชิ้น
 มอเตอร์ไฟฟ้า1 ชิ้น
 พูลเลย์สายพานร่องวี (หน้าตัด A)3 ชิ้น
 สายพานร่องวี (หน้าตัด A)1 ชิ้นเหล็กแบนกล้าละมุน1 ชิ้นชุดสลักเกลียวหกเหลี่ยมคละขนาด6 ชิ้นน็อตหกเหลี่ยม6 ชิ้น
 สกรูหนอนปลายเว้า3 ชิ้น
 สวิตช์เปิด/ปิด1 ชิ้น
เครื่องมือที่ต้องใช้:
ปากกาจับชิ้นงานหน้าโต๊ะสว่านแท่นชุดดอกสว่านประแจเลื่อน ชุดประแจหกเหลี่ยม
7
7
Put the unit in and set the saw
Put the unit in and set the saw
Fit the 200 mm blade on the arbor. Hang an M10 screw 32 from arm 34 with its head 35 on top. Lower the power unit in, the trunnions into the notches 30 and the forked lug 31 round the screw, and run a wing nut 36 up under the lug. Turn the wing nut to raise the blade through the opening to the depth wanted.
วัสดุสำหรับขั้นตอนนี้:
 Circular Saw Blade Set1 ชิ้นเพลาเกลียว1 ชิ้นน็อตปีกผีเสื้อ1 ชิ้น
 แหวนรองแบน2 ชิ้น
เครื่องมือที่ต้องใช้:
ประแจเลื่อน8
8
Follower and rip guide
Follower and rip guide
Angle follower: a hardwood bar 17 sliding in the groove, with an angle fence 18 clamped at any angle by a wing nut 19. Rip guide 20: a hardwood bar across the platform held by two hook bolts 21 that hook under the flange 8, with wing nuts 22. Mark a scale 23 on the platform's ends to set it.
วัสดุสำหรับขั้นตอนนี้:
แผ่นไม้เนื้อแข็ง1 ชิ้นเพลาเกลียว1 ชิ้นน็อตปีกผีเสื้อ3 ชิ้นเหล็กแบนกล้าละมุน1 ชิ้นเครื่องมือที่ต้องใช้:
เลื่อยจิ๊กซอว์สว่านไร้สายชุดดอกสว่านเลื่อยตัดเหล็กปากกาจับชิ้นงานหน้าโต๊ะตลับเมตร9
9
Try it, and as a grinder
Try it, and as a grinder
With the platform flat, check the blade is square to it with the square, rip a board along the guide and crosscut another against the follower. Tilt the platform with the tilt screw (and the block under it for steep angles) and check the angle with the protractor. Lift the power unit out, stand it on its cap nuts, swap the blade for the grinding wheel, swing the idler arm to the belt's other side, and run it.
เครื่องมือที่ต้องใช้:
 ล้อเจียรฉากรวมอเนกประสงค์
 ไม้โปรแทรกเตอร์แว่นนิรภัย
 ที่ป้องกันการได้ยิน (ครอบหู SNR 30 เดซิเบล)
10
10
Troubleshooting
Troubleshooting
Portable bench saw troubleshooting.
Flow
Loading...
11
11
History and honest limits
History and honest limits
**Fay M. Henkel** of New Rochelle, New York, US 1,695,188, dated 11 December 1928, filed 28 April 1927. He claimed a supporting unit with a platform and a power unit with a frame, "trunnions on the end of said frame, said supporting unit having recesses therein receiving the trunnions", a bearing and arbor, spring bars and a motor fixed to them, pulleys and a belt; and the spring bars' couplings serving as feet when the unit is removed. His frame, platform and legs are castings; ours are hardwood, plywood and steel. His bearing is a sleeve with a grease cup; ours are two greased flange bearings. He gives no sizes, motor or speeds; those are ours.
วัสดุ
22- 2 ชิ้นตัวยึดตำแหน่ง
- 1 ชิ้นตัวยึดตำแหน่ง
- 1 ชิ้นตัวยึดตำแหน่ง
- 1 ชิ้นตัวยึดตำแหน่ง
- ตัวยึดตำแหน่ง
- 40 ชิ้นตัวยึดตำแหน่ง
- 2 ชิ้นตัวยึดตำแหน่ง
- 1 ชิ้นตัวยึดตำแหน่ง
- ตัวยึดตำแหน่ง
- 2 ชิ้นตัวยึดตำแหน่ง
- 1 ชิ้นตัวยึดตำแหน่ง
- 5 ชิ้นตัวยึดตำแหน่ง
- 2 ชิ้นตัวยึดตำแหน่ง
- 9 ชิ้นตัวยึดตำแหน่ง
- 1 ชิ้นตัวยึดตำแหน่ง
- 1 ชิ้นตัวยึดตำแหน่ง
- ตัวยึดตำแหน่ง
- 1 ชิ้นตัวยึดตำแหน่ง
- 3 ชิ้นตัวยึดตำแหน่ง
- 1 ชิ้นตัวยึดตำแหน่ง
- 1 ชิ้นตัวยึดตำแหน่ง
- 2 ชิ้นตัวยึดตำแหน่ง
เครื่องมือที่จำเป็น
24- 1 vendor sell this, none ship to you yetตัวยึดตำแหน่ง
- 1 vendor sell this, none ship to you yetตัวยึดตำแหน่ง
- ตัวยึดตำแหน่ง
- ตัวยึดตำแหน่ง
- ตัวยึดตำแหน่ง
- 1 vendor sell this, none ship to you yetตัวยึดตำแหน่ง
- ตัวยึดตำแหน่ง
- ตัวยึดตำแหน่ง
- ตัวยึดตำแหน่ง
- ตัวยึดตำแหน่ง
- 1 vendor sell this, none ship to you yetตัวยึดตำแหน่ง
- ตัวยึดตำแหน่ง
- ตัวยึดตำแหน่ง
- ตัวยึดตำแหน่ง
- ตัวยึดตำแหน่ง
- ตัวยึดตำแหน่ง
- ตัวยึดตำแหน่ง
- ตัวยึดตำแหน่ง
- ตัวยึดตำแหน่ง
- ตัวยึดตำแหน่ง
- ตัวยึดตำแหน่ง
- ตัวยึดตำแหน่ง
- ตัวยึดตำแหน่ง
- ตัวยึดตำแหน่ง
พิมพ์เขียวนี้สร้าง

บลูพริ้นท์ที่เกี่ยวข้อง
บลูพริ้นท์เหล่านี้แบ่งปันความรู้ — เทคนิค วัสดุ หรือหลักการ

CC0 สาธารณสมบัติ
พิมพ์เขียวนี้เผยแพร่ภายใต้ CC0 คุณสามารถคัดลอก แก้ไข แจกจ่าย และใช้งานผลงานนี้เพื่อวัตถุประสงค์ใดก็ได้ โดยไม่ต้องขออนุญาต
สนับสนุนเมกเกอร์โดยซื้อสินค้าผ่านพิมพ์เขียวของพวกเขา ซึ่งพวกเขาจะได้รับ ค่าคอมมิชชันเมกเกอร์ ที่ผู้ขายกำหนด หรือสร้างเวอร์ชันใหม่ของพิมพ์เขียวนี้และรวมเป็นการเชื่อมต่อในพิมพ์เขียวของคุณเพื่อแบ่งรายได้