ศิลปะ
ความงามและสุขภาพ
งานฝีมือ
วัฒนธรรมและประวัติศาสตร์
ความบันเทิง
สิ่งแวดล้อม
อาหารและเครื่องดื่ม
วิศวกรรมย้อนรอย
วิทยาศาสตร์
กีฬา
เทคโนโลยี
อุปกรณ์สวมใส่
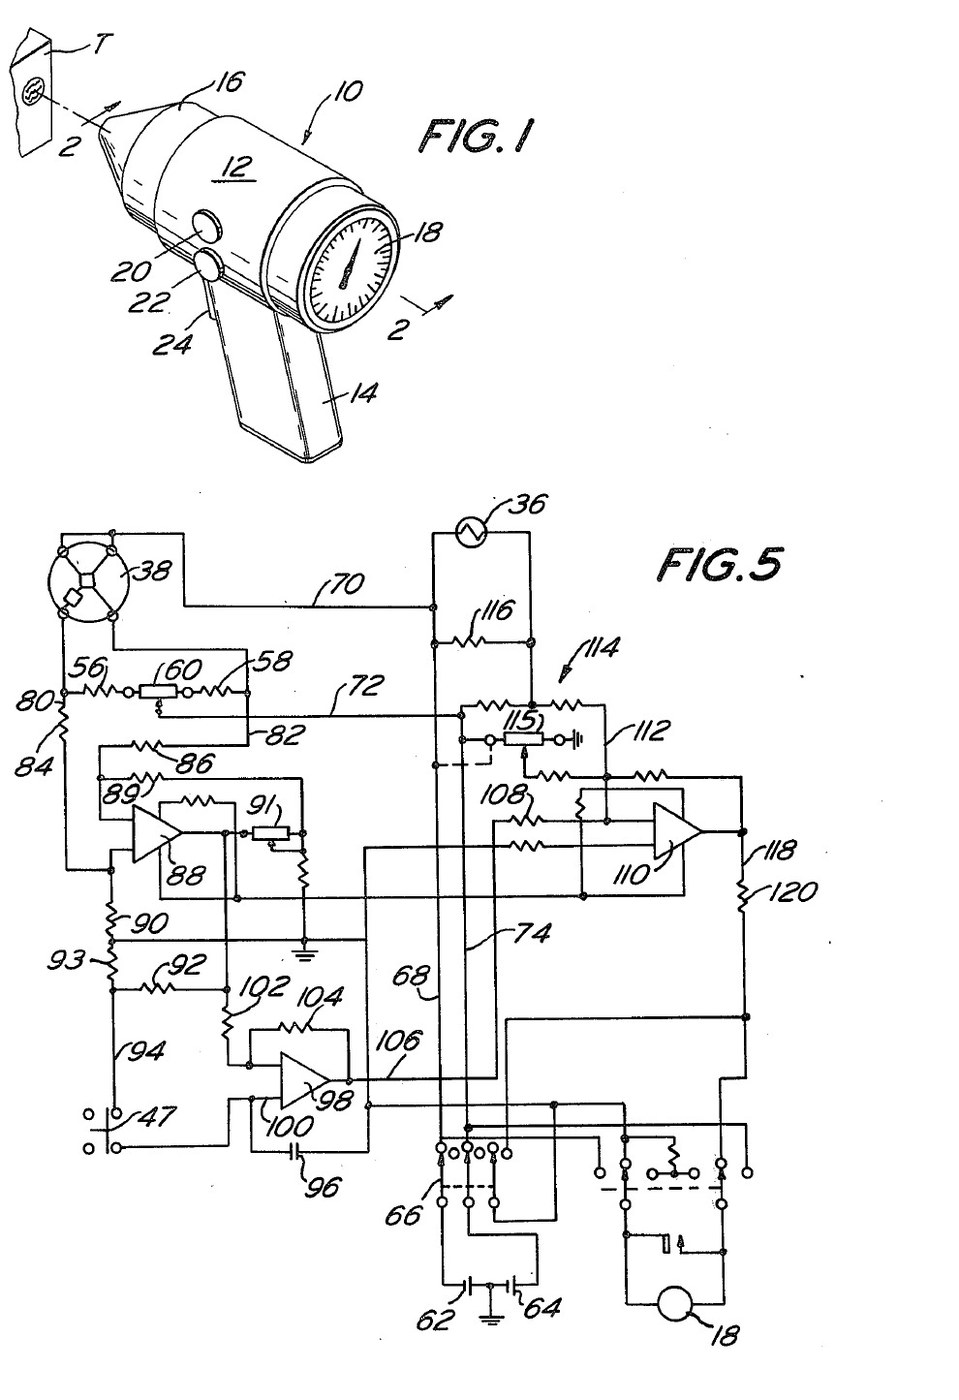


Infrared Thermometer: Pistol Grip with a Trigger-Swung Mirror That Zeroes on the Cavity (Michael, US 4,005,605, 1977)
A pistol-grip thermometer that reads a surface's temperature from its infrared radiation, without touching it. Inside, a concave mirror on a pivot first looks at the instrument's own cavity and a thermistor there, so the circuit stores a zero; pulling the trigger swings the mirror to the nose opening and focuses the target's radiation on a thermistor bolometer. The meter shows the difference, corrected for the cavity's temperature.
Result: a non-contact thermometer reading -20 to 60 °C, built for veterinary use.
Source: D. S. Michael (Mikron Instrument), US 4,005,605 (1977). Unknown: sizes, component values and most materials. Picture: the patent drawing.
ขั้นสูง
Unknown
คำแนะนำ
1
1
Build the housing and nose
Build the housing and nose
Make a housing with a pistol handle, in three pieces for easy assembly. Fix a cone-shaped nose to its front, cut off at the tip to leave a round opening about one tenth of the cavity's inside diameter, so little stray radiation gets in or out. Paint the inside of the nose and cavity flat black. An infrared-transparent sheet may close the nose to keep out dirt and draughts. Not given: sizes, the materials.
วัสดุสำหรับขั้นตอนนี้:
 วัสดุที่ไม่ทราบ1 housing, nose, window
 สีดำด้าน1 as needed
เครื่องมือที่ต้องใช้:
 แปรงทาสีหน้ากว้าง
 ขนาดที่ไม่ทราบ
2
2
Fit the detector, mirror and ambient thermistor
Fit the detector, mirror and ambient thermistor
Hold the thermistor bolometer on the housing's axis with a spider. Mount a concave mirror in a gimbal ring on two trunnions in bearings in the housing wall, with the detector at its focus when it faces the nose. Put a bead thermistor inside the cone. A leaf spring holds the ring tilted so the mirror faces the thermistor. Not given: the mirror's focal length, the metals.
วัสดุสำหรับขั้นตอนนี้:
 โบโลมิเตอร์เทอร์มิสเตอร์1 ชิ้น
 กระจกเว้า1 ชิ้น
 โลหะที่ไม่ทราบ1 gimbal ring, trunnions, spider
 ชุดเทอร์มิสเตอร์ NTC1 bead thermistor
 แหนบซ้อนแผ่น1 ชิ้น
เครื่องมือที่ต้องใช้:
 ชุดไขควงขนาดที่ไม่ทราบ
3
3
Fit the trigger
Fit the trigger
Pivot a trigger in the handle. A finger on it pushes the gimbal ring against the spring, so the mirror turns to face the nose opening, and at the same moment opens a small switch beside the trigger. Fit the off-on switch and two control knobs on the housing, and the meter in its back. Ours: a microswitch and a moving-coil meter.
วัสดุสำหรับขั้นตอนนี้:
โลหะที่ไม่ทราบ1 trigger, finger, pivot ไมโครสวิตช์1 ชิ้น
 สวิตช์โยก1 multipole off-on
 มิเตอร์แผงแบบขดลวดเคลื่อนที่1 ชิ้น
เครื่องมือที่ต้องใช้:
ชุดไขควง4
4
Wire the circuit and measure
Wire the circuit and measure
Wire the bolometer's active and passive elements as two arms of a Wheatstone bridge, with two resistors and a balancing potentiometer as the others; batteries in the handle feed it through the off-on switch. The bridge feeds a differential preamplifier with a gain potentiometer. Through the trigger switch its output charges a capacitor on the + input of a FET-input op-amp whose input bias current is under 1 pA; match the divider resistors to the op-amp's resistors within 0.1 %. Feed that op-amp's output into a summing amplifier together with an ambient correction from the bead thermistor (a fixed resistor across it, and a potentiometer to set the starting reading), and drive the meter from the sum. To use, switch on and balance the bridge; with the trigger released the mirror faces the cavity and the capacitor stores that reading. Aim at the target and pull the trigger: the meter shows the target minus the stored cavity reading, plus the ambient correction, so detector and preamplifier drift cancel. Not given: the component values.
วัสดุสำหรับขั้นตอนนี้:
 แผ่นวงจรพิมพ์1 ชิ้น
 ไอซีออปแอมป์3 preamplifier, FET-input store, summing
 ความต้านทาน1 set, incl. 0.1 % matched pairs
 โพเทนชิออมิเตอร์4 ชิ้น
 ชุดตัวเก็บประจุ1 storage capacitor
 แบตเตอรี่2 ชิ้น
 ลวดตะกั่วบัดกรี1 as needed
เครื่องมือที่ต้องใช้:
 หัวแร้งบัดกรี
วัสดุ
17- 1 housing, nose, windowตัวยึดตำแหน่ง
- 1 as neededตัวยึดตำแหน่ง
- 1 ชิ้นตัวยึดตำแหน่ง
- 1 ชิ้นตัวยึดตำแหน่ง
- 1 trigger, finger, pivotตัวยึดตำแหน่ง
- 1 bead thermistorตัวยึดตำแหน่ง
- 1 ชิ้นตัวยึดตำแหน่ง
- ตัวยึดตำแหน่ง
- ตัวยึดตำแหน่ง
- ตัวยึดตำแหน่ง
- 1 ชิ้นตัวยึดตำแหน่ง
- 3 preamplifier, FET-input store, summingตัวยึดตำแหน่ง
- 1 set, incl. 0.1 % matched pairsตัวยึดตำแหน่ง
- ตัวยึดตำแหน่ง
- 1 storage capacitorตัวยึดตำแหน่ง
- 2 ชิ้นตัวยึดตำแหน่ง
- 1 as neededตัวยึดตำแหน่ง
วัสดุจากพิมพ์เขียวที่เชื่อมต่อ

พิมพ์เขียวนี้สร้าง

CC0 สาธารณสมบัติ
พิมพ์เขียวนี้เผยแพร่ภายใต้ CC0 คุณสามารถคัดลอก แก้ไข แจกจ่าย และใช้งานผลงานนี้เพื่อวัตถุประสงค์ใดก็ได้ โดยไม่ต้องขออนุญาต
สนับสนุนเมกเกอร์โดยซื้อสินค้าผ่านพิมพ์เขียวของพวกเขา ซึ่งพวกเขาจะได้รับ ค่าคอมมิชชันเมกเกอร์ ที่ผู้ขายกำหนด หรือสร้างเวอร์ชันใหม่ของพิมพ์เขียวนี้และรวมเป็นการเชื่อมต่อในพิมพ์เขียวของคุณเพื่อแบ่งรายได้