การทำงานร่วมกัน
ศิลปะ
ความงามและสุขภาพ
งานฝีมือ
วัฒนธรรมและประวัติศาสตร์
ความบันเทิง
สิ่งแวดล้อม
อาหารและเครื่องดื่ม
วิศวกรรมย้อนรอย
วิทยาศาสตร์
กีฬา
เทคโนโลยี
อุปกรณ์สวมใส่
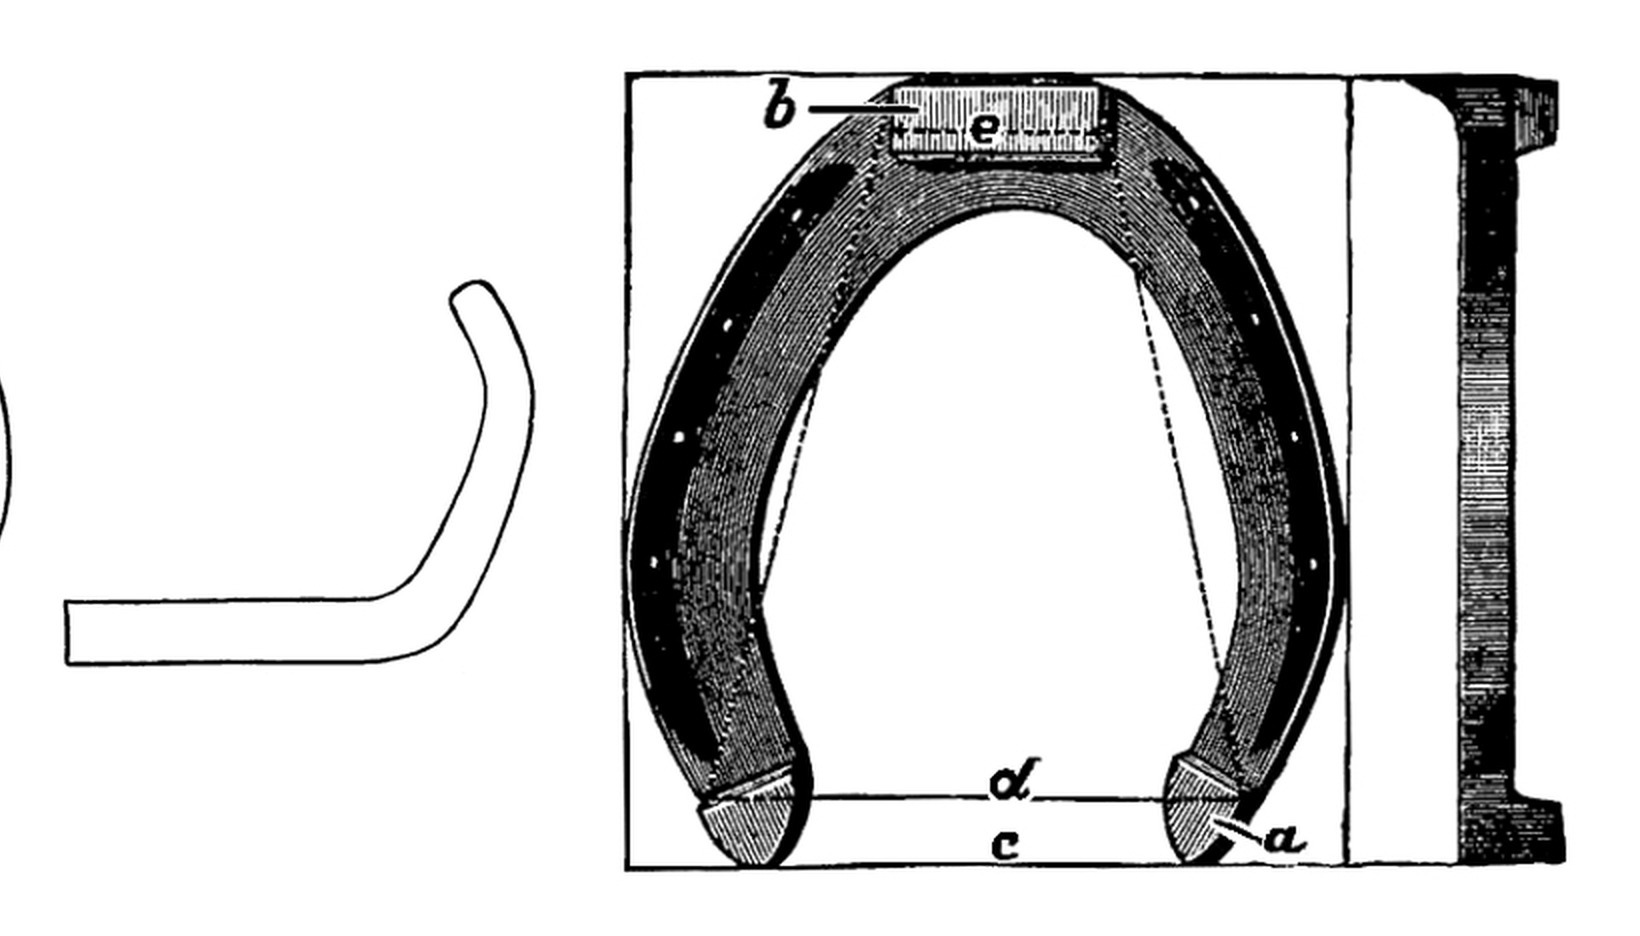


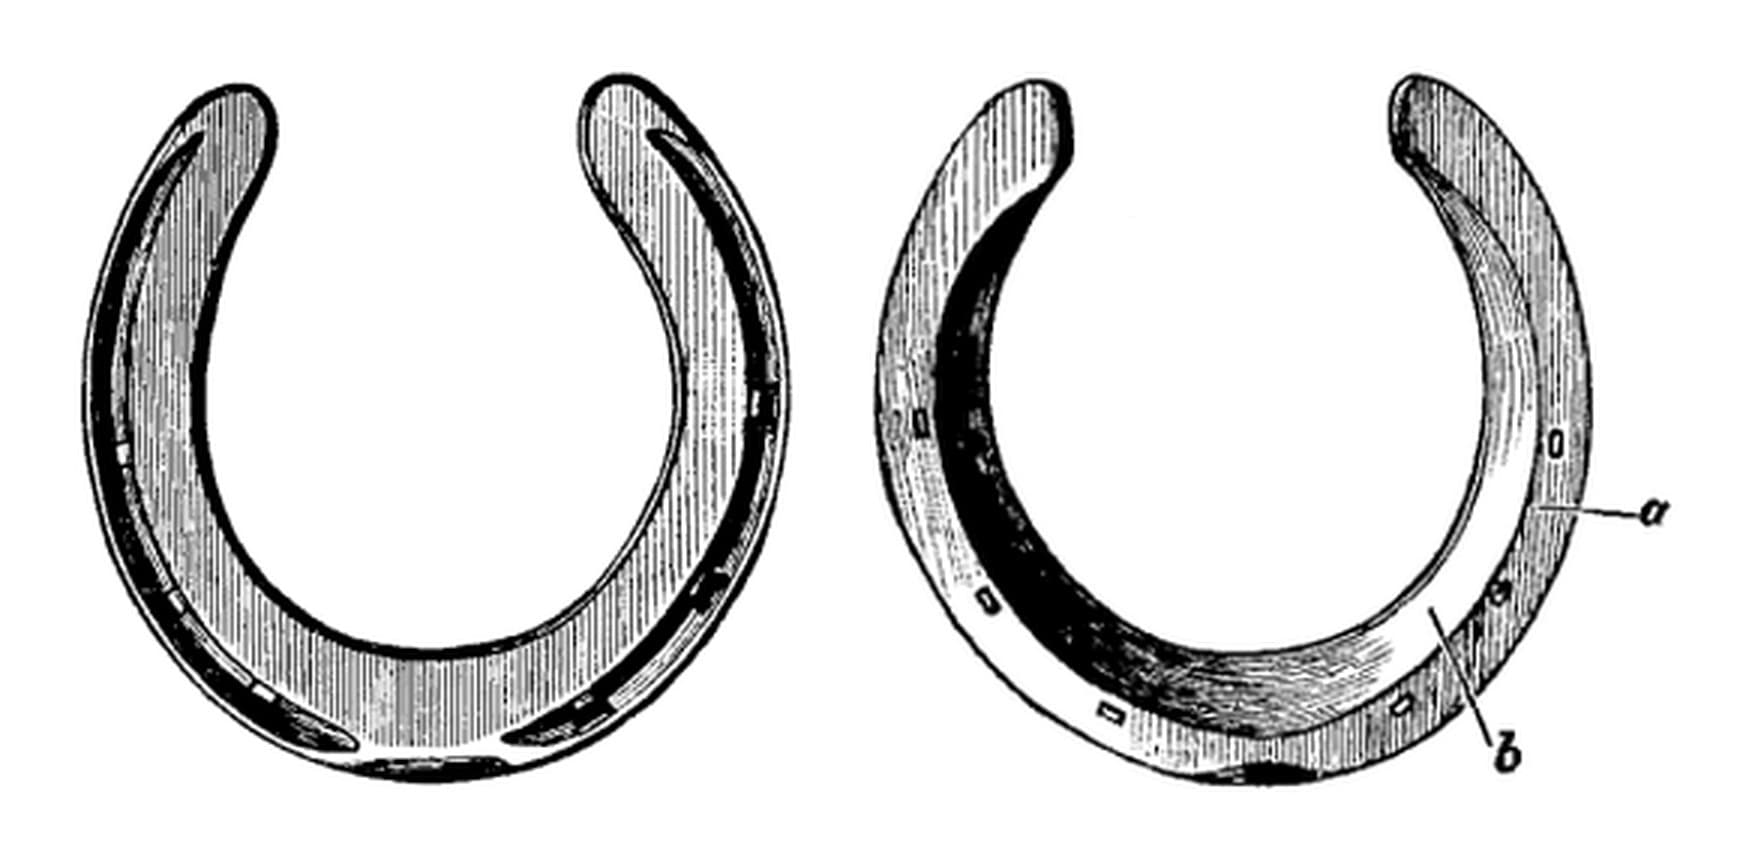
Hind Horseshoe: Round-Pointed Toe, No Seating, Nail Holes in the Front Two-Thirds (Lungwitz and Adams, Text-Book of Horseshoeing, 1913)
A flat hind horseshoe from Lungwitz and Adams, A Text-Book of Horseshoeing (1913). It is made "in like manner" as the front shoe, but the branches are bent to a different curve, giving a round-pointed toe, the hoof side is not concaved, and the nail holes run further back.
Fitting and nailing the shoe to the horse, calks and clips are not covered here.
ระดับกลาง
8-15 minutes a pair, once practised
คำแนะนำ
1
1
Bar length and sizes
Bar length and sizes
กำลังโหลดสมุด Jupyter…
2
2
Read Lungwitz and Adams
Read Lungwitz and Adams
"The hind shoe is made in like manner, but the branches are not bent in a circle but given that form shown in Fig. 106."
3
3
Measure and cut the bar
Measure and cut the bar
Measure the hoof from the point of the toe to the buttress and its greatest width; add them for the bar length. Trace the outline on stiff paper if you want to keep it. Cut the bar.
วัสดุสำหรับขั้นตอนนี้:
 แท่งเหล็กดัด1 ชิ้น
เครื่องมือที่ต้องใช้:
 ตลับเมตร
 ดินสอ
 แผ่นกระดาษหนา
 เตาตีเหล็กของช่างตีเหล็ก
 สกัดตัดบนทั่ง
 คีมช่างตีเหล็ก
4
4
Bend the outer branch to the hind curve
Bend the outer branch to the hind curve
Heat the bar white-hot just beyond its middle and bend it over the sledge head on the anvil face with the turning hammer, as for the front shoe, but bend the branch to the flatter, angled curve of his Fig. 106, not to a circle. The outer branch is made first, the right shoe first in a pair. Draw out the end with the sledge.
เครื่องมือที่ต้องใช้:
เตาตีเหล็กของช่างตีเหล็ก ทั่งปากนก
 เลื่อนลาก
 ค้อนตีให้กลมคีมช่างตีเหล็ก
5
5
Bevel, flatten and shape
Bevel, flatten and shape
Bevel the branch on the horn, then flatten it. Bending the toe of a hind shoe backs up the inner edge and thins the outer, so hammer the shoe smooth and even. Shape it so the toe is round-pointed, "yet not too much so", as in his Fig. 116.
เครื่องมือที่ต้องใช้:
ทั่งปากนกค้อนตีให้กลมคีมช่างตีเหล็ก6
6
Round the inner edge and fuller
Round the inner edge and fuller
Concaving is not necessary: just round the inner edge of the web. Fuller the ground side as for the front shoe, to about two-thirds of the thickness.
เครื่องมือที่ต้องใช้:
ทั่งปากนก ฟุลเลอร์ (เหล็กเซาะร่อง)เลื่อนลากค้อนตีให้กลมคีมช่างตีเหล็ก
7
7
Stamp the nail holes
Stamp the nail holes
Stamp and pritchel the nail holes in the front two-thirds of the shoe, none at the toe: usually one more than a front shoe, seldom more than eight. Set each as far from the outer edge as the wall is thick; on a hind hoof the wall is nearly as thick at the quarters as at the toe.
เครื่องมือที่ต้องใช้:
ทั่งปากนก เหล็กตอกร้อน
 เหล็กเจาะรูเกือกม้าค้อนตีให้กลมคีมช่างตีเหล็ก
8
8
Make the second branch and finish
Make the second branch and finish
Make the inner branch the same way, turned to the left. Go over the outer edge on the horn and hammer the bearing surface smooth and level. Rough it out in two heats if you can.
เครื่องมือที่ต้องใช้:
เตาตีเหล็กของช่างตีเหล็กทั่งปากนกค้อนตีให้กลมฟุลเลอร์ (เหล็กเซาะร่อง)เหล็กตอกร้อนเหล็กเจาะรูเกือกม้าคีมช่างตีเหล็ก9
9
Troubleshooting
Troubleshooting
Hind shoe troubleshooting.
Flow
Loading...
10
10
History and honest limits
History and honest limits
From **A Text-Book of Horseshoeing**, by A. Lungwitz and John W. Adams, 11th edition, J. B. Lippincott, 1913 (Project Gutenberg 66786), chapter III F. His Fig. 116 shows a hind shoe with toe- and heel-calks; the calks and the toe-clip are not made here, as this chapter gives no method for forging heel-calks or drawing clips. Fitting and nailing are not covered. The metric figures are ours.
วัสดุ
1- 1 ชิ้นตัวยึดตำแหน่ง
เครื่องมือที่จำเป็น
12- 1 vendor sell this, none ship to you yetตัวยึดตำแหน่ง
- 1 vendor sell this, none ship to you yetตัวยึดตำแหน่ง
- ตัวยึดตำแหน่ง
- ตัวยึดตำแหน่ง
- ตัวยึดตำแหน่ง
- ตัวยึดตำแหน่ง
- ตัวยึดตำแหน่ง
- ตัวยึดตำแหน่ง
- ตัวยึดตำแหน่ง
- ตัวยึดตำแหน่ง
- ตัวยึดตำแหน่ง
- ตัวยึดตำแหน่ง
พิมพ์เขียวนี้สร้าง
บลูพริ้นท์ที่เกี่ยวข้อง
บลูพริ้นท์เหล่านี้แบ่งปันความรู้ — เทคนิค วัสดุ หรือหลักการ
CC0 สาธารณสมบัติ
พิมพ์เขียวนี้เผยแพร่ภายใต้ CC0 คุณสามารถคัดลอก แก้ไข แจกจ่าย และใช้งานผลงานนี้เพื่อวัตถุประสงค์ใดก็ได้ โดยไม่ต้องขออนุญาต
สนับสนุนเมกเกอร์โดยซื้อสินค้าผ่านพิมพ์เขียวของพวกเขา ซึ่งพวกเขาจะได้รับ ค่าคอมมิชชันเมกเกอร์ ที่ผู้ขายกำหนด หรือสร้างเวอร์ชันใหม่ของพิมพ์เขียวนี้และรวมเป็นการเชื่อมต่อในพิมพ์เขียวของคุณเพื่อแบ่งรายได้