Fulling Wool Felt for Hats — Medieval Felting
คำแนะนำ
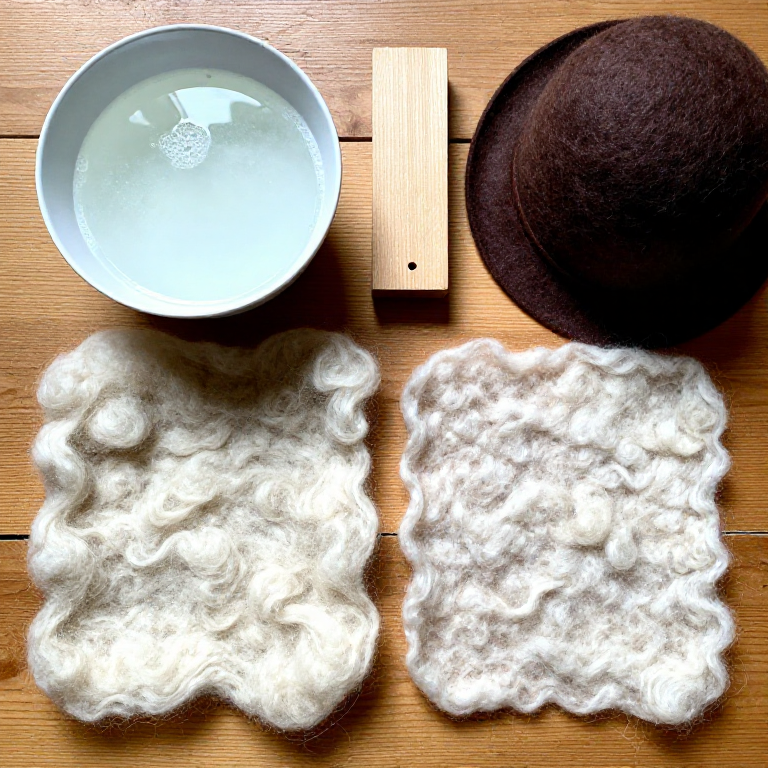
Lay Out the Wool Fibres
Lay Out the Wool Fibres
Pull thin, even wisps of carded wool from the batt and lay them on a bamboo rolling mat or sheet of bubble wrap. Create a first layer with all fibres running in the same direction (horizontal), covering the desired area with an even thickness and no thin spots or gaps. Add a second layer with fibres running perpendicular (vertical) to the first. Add a third layer with fibres running horizontal again. Three layers is the minimum for a strong felt — more layers produce thicker, firmer felt. The finished felt will shrink by approximately 30 to 40 percent in each direction during the felting process, so lay out an area correspondingly larger than the desired final size. For a hat, the layup should be approximately 50 to 60 cm square to produce a piece large enough to stretch over a hat block.
วัสดุสำหรับขั้นตอนนี้:
 Wool Fleece200-300 grams ชิ้น
 Waterseveral litres ชิ้น
 Olive Oil (Pomace Grade, 1L)30-50 grams dissolved in water ชิ้น
 Vinegar Mother50 ml มล.
เครื่องมือที่ต้องใช้:
 Bubble Wrap
 Hat Block (Wooden, Brim)
Wet and Agitate the Fibres
Wet and Agitate the Fibres
Sprinkle hot soapy water (60-70 degrees Celsius) over the layered wool using a spray bottle or by drizzling from a cup. Press gently to saturate all layers without disturbing the fibre arrangement. The soap and hot water serve two functions: the alkaline soap opens the microscopic barbed scales on each wool fibre, and the heat softens the keratin protein. Begin agitating the wet wool by pressing gently with flat palms in a circular motion. Start with very light pressure — heavy pressure at this stage will shift the fibres out of position. After 5 to 10 minutes of gentle rubbing, the fibres will begin to entangle. Test by pinching the surface: if the fibres lift as a sheet rather than pulling apart individually, the initial felting (prefelt stage) has begun.
Full the Felt by Rolling
Full the Felt by Rolling
Once the fibres hold together as a prefelt, increase the agitation to tighten the felt. Roll the felt sheet tightly inside the bamboo mat or bubble wrap and roll it back and forth vigorously (200 to 300 rolls). Open, rotate the felt 90 degrees, re-roll, and repeat from a different direction to shrink evenly in all dimensions. This rolling process is called fulling — the same term used for the Roman and medieval cloth-finishing process. The felt will shrink significantly and become progressively denser and firmer. Continue fulling until the felt has shrunk by approximately 30 to 40 percent and is dense enough that individual fibres cannot be easily pulled from the surface. The felt should feel uniform in thickness with no thin spots.
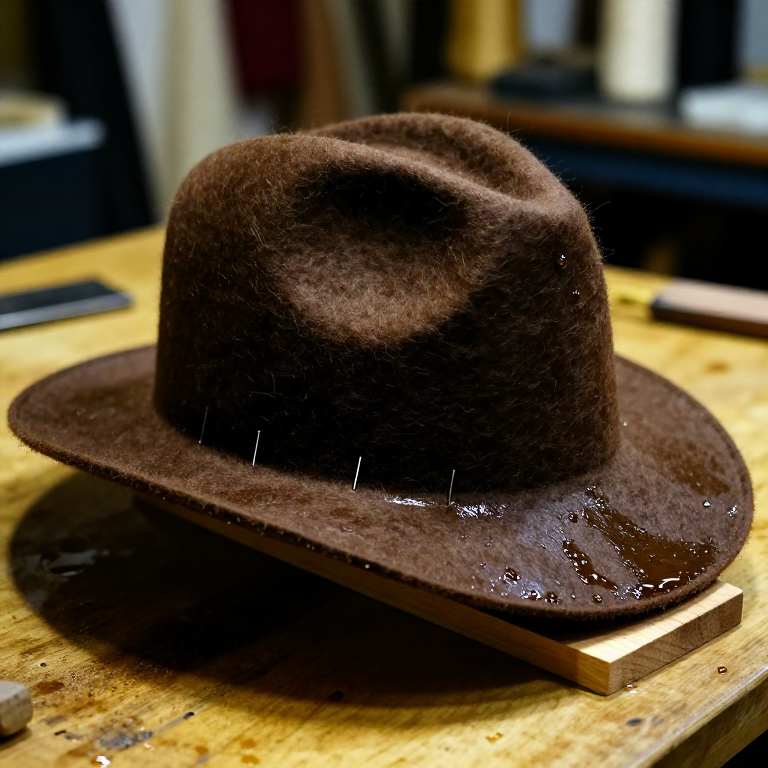
Shape Over a Hat Block (Optional)
Shape Over a Hat Block (Optional)
While the felt is still wet and warm (and therefore pliable), it can be shaped over a hat block, bowl, or other form. Stretch the felt over the block, pulling it smooth and even. Wool felt has remarkable stretch and memory when wet — it can be pulled and shaped significantly, and will hold the shape once dried. For a simple medieval cap (coif), stretch the wet felt over a head-sized bowl or wooden block, smooth out any wrinkles, and pin the edges in place. Allow the felt to dry completely on the block — at least 24 hours in warm, dry conditions. The dried felt will hold the three-dimensional shape permanently. If the felt is too thick in places, it can be shaved thinner with a sharp razor while damp.
Rinse, Dry, and Finish
Rinse, Dry, and Finish
Rinse the felted piece thoroughly in cool water to remove all soap residue — residual soap can attract moths and cause the felt to deteriorate. A final rinse in water with a splash of vinegar (approximately 5 percent solution) helps neutralise any remaining alkalinity and closes the wool fibre scales, producing a smoother surface. Squeeze out excess water gently (do not wring) and allow to dry completely. Once dry, the felt can be trimmed to final shape with sharp scissors, steam-pressed with an iron for a smoother finish, or brushed with a stiff brush to raise a slight nap. Medieval felt was used for hats, cap linings, shoe insoles, armour padding (worn under mail), horse blankets, and tent panels. It is naturally water-resistant, insulating, and remarkably durable — archaeological felt from medieval sites often survives in good condition despite centuries of burial.
วัสดุ
4- 200 g ชิ้นตัวยึดตำแหน่ง
- 50 g ชิ้นตัวยึดตำแหน่ง
- 100 ml ชิ้นตัวยึดตำแหน่ง
เครื่องมือที่จำเป็น
4- ตัวยึดตำแหน่ง
- ตัวยึดตำแหน่ง
- ตัวยึดตำแหน่ง
- ตัวยึดตำแหน่ง
Related blueprints
Other builds that share materials, tools, or techniques with this one.
CC0 สาธารณสมบัติ
พิมพ์เขียวนี้เผยแพร่ภายใต้ CC0 คุณสามารถคัดลอก แก้ไข แจกจ่าย และใช้งานผลงานนี้เพื่อวัตถุประสงค์ใดก็ได้ โดยไม่ต้องขออนุญาต
สนับสนุนเมกเกอร์โดยซื้อสินค้าผ่านพิมพ์เขียวของพวกเขา ซึ่งพวกเขาจะได้รับ ค่าคอมมิชชันเมกเกอร์ ที่ผู้ขายกำหนด หรือสร้างเวอร์ชันใหม่ของพิมพ์เขียวนี้และรวมเป็นการเชื่อมต่อในพิมพ์เขียวของคุณเพื่อแบ่งรายได้