Cutting Hand-Cut Dovetail Joints for a Box — Through Dovetails
คำแนะนำ
Mark the Baseline and Layout the Tails
Mark the Baseline and Layout the Tails
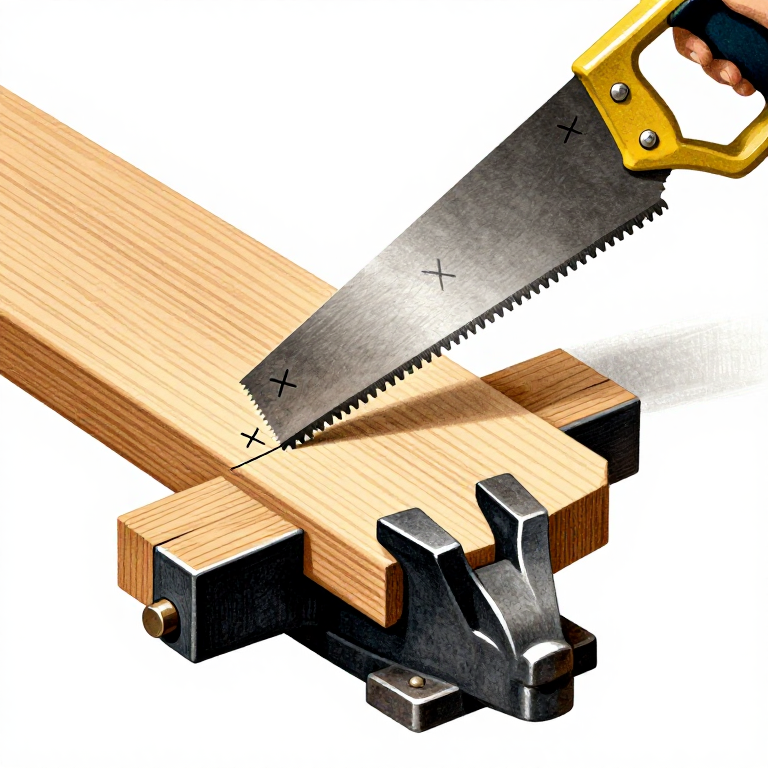
Set the marking gauge to the exact thickness of the mating board and scribe a baseline around the end of each board (on both faces and both edges). This baseline marks the depth of the joint — all saw cuts stop at this line. On the tail board, mark the dovetail angles using a dovetail marker set to a 1:8 ratio for hardwood (approximately 7 degrees from square). Space the tails evenly across the board width, with half-pins at each edge for strength. The tail spacing is aesthetic — narrower pins and wider tails create a more refined look. Mark the waste areas with an X so you know which sections to remove.
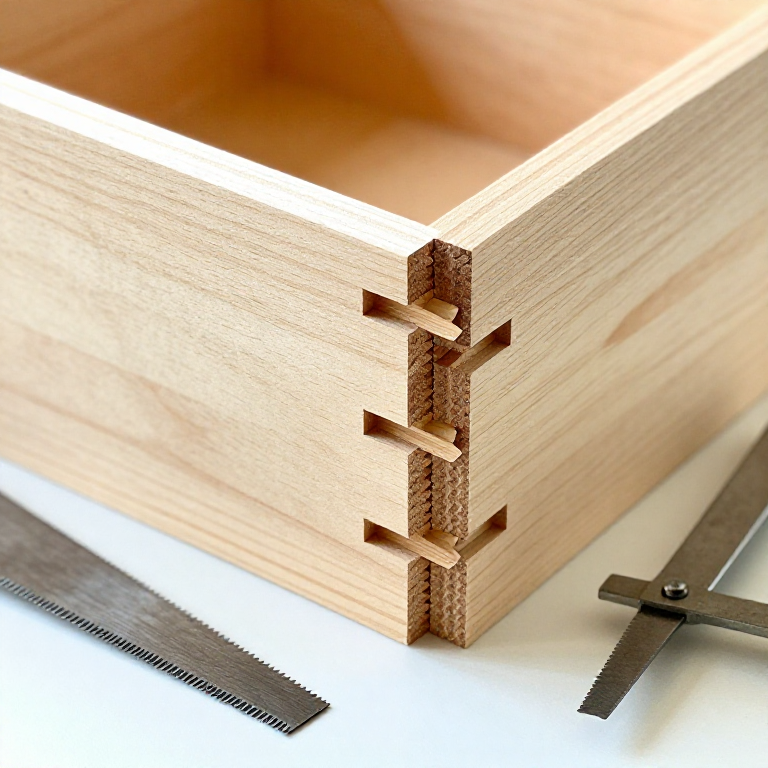
Saw the Tails
Saw the Tails
Clamp the tail board vertically in a vise. Using a dovetail saw (a fine-toothed backsaw), cut along the marked angle lines down to the baseline, staying on the waste side of each line. The saw kerf should split the line — leaving the full marked line on the tail side. Saw straight and perpendicular to the board face. To remove the waste between tails, use a coping saw to cut close to the baseline, then pare exactly to the baseline with a sharp chisel. Work from both faces toward the centre to prevent blowout. The baseline shoulder must be flat and square — this is the visible face of the finished joint.
Transfer and Cut the Pins
Transfer and Cut the Pins
Place the cut tail board on top of the end grain of the pin board, aligning it precisely with the baseline and outside face. Using a sharp marking knife, trace the outline of each tail onto the end grain of the pin board. Square these marks down to the baseline using a small square. Mark the waste areas. Saw along the marked lines with the dovetail saw, cutting on the waste side. Remove the waste between pins with a chisel, working from both faces. The pins must match the tails precisely — test-fit by pressing the two boards together dry. A correctly cut dovetail requires firm hand pressure to assemble but does not require a mallet. Gaps indicate the pins are too narrow; inability to assemble indicates they are too wide.
Test-Fit and Adjust
Test-Fit and Adjust
Dry-assemble all four corners simultaneously to ensure the box is square and all joints close fully. Check squareness by measuring both diagonals — they should be equal. If a joint is too tight at a specific point, identify the contact point (look for shiny burnish marks on the end grain) and pare a thin shaving from that spot with a sharp chisel. Do not force tight joints with a mallet — the wedging action of the dovetail can split the pin board. If a joint is slightly loose, it can often be saved with a thin shim glued into the gap, but the goal is a joint that fits from the saw with no adjustment needed.
Glue, Assemble, and Finish
Glue, Assemble, and Finish
Apply a thin layer of wood glue to all mating surfaces (both tails and pins). Assemble the four corners simultaneously, tapping gently with a mallet if needed (protect the wood surface with a scrap block). Clamp across both diagonals or use a band clamp to pull the box square while the glue sets. Before the glue dries, check squareness again and adjust clamp pressure to correct any racking. After the glue cures, plane or sand the joints flush — the end grain of the tails and pins should be perfectly level with the face of the pin board. Install the bottom panel in a groove (pre-cut before assembly) or nail it to the underside. Sand to 220 grit and apply the finish of your choice. A well-cut dovetail joint is both the strongest corner construction and one of the most visually appealing elements in woodworking.
วัสดุสำหรับขั้นตอนนี้:
 Hardwood Boards (10-12mm)4 boards ชิ้น
 Wood Gluesmall amount ขวด
วัสดุ
3- 4 boards milled to identical thickness, sized for box sides ชิ้นตัวยึดตำแหน่ง
- Plywood or solid wood (for box bottom)1 panel, 5-6mm thick ชิ้น
เครื่องมือที่จำเป็น
6- ตัวยึดตำแหน่ง
- Chisels (sharp, 6mm, 12mm, and 18mm)
- ตัวยึดตำแหน่ง
- Dovetail marker or sliding bevel (1:6 or 1:8 ratio)
- ตัวยึดตำแหน่ง
Required Equipment
Equipment this kind of build typically needs — buy from any maker below.
- CriticalHand Saw·
 Portable Band Saw
 Track-Mounted Chain Saw Quarry Cutter
 Band Saw (9-inch, Benchtop)
 Miter Box with Saw
 Small Hand Saw
 Jeweler's Saw
 - CriticalTape Measure·
 Barrier Tape
 Bias Tape
 Finish Line Tape Dispenser
 Measuring Tape 3m
 Plumber's Tape (PTFE)
 Measuring Tape (30m)
 - RecommendedChisel·
 Thin Flat Chisel (10mm)
 Cold Chisel (flat, 25mm)
 Copper Chisel
 Cold Chisel (pointed)
 Chisel Set (Wood)
 Steel Chisel
 - RecommendedClamps·
 Injection Mold Clamp Kit
 Parallel Clamp
 Wheel Loader with Marble Clamp
 C-Clamp
 Utility Clamp (Burette/Flask)
 Toggle Clamp Set (4 Types)
 - RecommendedDust Mask / Respirator·
 Full-Face Gas Mask (ABEK multi-gas cartridge)
 Dust Mask
 Venetian Mask Blank (Papier-Mache)
 Full-Face Respirator
 Respirator Fit Test Kit
 Respirator with Acid Gas Cartridge
 - RecommendedSafety Glasses·
 Safety Sign (Caution/Warning)
 Splash-Proof Safety Goggles
 Reflective Safety Vest Kit (DIY)
 Chemical Splash Goggles
 Safety Netting for Rockfall
 Steel-Toed Safety Boots
 - RecommendedSandpaper·
 Sandpaper (120 Grit)
 Sandpaper (1000 Grit)
 Sandpaper (80 Grit)
 Wet/Dry Sandpaper Pack (400-3000 Grit)
 Sandpaper 220 Grit (Fine)
 Sandpaper (320 Grit)
 - RecommendedWork Gloves·
 Boxing Gloves (Training)
 Leather Gauntlet Gloves
 Cotton Gloves
 Welding Gloves
 Heavy-Duty Gloves
 Leather Work Gloves
 - OptionalFire Extinguisher·
 ABC Fire Extinguisher
 Fire Extinguisher
 - OptionalFirst Aid Kit·
 First Aid Kit
 Mountain First Aid Kit (Altitude)
 Workshop First Aid Kit
 Bow Release Aid
You can swap these in
Can't get one of the materials? Swap it for an equivalent — these work just as well.
- Instead of Plywood Sheet, try:
 Baltic Birch Plywood (1/8 inch, 12x12, 10-Pack)
 Bendable Plywood (Wiggle Board)
 CDX Softwood Plywood
 Fire-Rated Plywood
 - Instead of Dovetail Saw, try: Portable Band SawBand Saw (9-inch, Benchtop)Miter Box with Saw
- Instead of Bevel Gauge, try:
 Stainless Steel 316 Sheet 16 Gauge
 Sterling Silver Wire 925 20 Gauge
 Wire Tension Monitoring Gauge
 - Instead of Wood Glue, try:
 Polyurethane Glue
 - Instead of Drawknife, try:
 Drawknife (bark spud)
Recommended for this build
Products makers often use with builds like this one.
 Dowel RodUsed together and in similar builds
 CordageUsed together and in similar builds
 AwlUsed together and in similar builds
 WaterFrequently used with this build's materials
 Hemp CordUsed together and in similar builds
 Douglas Fir Timber BeamUsed together and in similar builds
 SawUsed together and in similar builds
 AdzeUsed together and in similar builds
Related blueprints
Other builds that share materials, tools, or techniques with this one.

CC0 สาธารณสมบัติ
พิมพ์เขียวนี้เผยแพร่ภายใต้ CC0 คุณสามารถคัดลอก แก้ไข แจกจ่าย และใช้งานผลงานนี้เพื่อวัตถุประสงค์ใดก็ได้ โดยไม่ต้องขออนุญาต
สนับสนุนเมกเกอร์โดยซื้อสินค้าผ่านพิมพ์เขียวของพวกเขา ซึ่งพวกเขาจะได้รับ ค่าคอมมิชชันเมกเกอร์ ที่ผู้ขายกำหนด หรือสร้างเวอร์ชันใหม่ของพิมพ์เขียวนี้และรวมเป็นการเชื่อมต่อในพิมพ์เขียวของคุณเพื่อแบ่งรายได้