ศิลปะ
ความงามและสุขภาพ
งานฝีมือ
วัฒนธรรมและประวัติศาสตร์
ความบันเทิง
สิ่งแวดล้อม
อาหารและเครื่องดื่ม
วิศวกรรมย้อนรอย
วิทยาศาสตร์
กีฬา
เทคโนโลยี
อุปกรณ์สวมใส่
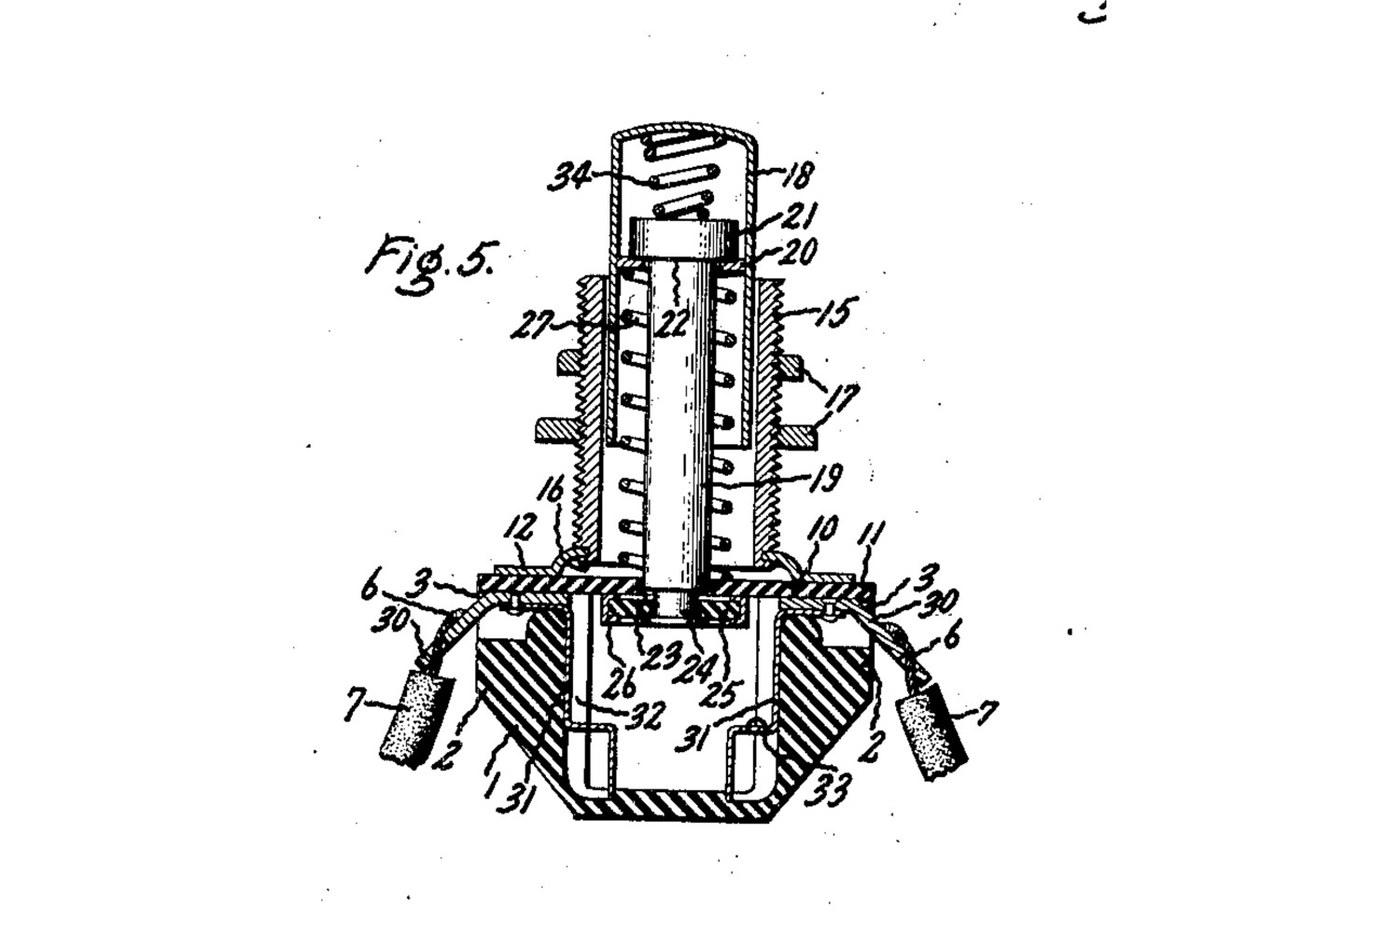


Push Button: Normally Open Momentary Switch with a Cushioned Contact (De Reamer, GE 1939)
A panel push button that closes a circuit only while you press it. A spring holds the button out, and a metal rim on the end of its rod sits clear of two contacts. Press it and the rim bridges both contacts. A second spring inside the button lets the rod give, so the contacts never take more than that spring's force.
Source: Frank C. De Reamer, US 2,166,803 (General Electric, 1939), Fig. 5. Unknown: the insulating material, the metals and every size. De Reamer gives none of them, so they are linked to unknown heads. The tools are ours. Picture: the patent's Fig. 5.
ขั้นสูง
2 days
คำแนะนำ
1
1
Mould the housing
Mould the housing
Mould a cup-shaped housing of insulating material, with a boss on each of two opposite sides, a recess in the top of each boss, a groove inside below each boss, and a bead round the top. Unknown: the material, the sizes and the moulding.
วัสดุสำหรับขั้นตอนนี้:
 วัสดุฉนวนที่ไม่ทราบ1 as required
เครื่องมือที่ต้องใช้:
 แม่พิมพ์อัดขึ้นรูป
 ขนาดที่ไม่ทราบ
2
2
Make the terminals and contacts
Make the terminals and contacts
Bend two angled metal strips. The upper end of each sits in a boss recess, and the lower end is a solder lug. Fix each upper end to a contact that fits the groove inside the housing, stepped at its bottom end. Unknown: the metal.
วัสดุสำหรับขั้นตอนนี้:
 โลหะที่ไม่ทราบ1 as required
เครื่องมือที่ต้องใช้:
 กรรไกรตัดแผ่นโลหะ
 คีมปากแบนขนาดที่ไม่ทราบ
3
3
Make the sleeve, plate and cover
Make the sleeve, plate and cover
Turn a threaded sleeve and cut its thread. Spin its lower end over onto a metal plate with tangs. Cut a cover of insulating sheet with ears that reach over the bosses and a hole in the middle to guide the rod.
วัสดุสำหรับขั้นตอนนี้:
โลหะที่ไม่ทราบ1 as requiredวัสดุฉนวนที่ไม่ทราบ1 as requiredเครื่องมือที่ต้องใช้:
 เครื่องกลึงโลหะ
 ชุดเครื่องมือกลึง (HSS)
 ด้ามจับดายเกลียวกรรไกรตัดแผ่นโลหะ
 เวอร์เนียคาลิเปอร์ขนาดที่ไม่ทราบ
4
4
Make the push button
Make the push button
Make a drawn metal tube closed at the top, and a rod with a head. Put a small coil spring in the top of the tube, then the rod's head. Wedge a washer into the tube under the head. Leave clearance so the rod can swivel a little. Turn the rod's lower end down to a smaller diameter. Unknown: the metal.
วัสดุสำหรับขั้นตอนนี้:
โลหะที่ไม่ทราบ1 as required ชุดสปริงกด1 spring
เครื่องมือที่ต้องใช้:
เครื่องกลึงโลหะชุดเครื่องมือกลึง (HSS)เวอร์เนียคาลิเปอร์ขนาดที่ไม่ทราบ5
5
Assemble
Assemble
Set the terminals in their recesses and the contacts in their grooves. Slide the button into the sleeve, with a coil spring round the rod between the cover and the wedged washer. Pass the rod's end through the cover's hole. Put on it a loose insulating washer with a metal rim round its edge. Hammer the rod's end over into a flange. Lay the cover on the housing, so its ears clamp the terminals, and bend the plate's tangs over the bead.
วัสดุสำหรับขั้นตอนนี้:
วัสดุฉนวนที่ไม่ทราบ1 as requiredโลหะที่ไม่ทราบ1 as requiredชุดสปริงกด1 springเครื่องมือที่ต้องใช้:
 ปากกาจับชิ้นงานหน้าโต๊ะ
 ค้อนหัวกลมคีมปากแบน
 แว่นนิรภัย
6
6
Mount and wire it
Mount and wire it
Put the sleeve through a hole in the panel and clamp the panel between two nuts on the thread. Solder the bared wire ends to the two lugs.
วัสดุสำหรับขั้นตอนนี้:
 น็อตหกเหลี่ยม2 pcs
 ลวดตะกั่วบัดกรี1 as required
เครื่องมือที่ต้องใช้:
 หัวแร้งบัดกรีคีมปากแบน
7
7
Check it
Check it
At rest, the rim sits against the underside of the cover and the circuit is open. Pressed, the rim meets the stepped ends of both contacts and closes it. The checking is ours: the meter reads open, then closed while pressed.
เครื่องมือที่ต้องใช้:
 มัลติมิเตอร์
วัสดุ
5- 1 as requiredตัวยึดตำแหน่ง
- 1 as requiredตัวยึดตำแหน่ง
- 1 springตัวยึดตำแหน่ง
- 2 pcsตัวยึดตำแหน่ง
- 1 as requiredตัวยึดตำแหน่ง
เครื่องมือที่จำเป็น
13- ตัวยึดตำแหน่ง
- ตัวยึดตำแหน่ง
- ตัวยึดตำแหน่ง
- ตัวยึดตำแหน่ง
- ตัวยึดตำแหน่ง
- ตัวยึดตำแหน่ง
- ตัวยึดตำแหน่ง
- ตัวยึดตำแหน่ง
- ตัวยึดตำแหน่ง
- ตัวยึดตำแหน่ง
- ตัวยึดตำแหน่ง
- 2 vendors sell this, none ship to you yetตัวยึดตำแหน่ง
- ตัวยึดตำแหน่ง
พิมพ์เขียวนี้สร้าง
บลูพริ้นท์ที่เกี่ยวข้อง
บลูพริ้นท์เหล่านี้แบ่งปันความรู้ — เทคนิค วัสดุ หรือหลักการ

CC0 สาธารณสมบัติ
พิมพ์เขียวนี้เผยแพร่ภายใต้ CC0 คุณสามารถคัดลอก แก้ไข แจกจ่าย และใช้งานผลงานนี้เพื่อวัตถุประสงค์ใดก็ได้ โดยไม่ต้องขออนุญาต
สนับสนุนเมกเกอร์โดยซื้อสินค้าผ่านพิมพ์เขียวของพวกเขา ซึ่งพวกเขาจะได้รับ ค่าคอมมิชชันเมกเกอร์ ที่ผู้ขายกำหนด หรือสร้างเวอร์ชันใหม่ของพิมพ์เขียวนี้และรวมเป็นการเชื่อมต่อในพิมพ์เขียวของคุณเพื่อแบ่งรายได้