ศิลปะ
ความงามและสุขภาพ
งานฝีมือ
วัฒนธรรมและประวัติศาสตร์
ความบันเทิง
สิ่งแวดล้อม
อาหารและเครื่องดื่ม
วิศวกรรมย้อนรอย
วิทยาศาสตร์
กีฬา
เทคโนโลยี
อุปกรณ์สวมใส่
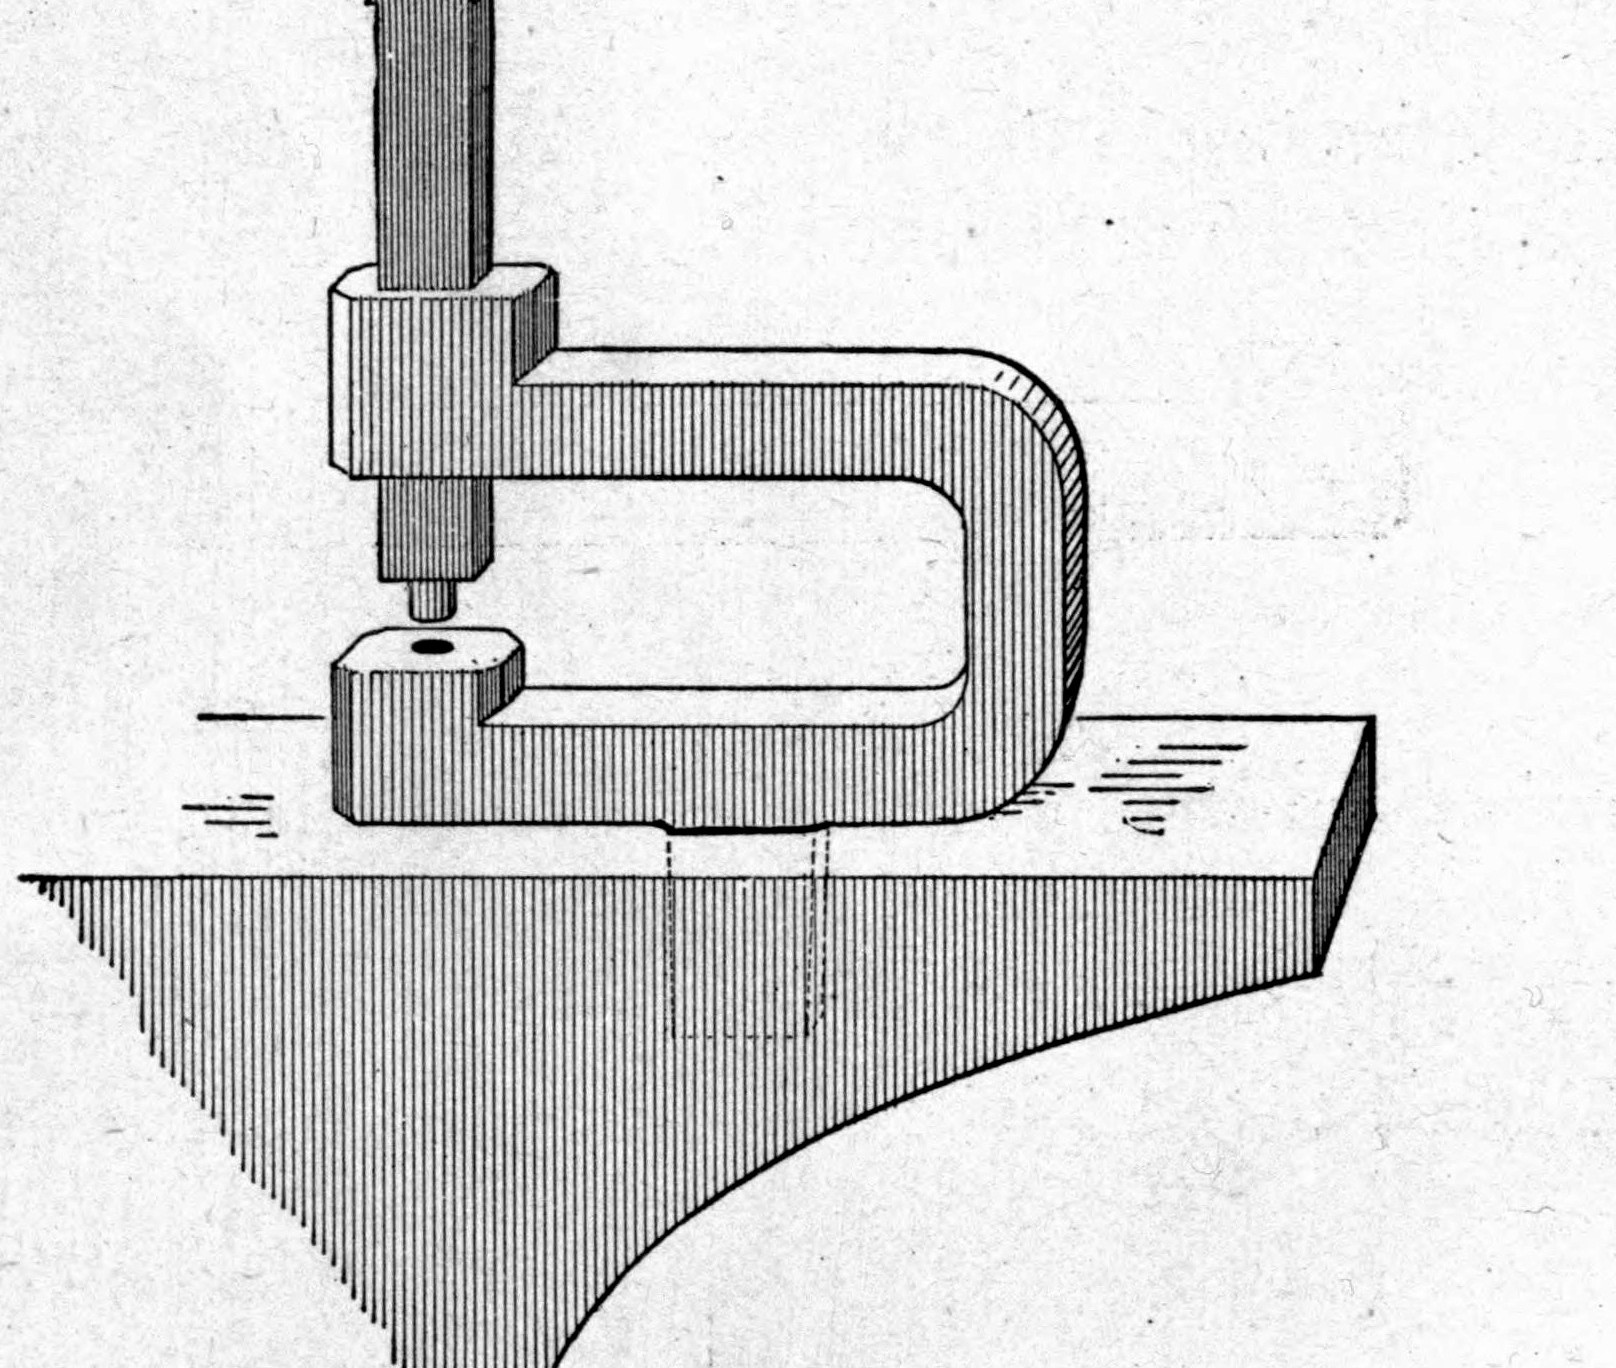


Anvil Hole Punch: Forged C-Frame With a Steel Die Block and Top Die, Set in the Hardy Hole (Richardson, 1889)
A blacksmith's anvil punch from Richardson's Practical Blacksmithing (1889): a bent C-frame of Swedish iron with a steel die block welded on, a square shank that drops into the anvil's hardy hole, and a cast-steel top die struck with a sledge. A set of six, 1/4 to 1 in, punches cold iron up to 5/16 or 3/8 in thick.
ขั้นสูง
About 1 day
คำแนะนำ
1
1
The set of six
The set of six
กำลังโหลดสมุด Jupyter…
2
2
Read Practical Blacksmithing
Read Practical Blacksmithing
"I think every blacksmith should have a set of them."
3
3
Forge the frame and die block
Forge the frame and die block
Take Swedish iron 1-1/2 by 3/4 by 10 in, upset one end a little, and weld a square of good steel 1-1/2 by 1-1/2 in firmly on it. Punch a hole in the centre of the steel a little larger than the hole to be cut, driving from the iron side so the hole is largest at the bottom and the slugs drop out. Heat the other end, cut it half off 1-1/2 in from the end, bend it over and weld it, then punch and work out a perfectly true 3/4 in square hole (Fig. 68).
วัสดุสำหรับขั้นตอนนี้:
 แท่งเหล็กดัด1 ชิ้น
 แท่งเหล็กกล้าเครื่องมือ1 ชิ้น
เครื่องมือที่ต้องใช้:
 เตาตีเหล็กของช่างตีเหล็ก
 ทั่ง
 ค้อน
 คีมช่างตีเหล็ก
 เหล็กตอกร้อน
 สกัดร้อน
 ค้อนปอนด์
4
4
Weld on the shank
Weld on the shank
Weld an iron the size of your anvil's square hole on the bottom side, 2-1/2 in from the round hole (Fig. 69). File and dress the piece.
วัสดุสำหรับขั้นตอนนี้:
แท่งเหล็กดัด1 ชิ้นเครื่องมือที่ต้องใช้:
เตาตีเหล็กของช่างตีเหล็กทั่งค้อน ตะไบ (ตะไบมือ)
5
5
Make the top die
Make the top die
Cut 6 in of 3/4 in square cast steel, draw it down and file one end to fit the round hole; for the 1/4 in punch make the round part 5/16 in long, larger for larger punches (Fig. 70).
วัสดุสำหรับขั้นตอนนี้:
แท่งเหล็กกล้าเครื่องมือ1 ชิ้นเครื่องมือที่ต้องใช้:
เตาตีเหล็กของช่างตีเหล็กทั่งค้อนตะไบ (ตะไบมือ) เลื่อยตัดเหล็ก
6
6
Bend, fit and temper
Bend, fit and temper
Heat the frame and bend it so the two holes line up; fit the top die and make sure it enters the hole perfectly true. Let it cool slowly, check the bottom die face and that the die works straight and easily, then temper as for any tool that cuts iron (Fig. 71).
เครื่องมือที่ต้องใช้:
เตาตีเหล็กของช่างตีเหล็กทั่งค้อน ถังชุบน้ำ
7
7
Troubleshooting
Troubleshooting
Anvil punch troubleshooting.
Flow
Loading...
8
8
History and honest limits
History and honest limits
From M. T. Richardson (ed.), **Practical Blacksmithing**, vol. I (1889), "Making an Anvil Punch" by N. C. M. (checked on the archive.org scan practicalblacksm00richrich, pp. 126-128). He gives no temper colour; the tools and metric figures are ours.
วัสดุ
2- 1 ชิ้นตัวยึดตำแหน่ง
- 1 ชิ้นตัวยึดตำแหน่ง
เครื่องมือที่จำเป็น
10- ตัวยึดตำแหน่ง
- ตัวยึดตำแหน่ง
- ตัวยึดตำแหน่ง
- ตัวยึดตำแหน่ง
- ตัวยึดตำแหน่ง
- ตัวยึดตำแหน่ง
- ตัวยึดตำแหน่ง
- ตัวยึดตำแหน่ง
- ตัวยึดตำแหน่ง
- ตัวยึดตำแหน่ง
พิมพ์เขียวนี้สร้าง

บลูพริ้นท์ที่เกี่ยวข้อง
บลูพริ้นท์เหล่านี้แบ่งปันความรู้ — เทคนิค วัสดุ หรือหลักการ
CC0 สาธารณสมบัติ
พิมพ์เขียวนี้เผยแพร่ภายใต้ CC0 คุณสามารถคัดลอก แก้ไข แจกจ่าย และใช้งานผลงานนี้เพื่อวัตถุประสงค์ใดก็ได้ โดยไม่ต้องขออนุญาต
สนับสนุนเมกเกอร์โดยซื้อสินค้าผ่านพิมพ์เขียวของพวกเขา ซึ่งพวกเขาจะได้รับ ค่าคอมมิชชันเมกเกอร์ ที่ผู้ขายกำหนด หรือสร้างเวอร์ชันใหม่ของพิมพ์เขียวนี้และรวมเป็นการเชื่อมต่อในพิมพ์เขียวของคุณเพื่อแบ่งรายได้