การทำงานร่วมกัน
ศิลปะ
ความงามและสุขภาพ
งานฝีมือ
วัฒนธรรมและประวัติศาสตร์
ความบันเทิง
สิ่งแวดล้อม
อาหารและเครื่องดื่ม
วิศวกรรมย้อนรอย
วิทยาศาสตร์
กีฬา
เทคโนโลยี
อุปกรณ์สวมใส่
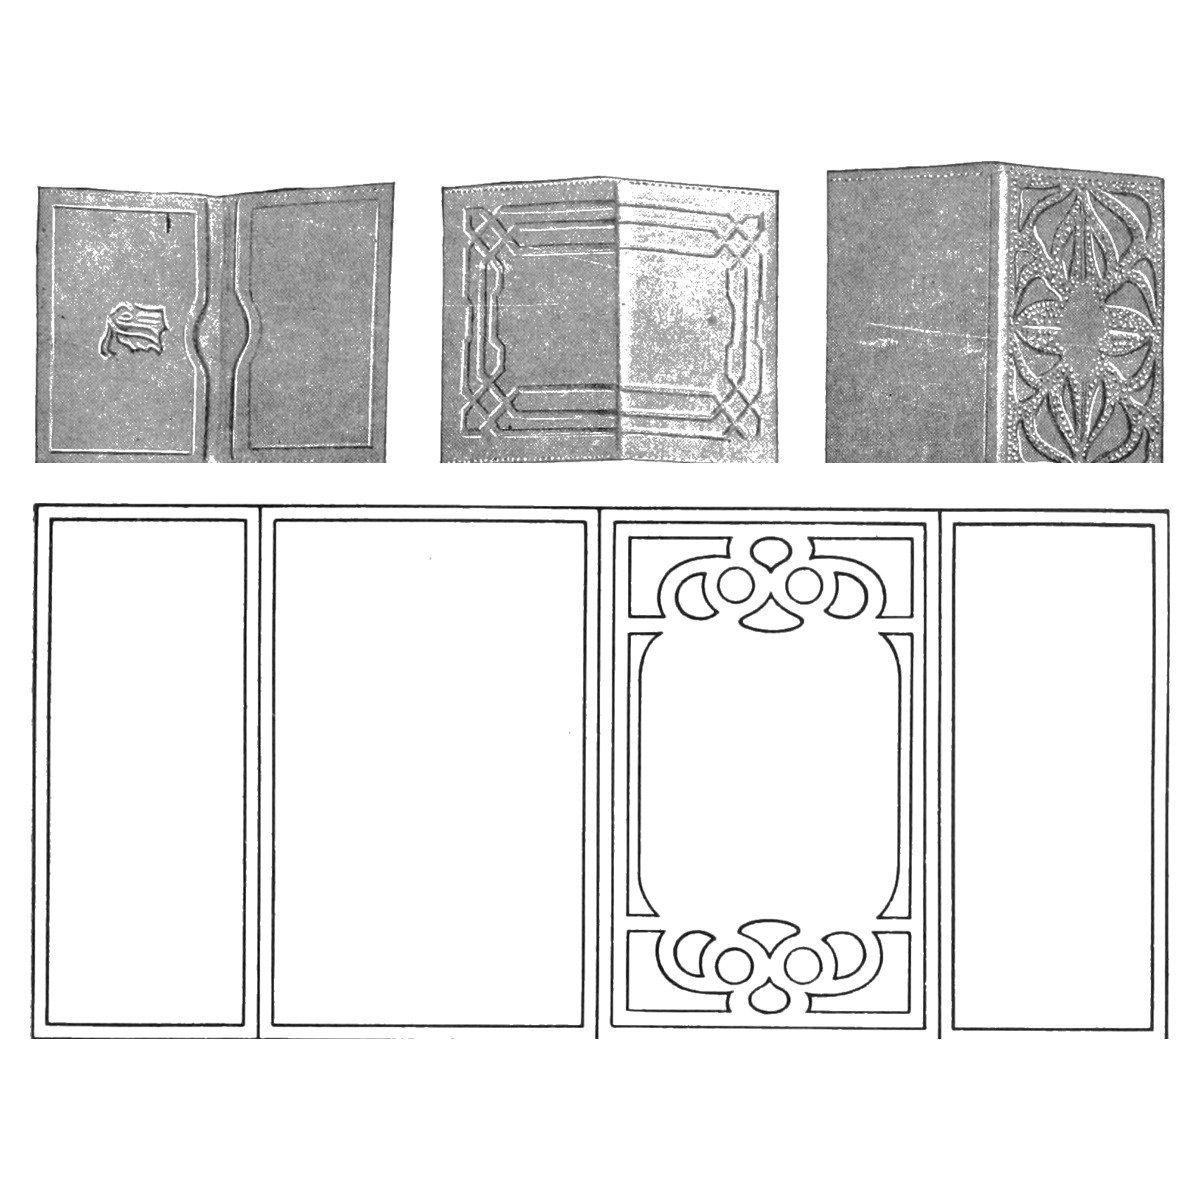


Tooled Calfskin Card Case: Folded Pockets, Lined Centre and a Border Design (Boy Mechanic, 1915)
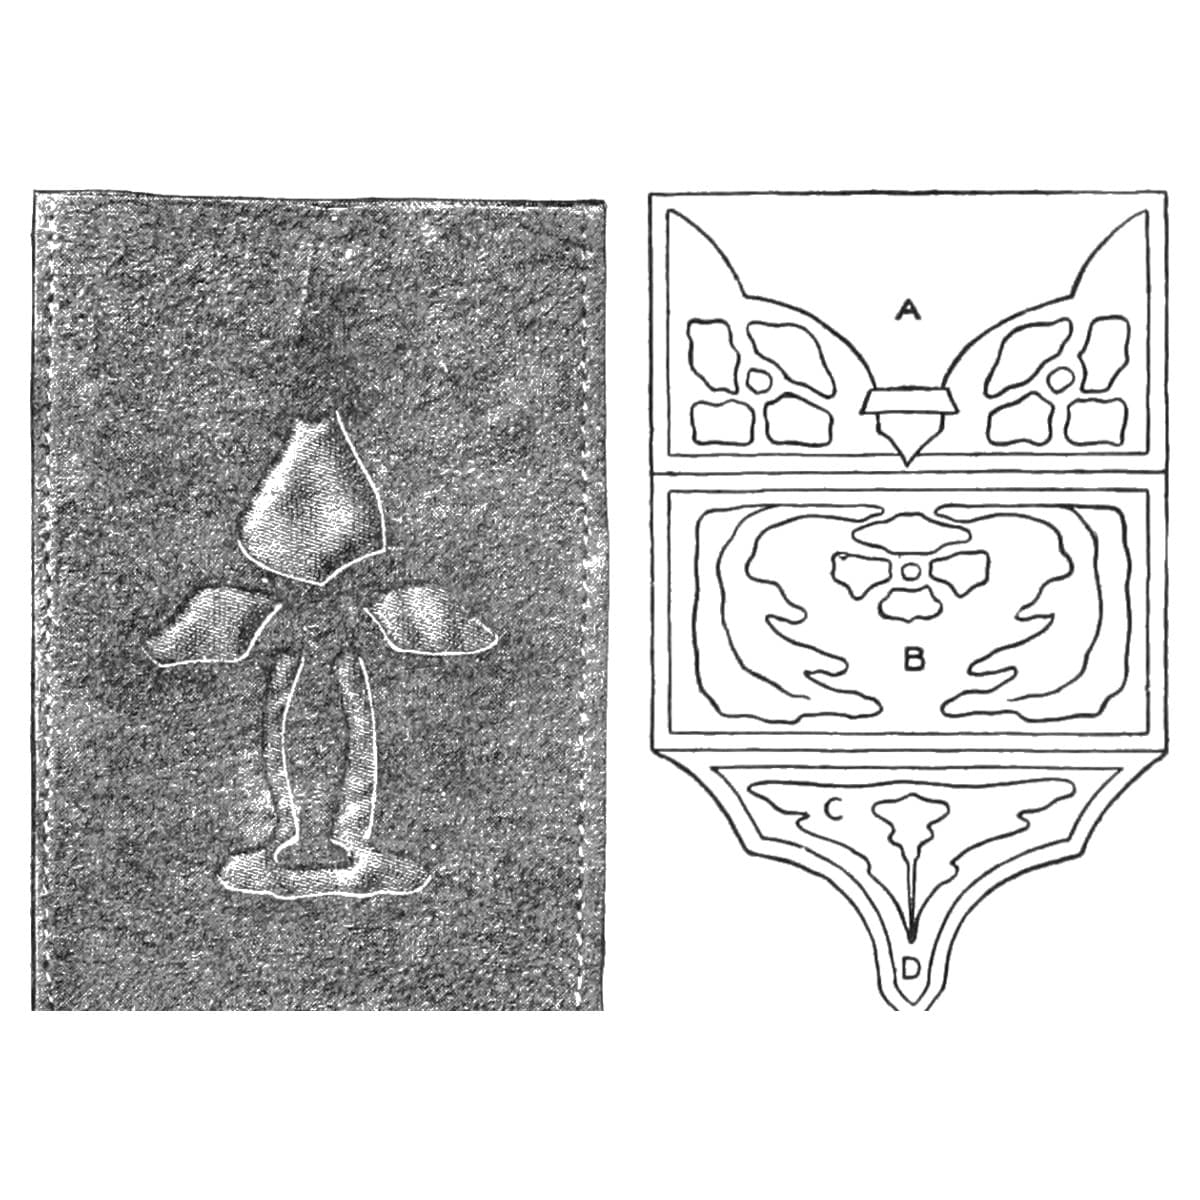
Mary C. Scovel's card case (The Boy Mechanic, Book 2, 1915): a 10 by 4-3/4 in pattern folded in the middle, with 2 in turned in at each end to make the pockets, tooled on one of the wide panels, lined at the centre with skiver or silk, and sewn at top and bottom.
เริ่มต้น
About 3 hours
คำแนะนำ
1
1
Her pattern in centimetres
Her pattern in centimetres
กำลังโหลดสมุด Jupyter…
2
2
Read The Boy Mechanic, Book 2
Read The Boy Mechanic, Book 2
Her outfit: "two special tools costing 50 cents each, one with a narrow edge for lining patterns, and one with broad ends for tooling; and a piece of tin, plate glass, or very smooth hard wood, which should not be smaller than 9 by 12 in. A soft sponge, a triangle, a rule, tracing paper and a hard pencil are also needed." Russian calfskin is best for tooling and stamping.
3
3
Make the paper pattern
Make the paper pattern
Take paper 10 by 4-3/4 in and fold it in the middle, 5 in each side, then fold in 2 in at each outside edge toward the centre to make the pockets (a longer paper and deeper fold for deeper pockets). Cut the leather to the pattern with at least 1/4 in margin.
วัสดุสำหรับขั้นตอนนี้:
 หนังลูกวัว1 ชิ้น
เครื่องมือที่ต้องใช้:
 กระดาษลอกลาย
 ดินสอ
 กรรไกร
 ไม้บรรทัด
4
4
Line out the folds
Line out the folds
Damp the leather on the rough side. Lay the folded paper on the right side and, with ruler, triangle and lining tool, draw the vertical lines where it is to fold at the centre and at each pocket, and line all round the four sides. There are now four panels, two wide and two narrow.
เครื่องมือที่ต้องใช้:
 ฟองน้ำไม้บรรทัด
 ไม้ฉากสามเหลี่ยม
 เครื่องมือแกะลายหนัง
5
5
Damp the leather and transfer the design
Damp the leather and transfer the design
Draw the whole design for the front (one of the wide panels) on tracing paper. Wet the leather on the wrong (unfinished) side with a soft sponge: pat it to moisten, not soak, it; too wet and the tool sticks and leaves an uneven background. Pin the design firmly on the leather, tack the leather down on its outer margin to the glass or board, and go over every line with a hard pencil, with firm, even pressure. Lift the paper and go over the lines with the narrow lining tool, with a strong, firm stroke. A line design can stop here.
วัสดุสำหรับขั้นตอนนี้:
หนังลูกวัว1 ชิ้นเครื่องมือที่ต้องใช้:
ฟองน้ำกระดาษลอกลายดินสอ หมุดปักกระดาษ (กล่อง 50 ตัว)
 แผ่นแก้วเครื่องมือแกะลายหนัง
6
6
Tool or stamp the background
Tool or stamp the background
Leave at least 1/8 in between the edge of the pattern and the design. To tool, press the background down with the broad end in even, long strokes; if it will not go down, the leather is too dry, so take it off and damp the back again. Keep the edges sharp between pressed and raised parts. To stamp instead, strike a small carpenter's nail set lightly with a wooden mallet in rows of circles; too hard a blow cuts the leather.
เครื่องมือที่ต้องใช้:
เครื่องมือแกะลายหนัง เหล็กส่งตะปู
 ค้อนไม้ฟองน้ำ
7
7
Line, fold and sew
Line, fold and sew
Line only the two centre rectangles, with skiver leather or silk cut about 1/16 in less at top and bottom and 1/4 in wider on each side. Leather: paste its back with library paste, smooth it down and dry it under a heavy weight. Silk: paste only about 1/4 in round its edges, and weight it. Fold the case and sew it at top and bottom; cut off the surplus leather about 1/8 in from the stitches. Stitch on a sewing machine with a long stitch, a large needle and silk as heavy as the needle takes; try it on a scrap first, and put tissue paper over the leather if the foot marks it. Without a machine, prick holes with an awl and sew with needle and silk, running or over-and-over; going over-and-over to the end and back gives an X stitch.
วัสดุสำหรับขั้นตอนนี้:
 ผ้าไหม1 ชิ้น
 กาวแป้งสาลี1 ชิ้น
 ด้ายไหม1 ชิ้น
เครื่องมือที่ต้องใช้:
กรรไกร จักรเย็บผ้า
 เหล็กหมาด (สว่านเจาะรูมือ)
 เข็มเย็บอานม้าสองเล่ม
 มีดคัตเตอร์งานประดิษฐ์
8
8
Troubleshooting
Troubleshooting
Card case troubleshooting.
Flow
Loading...
9
9
History and honest limits
History and honest limits
From Mary C. Scovel, "Arts-Crafts Leather Work", in **The Boy Mechanic, Book 2**, Popular Mechanics, 1915 (Project Gutenberg 44585; checked on the archive.org scan boymechanicbook200chic2, pp. 432-441), Part II. The tools and metric figures are ours.
วัสดุ
4- 2 ชิ้นตัวยึดตำแหน่ง
- 1 ชิ้นตัวยึดตำแหน่ง
- 1 ชิ้นตัวยึดตำแหน่ง
- 1 ชิ้นตัวยึดตำแหน่ง
เครื่องมือที่จำเป็น
15- ตัวยึดตำแหน่ง
- 1 vendor sell this, none ship to you yetตัวยึดตำแหน่ง
- ตัวยึดตำแหน่ง
- ตัวยึดตำแหน่ง
- ตัวยึดตำแหน่ง
- ตัวยึดตำแหน่ง
- ตัวยึดตำแหน่ง
- ตัวยึดตำแหน่ง
- ตัวยึดตำแหน่ง
- ตัวยึดตำแหน่ง
- ตัวยึดตำแหน่ง
- ตัวยึดตำแหน่ง
- ตัวยึดตำแหน่ง
- ตัวยึดตำแหน่ง
- ตัวยึดตำแหน่ง
พิมพ์เขียวนี้สร้าง

บลูพริ้นท์ที่เกี่ยวข้อง
บลูพริ้นท์เหล่านี้แบ่งปันความรู้ — เทคนิค วัสดุ หรือหลักการ
CC0 สาธารณสมบัติ
พิมพ์เขียวนี้เผยแพร่ภายใต้ CC0 คุณสามารถคัดลอก แก้ไข แจกจ่าย และใช้งานผลงานนี้เพื่อวัตถุประสงค์ใดก็ได้ โดยไม่ต้องขออนุญาต
สนับสนุนเมกเกอร์โดยซื้อสินค้าผ่านพิมพ์เขียวของพวกเขา ซึ่งพวกเขาจะได้รับ ค่าคอมมิชชันเมกเกอร์ ที่ผู้ขายกำหนด หรือสร้างเวอร์ชันใหม่ของพิมพ์เขียวนี้และรวมเป็นการเชื่อมต่อในพิมพ์เขียวของคุณเพื่อแบ่งรายได้