

Sprag Clutch
คำแนะนำ
Understand the wedge before cutting
Understand the wedge before cutting
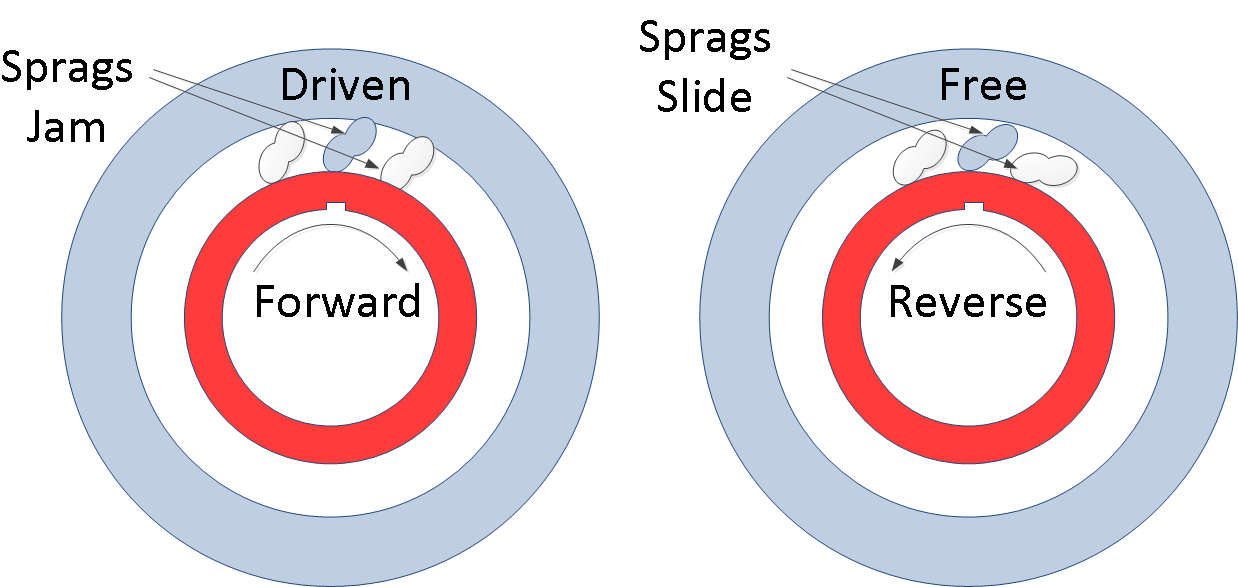
The sprag works because it is a cam with two different effective heights.
- Draw a sprag at large scale: a shape whose distance across one diagonal is slightly GREATER than the gap between the races, and across the other diagonal slightly LESS.
- Mark the gap you will build: inner race 40 mm diameter, outer race bore 56 mm, so an 8 mm gap.
- Size the sprag's short diagonal at about 7.8 mm and its long diagonal at about 8.3 mm.
- Note the tilt angle at which it changes from free to wedged.
The whole mechanism is that half-millimetre difference. Rotate the sprag one way, the short diagonal spans the gap and it rolls; rotate it back, the long diagonal tries to span a gap too small for it, and it jams. There is no other trick.
Draw it full size and cut a card model first. Feeling a cardboard sprag tip from rolling to wedging in a card slot teaches the geometry faster than any amount of filing.วัสดุสำหรับขั้นตอนนี้:
 ชุดกระดาษการ์ดคละสี1 แพ็ค
 กระดาษกราฟ1 pad
เครื่องมือที่ต้องใช้:
 เวอร์เนียร์ดิจิทัล 6 นิ้ว
 ฉากรวมอเนกประสงค์
Turn the two races
Turn the two races
Both running surfaces must be smooth and concentric — this clutch grips on friction, so finish matters.
- Cut an inner race 40 mm diameter, 25 mm long, from aluminium round bar; bore 8.0 mm.
- Make an outer race from 18 mm ply faced internally with rolled 1 mm aluminium, bore 56 mm.
- File and polish both running surfaces progressively finer.
- Check the gap all the way round with the caliper — it must be 8 mm everywhere.
What a real sprag clutch uses: hardened, ground and lapped steel races and sprags, running in oil, with a ribbon spring holding every sprag lightly against both races so engagement is instantaneous. Modern build spec (derived): polished aluminium demonstrates the action but will wear quickly and will slip at far lower torque.
A varying gap is the killer here. If the gap is 8.3 mm at one point, the sprag never wedges there and the clutch slips through that sector on every revolution.วัสดุสำหรับขั้นตอนนี้:
 แท่งอะลูมิเนียมกลม1 ชิ้น
 ไม้อัดเบิร์ชบอลติก1 แผ่น
 แท่งอะลูมิเนียมแบน1 ชิ้น
เครื่องมือที่ต้องใช้:
 โครงเลื่อยตัดเหล็กพร้อมใบ
 เลื่อยฉลุ
 ชุดตะไบ
 ปากกาจับชิ้นงานหน้าโต๊ะเวอร์เนียร์ดิจิทัล 6 นิ้ว
 สว่านไร้สาย
File three sprags and cage them
File three sprags and cage them
Three, equally spaced, all identical — and all must tilt together.
- Cut three blanks from 8 mm aluminium bar, each about 10 mm long.
- File each to the two-diagonal profile from step 1, working to the caliper.
- Make a cage: two thin plywood rings with three slots, holding the sprags at 120 degrees.
- Fit a light spring in the cage to bias every sprag toward the wedged position.
- Assemble races, cage and sprags together.
Why they must be identical. If one sprag wedges before the others, it carries the entire load alone and either slips or gouges the race. The cage and spring exist to make all three arrive at the wedge point simultaneously — sharing the load between them.
File all three together as a stack where you can, and check each against the same two caliper settings. Half a millimetre of difference between sprags is the whole working tolerance.วัสดุสำหรับขั้นตอนนี้:
แท่งอะลูมิเนียมกลม1 ชิ้น ชุดสปริงกด1 ชุดไม้อัดเบิร์ชบอลติก1 แพ็ค
เครื่องมือที่ต้องใช้:
ชุดตะไบปากกาจับชิ้นงานหน้าโต๊ะเวอร์เนียร์ดิจิทัล 6 นิ้วเลื่อยฉลุสว่านไร้สายCompare directly against the ratchet
Compare directly against the ratchet
Both are one-way drives. The differences are measurable in a few minutes.
- Turn the sprag clutch in the free direction — note it is silent and smooth.
- Reverse: it locks immediately, from whatever angle you happened to be at.
- Measure the backlash: mark both races, load in the locked direction, and see how far the inner moves before it grips.
- Do the same on a 24-tooth ratchet — its backlash is up to a full tooth, 15 degrees.
- Tabulate: noise, backlash, engagement angle.
เครื่องมือที่ต้องใช้:
เวอร์เนียร์ดิจิทัล 6 นิ้วฉากรวมอเนกประสงค์History and where each one-way device belongs
History and where each one-way device belongs
Sprag clutches came out of the automotive industry in the 1930s and 40s, developed for automatic transmissions where a one-way element must hold a reaction member silently and without backlash while gears change. They are also the standard overrunning element in helicopter rotor drives — if an engine fails, the sprag lets the rotor overrun and autorotate rather than being dragged to a stop by the dead engine, which is a safety function of the first order.
Three one-way devices, three regions of use. The ratchet and pawl is cheap, tolerant, works dirty, holds enormous loads on its teeth, and is noisy with coarse steps. The bicycle freewheel is a refined pawl mechanism — more teeth, finer steps, still audible. The sprag is silent, stepless and instant, but needs fine finishes, clean lubrication and cannot be made from rough parts.
Notice how the choice follows the environment rather than the function. All three do exactly the same thing logically — permit rotation one way, forbid it the other. What separates them is dirt, noise, precision and cost. That is very often how mechanisms are actually selected, and it is the kind of comparison this catalogue exists to make visible.
Honest limit of this build: aluminium on aluminium will gall and the surfaces will pick up. Expect it to work convincingly for demonstration and to degrade with use. The geometry is the lesson; the materials are what a production part gets right.
วัสดุ
7- 1 แพ็คตัวยึดตำแหน่ง
- 1 padตัวยึดตำแหน่ง
- 1 ชิ้นตัวยึดตำแหน่ง
- 1 แพ็คตัวยึดตำแหน่ง
- 1 ชิ้นตัวยึดตำแหน่ง
- 1 ชุดตัวยึดตำแหน่ง
- 1 แผ่นตัวยึดตำแหน่ง
บลูพริ้นท์ที่เกี่ยวข้อง
บลูพริ้นท์เหล่านี้แบ่งปันความรู้ — เทคนิค วัสดุ หรือหลักการ
CC0 สาธารณสมบัติ
พิมพ์เขียวนี้เผยแพร่ภายใต้ CC0 คุณสามารถคัดลอก แก้ไข แจกจ่าย และใช้งานผลงานนี้เพื่อวัตถุประสงค์ใดก็ได้ โดยไม่ต้องขออนุญาต
สนับสนุนเมกเกอร์โดยซื้อสินค้าผ่านพิมพ์เขียวของพวกเขา ซึ่งพวกเขาจะได้รับ ค่าคอมมิชชันเมกเกอร์ ที่ผู้ขายกำหนด หรือสร้างเวอร์ชันใหม่ของพิมพ์เขียวนี้และรวมเป็นการเชื่อมต่อในพิมพ์เขียวของคุณเพื่อแบ่งรายได้