ศิลปะ
ความงามและสุขภาพ
งานฝีมือ
วัฒนธรรมและประวัติศาสตร์
ความบันเทิง
สิ่งแวดล้อม
อาหารและเครื่องดื่ม
วิศวกรรมย้อนรอย
วิทยาศาสตร์
กีฬา
เทคโนโลยี
อุปกรณ์สวมใส่
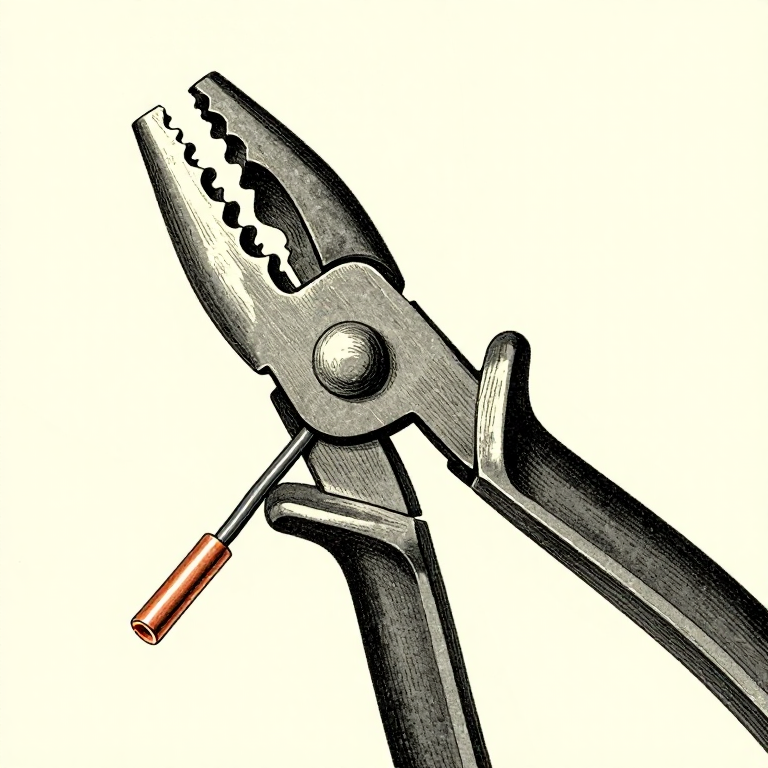


Stripping Insulation Without Nicking the Copper
A nicked conductor is a wire that will break later. The cut is a stress concentration, the wire flexes there, and it fails weeks after you finished — inside the insulation, where nothing shows.
On stranded wire the same mistake is quieter still: a few strands cut away and the wire carries less current than you think, runs warmer, and nothing looks wrong at all.
Getting this right is almost entirely about using the correct hole on the stripper and not using a knife. It takes a minute to learn and it removes a whole class of intermittent fault.
เริ่มต้น
2 hours
คำแนะนำ
1
1
Use the hole marked for the gauge you are cutting
Use the hole marked for the gauge you are cutting
A wire stripper has a row of holes, each sized for one gauge. Put the wire in the hole with its own number on it, squeeze, and the blades close to exactly the conductor's diameter — cutting the insulation and stopping at the copper.
Using a hole one size too small cuts into the conductor. One size too large and the insulation tears instead of cutting, and you drag it off, stretching the wire behind it. Both are visible under a loupe and neither is visible to the naked eye.
If the gauge is unmarked or unknown, start with a hole that is definitely too large and work down until the insulation parts cleanly. That costs three seconds and one scrap end.
วัสดุสำหรับขั้นตอนนี้:
 สายไฟต่อวงจร1 ชิ้น
เครื่องมือที่ต้องใช้:
 คีมปอกสายไฟ
 กล้องส่องขยาย
2
2
Never strip with a knife — and why the rotation trick still fails
Never strip with a knife — and why the rotation trick still fails
A blade pressed hard enough to cut PVC is pressed hard enough to score copper, and the score is exactly where the wire will break.
The common workaround — rolling the wire under the blade to cut all round — produces a ring of small nicks instead of one, and a ring of nicks is a perfect fracture line. It is worse than a single cut, not better.
Where there is genuinely no stripper, the least bad method is to soften and pull: grip the insulation with pliers and draw it off, or for thick cable make a LENGTHWAYS slit well back from the end and fold the insulation open rather than cutting around the conductor. A lengthways cut does not create a break line.
วัสดุสำหรับขั้นตอนนี้:
สายไฟต่อวงจร1 ชิ้นเครื่องมือที่ต้องใช้:
 มีดคัตเตอร์งานฝีมือพร้อมใบมีดสำรองคีมปอกสายไฟกล้องส่องขยาย
3
3
Strip the right LENGTH, and check it against the joint
Strip the right LENGTH, and check it against the joint
Too little and the conductor does not reach the bottom of the terminal; too much and bare copper stands proud of it, ready to touch its neighbour.
The right length is set by the joint, not by habit. For a screw terminal, just enough that no bare wire shows outside the clamp. For a crimp, exactly the length of the barrel. For a solder joint on a pin, enough to wrap or sit against it and no more.
Offer the stripped end up to the terminal before committing. A wire stripped too long can be trimmed; one stripped too short has to be cut back and redone, which shortens the wire every time and eventually costs you the whole run.
วัสดุสำหรับขั้นตอนนี้:
สายไฟต่อวงจร1 ชิ้นเครื่องมือที่ต้องใช้:
คีมปอกสายไฟ เทอร์มินัลบล็อกแบบขันสกรู
 หางปลาแบบกลม
4
4
Twist stranded wire — but do not tin it for a screw terminal
Twist stranded wire — but do not tin it for a screw terminal
Give stranded wire a light twist in the direction its strands already lie, just enough to keep them together. Heavy twisting distorts the bundle and makes it harder to seat.
Do NOT tin a stranded wire that is going into a SCREW terminal. Solder creeps under sustained pressure — it flows slowly away from the clamped point — so the screw gradually loosens over months and the joint heats up. This is a real documented failure mode and it is forbidden in professional practice for exactly that reason.
The correct answer for stranded wire into a screw terminal is a bootlace ferrule: a metal sleeve crimped onto the strands that presents a solid, non-creeping end to the screw. Tinning is fine where the joint is soldered anyway, and wrong wherever a screw is doing the clamping.
วัสดุสำหรับขั้นตอนนี้:
 ปลอกหุ้มปลายสายไฟ1 ชิ้นสายไฟต่อวงจร1 ชิ้น
เครื่องมือที่ต้องใช้:
 คีมย้ำหางปลาเทอร์มินัลบล็อกแบบขันสกรู
 หัวแร้งบัดกรี
เครื่องมือที่จำเป็น
7- ตัวยึดตำแหน่ง
- ตัวยึดตำแหน่ง
- ตัวยึดตำแหน่ง
- เทอร์มินัลบล็อกแบบขันสกรูค่าคอมมิชชัน 10%Magento Legacy Storeships internationallyตัวยึดตำแหน่ง
- ตัวยึดตำแหน่ง
- ตัวยึดตำแหน่ง
- หัวแร้งบัดกรีค่าคอมมิชชัน 10%Magento Legacy Storeships internationallyตัวยึดตำแหน่ง
บลูพริ้นท์ที่เกี่ยวข้อง
บลูพริ้นท์เหล่านี้แบ่งปันความรู้ — เทคนิค วัสดุ หรือหลักการ


CC0 สาธารณสมบัติ
พิมพ์เขียวนี้เผยแพร่ภายใต้ CC0 คุณสามารถคัดลอก แก้ไข แจกจ่าย และใช้งานผลงานนี้เพื่อวัตถุประสงค์ใดก็ได้ โดยไม่ต้องขออนุญาต
สนับสนุนเมกเกอร์โดยซื้อสินค้าผ่านพิมพ์เขียวของพวกเขา ซึ่งพวกเขาจะได้รับ ค่าคอมมิชชันเมกเกอร์ ที่ผู้ขายกำหนด หรือสร้างเวอร์ชันใหม่ของพิมพ์เขียวนี้และรวมเป็นการเชื่อมต่อในพิมพ์เขียวของคุณเพื่อแบ่งรายได้