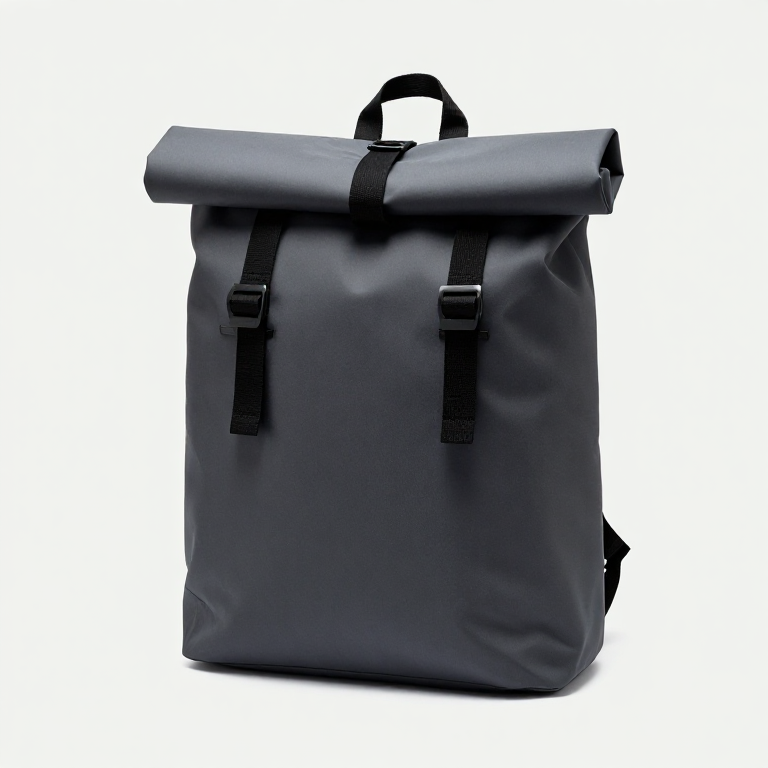


The Roll-Top Backpack
A backpack transfers a load to a body, and everything that makes one good or unbearable follows from two facts.
First, load position beats load reduction. A pack whose mass sits high and close to the spine is carried near the body's own line of gravity, so you stand upright. The same mass slung low and away pulls you backwards, and you compensate by leaning forward — which is why a badly packed light bag can be more tiring than a well-packed heavy one.
Second, seams carry everything. As with a tote, the fabric is far stronger than the joins, so shoulder-strap anchors, haul loops and the base are where a pack fails. The base takes both abrasion and the entire load every time the bag is set down.
The roll-top is the interesting closure. Instead of a zip — the commonest failure point on any bag, and a straight line of water ingress — the top is a plain tube, rolled down at least three times and clipped. The rolls form a labyrinth seal that is genuinely water-resistant, it has no mechanism to break, and the volume adapts to the load. It fails gracefully: a worn roll-top is still a bag, a broken zip is a sack.
Build one, load it, and measure where it pulls you.
คำแนะนำ
Cut the panels and plan the load path
Cut the panels and plan the load path
Cut a main body, base, and two shoulder straps from heavy coated nylon. Mark on the pattern where each strap anchor lands and check both are the same distance from the centreline.
Asymmetric strap anchors are the commonest home-made fault and produce a pack that twists on the back all day; the wearer blames the straps and the error is in the cutting.
วัสดุสำหรับขั้นตอนนี้:
 Cordura 500D2 เมตร
 ด้ายโพลีเอสเตอร์1 ชิ้น
เครื่องมือที่ต้องใช้:
 จักรเย็บผ้า
 ตลับเมตร
Build the straps to spread pressure
Build the straps to spread pressure
Make each strap a sandwich of webbing, closed-cell foam and fabric, at least 50 mm wide at the shoulder, curving outward to clear the neck.
Measure the total contact area of both straps.
Divide the intended load by it.
That is the pressure your shoulders will carry, and halving strap width doubles it — which is the whole reason thin straps hurt.
วัสดุสำหรับขั้นตอนนี้:
 สายรัดไนลอนถัก3 เมตร
 แผ่นรองโฟมเซลล์ปิด (EVA)1 แผ่น
Box-stitch every anchor
Box-stitch every anchor
Sew each strap anchor and haul loop with a box-and-cross through a reinforcing patch, not through the single layer of the body panel.
Backstitch every start and finish.
A reinforcing patch turns a point load into an area load twice over — once by the stitch pattern and once by the extra layer — and it is the difference between a pack that lasts a decade and one that tears out in a year.
Make the roll-top a real seal
Make the roll-top a real seal
Extend the body well above the intended volume, stiffen the top edge with a folded batten, and fit a buckle at each end of it.
Roll it down three full turns and clip.
Test by putting a dry cloth inside and pouring water over the closed top.
Fewer than three rolls leaks. Each roll adds another reversal the water has to climb, and that is the entire sealing mechanism.
วัสดุสำหรับขั้นตอนนี้:
 ชุดอุปกรณ์หัวเข็มขัด1 ชุด
Measure how the load changes your posture
Measure how the load changes your posture
Load the pack to a fixed weight with the mass placed high and against the back. Photograph yourself from the side against a plumb line. Repeat with the same mass placed low and away.
Measure the lean angle in both photographs.
Expect a visibly larger forward lean for the low, distant load.
You just measured why packing order matters more than pack weight.
เครื่องมือที่ต้องใช้:
 ลูกดิ่ง
 ไม้โปรแทรกเตอร์ / เครื่องวัดมุม
Load it to failure, and predict where
Load it to failure, and predict where
Write down where you think it will fail first, then hang the pack by its straps and add weight in steps until something gives.
Record the load and the location.
Expect a strap anchor or the base seam.
A written prediction turns a destructive test into an experiment. Being wrong about the location is the most useful outcome available.
เครื่องมือที่ต้องใช้:
 เครื่องวัดแรง (ตาชั่งสปริง)
Compendium — carrying loads, and what a hip belt really does
Compendium — carrying loads, and what a hip belt really does
Humans have carried loads on the back for as long as there have been humans, and the surviving traditional solutions are startlingly consistent: a tumpline across the forehead in the Andes, the Himalaya and among Eastern Woodlands peoples; the Norwegian and Sámi kløv and knapsack; the Japanese oi. Tumplines in particular transfer load through the spine's axis rather than through the shoulders, and skilled users carry loads that seem impossible with straps alone — a reminder that the strap-based pack is one solution rather than the solution.
What a hip belt changes. On a properly fitted pack with a stiffened back panel, a hip belt moves the majority of the load off the shoulders onto the iliac crest and therefore onto the legs. This only works if the frame is rigid enough to transmit the load downwards; a soft daypack with a thin webbing belt does almost nothing structurally and mainly stops the bag swinging. The belt is not padding — it is a load path, and without a frame there is nothing for it to be a path from.
Why roll-tops keep coming back. They originate in genuinely wet work — fishing, kayaking, cycle couriers — where a zip is a liability. The closure has no mechanism, adjusts its volume to the load, distributes closing force along the whole top edge rather than through a slider, and can be repaired with a needle. The trade is access: everything is on top of everything else, and getting to the bottom means unrolling. That is a real ergonomic cost and the reason panel-loaders exist.
Materials, honestly. Cordura and other high-denier nylons are abrasion-resistant and strong but not waterproof by themselves — the water resistance comes from a coating or laminate that wears and eventually fails, and from the seams, which need taping or sealing to be genuinely watertight. Waxed cotton is repairable and heavy. Dyneema composites are extremely light and strong and abrade poorly against rock. No fabric wins on all four of weight, abrasion, waterproofing and repairability, and every commercial pack is a declared position on that trade.
Practical notes. Domestic machines struggle through several layers of coated nylon plus webbing — heavy needle, longer stitch, hand-wheel the thick crossings. Seal cut edges of synthetic webbing with heat so they cannot fray. And carrying advice that is not optional: keep a loaded pack under a sensible fraction of body weight, especially for children, and load heavy items high and against the spine.
วัสดุ
5- 2 เมตรตัวยึดตำแหน่ง
- 1 ชิ้นตัวยึดตำแหน่ง
- 3 เมตรตัวยึดตำแหน่ง
- 1 แผ่นตัวยึดตำแหน่ง
- 1 ชุดตัวยึดตำแหน่ง
เครื่องมือที่จำเป็น
5- ตัวยึดตำแหน่ง
- 1 vendor sell this, none ship to you yetตัวยึดตำแหน่ง
- ตัวยึดตำแหน่ง
- ตัวยึดตำแหน่ง
- ตัวยึดตำแหน่ง
วัสดุจากพิมพ์เขียวที่เชื่อมต่อ
บลูพริ้นท์ที่เกี่ยวข้อง
บลูพริ้นท์เหล่านี้แบ่งปันความรู้ — เทคนิค วัสดุ หรือหลักการ
CC0 สาธารณสมบัติ
พิมพ์เขียวนี้เผยแพร่ภายใต้ CC0 คุณสามารถคัดลอก แก้ไข แจกจ่าย และใช้งานผลงานนี้เพื่อวัตถุประสงค์ใดก็ได้ โดยไม่ต้องขออนุญาต
สนับสนุนเมกเกอร์โดยซื้อสินค้าผ่านพิมพ์เขียวของพวกเขา ซึ่งพวกเขาจะได้รับ ค่าคอมมิชชันเมกเกอร์ ที่ผู้ขายกำหนด หรือสร้างเวอร์ชันใหม่ของพิมพ์เขียวนี้และรวมเป็นการเชื่อมต่อในพิมพ์เขียวของคุณเพื่อแบ่งรายได้