การทำงานร่วมกัน
ศิลปะ
ความงามและสุขภาพ
งานฝีมือ
วัฒนธรรมและประวัติศาสตร์
ความบันเทิง
สิ่งแวดล้อม
อาหารและเครื่องดื่ม
วิศวกรรมย้อนรอย
วิทยาศาสตร์
กีฬา
เทคโนโลยี
อุปกรณ์สวมใส่
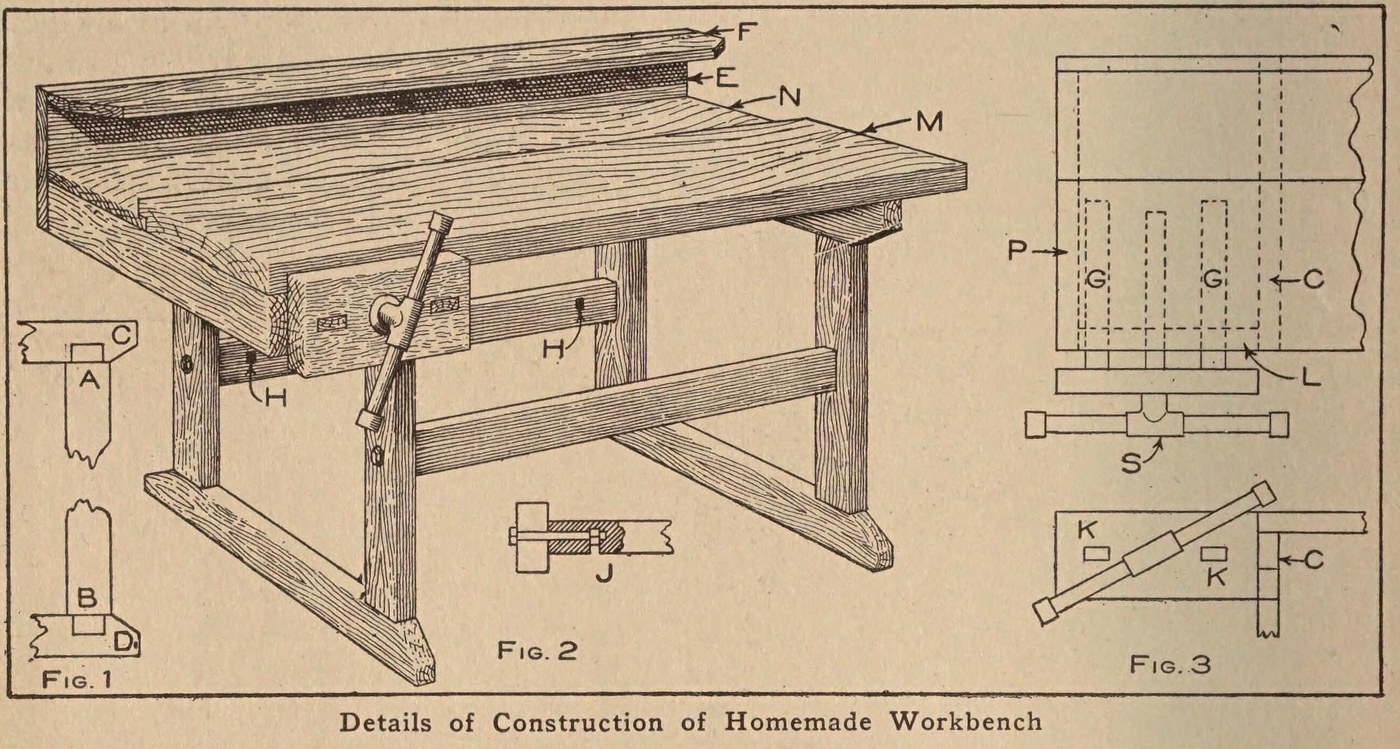


Workbench: a Pine Bench with a Plank Top and Vise (Boy Mechanic, 1913)
A boy's first workshop bench: two mortised pine leg frames bolted to braces, a 3 1/2 ft top of one 2 x 12 in plank with a back board, a tool rack behind, and a wooden vise on an iron bench screw.
Source: C. E. McKinney, Jr., 'Homemade Workbench', The Boy Mechanic, Book 1 (1913), pp. 442-443. Picture: Figs. 1-3 of the book.
ระดับกลาง
Unknown
คำแนะนำ
1
1
Make the two leg frames
Make the two leg frames
Cut four 2 x 4 in pine legs 23 in long with a tenon on each end 1/2 in thick, 3 1/2 in wide and 1 1/2 in long (Fig. 1, A and B). Cut four crosspieces of the same stock 20 in long, mortised in the narrow edge 1 1/4 in from each end, and slope their corners from the leg out to the middle. Fit each pair of legs to a pair of crosspieces to make the two supports.
วัสดุสำหรับขั้นตอนนี้:
 ไม้สนแปรรูป1 2 x 4 in: legs, crosspieces
เครื่องมือที่ต้องใช้:
 เลื่อยมือ
 สิ่วเจาะเดือย
 ค้อน
2
2
Brace them together
Brace them together
Join the supports with two 2 x 4 in braces 24 in long, ends sawn square. Bore through each leg and 4 in into the centre of each brace end, bore an intersecting hole on the back of each brace for the nut, and draw each joint tight with a 3/8 x 6 in bolt (Fig. 2, J). A cross brace on the back stops rocking when planing.
วัสดุสำหรับขั้นตอนนี้:
ไม้สนแปรรูป1 2 x 4 in: braces สลักเกลียวหัวกลม4 3/8 x 6 in
เครื่องมือที่ต้องใช้:
เลื่อยมือ สว่านมือหมุนพร้อมดอก
 ประแจเลื่อน
3
3
Fit the plank top
Fit the plank top
Make the main top M from one 2 x 12 in plank 3 1/2 ft long. Rabbet its back edge 1/2 in to take a back board N of the same length, 8 1/2 in wide and 7/8 in thick. Screw the top to the top crosspieces with long screws.
วัสดุสำหรับขั้นตอนนี้:
 แผ่นไม้เนื้อแข็งหนา1 2 x 12 in, 3 1/2 ft
 แผ่นไม้สน1 back board
 สกรูไม้1 long
เครื่องมือที่ต้องใช้:
เลื่อยมือ กบมือเล็ก
 ไขควงปากแบน
4
4
Add the tool rack
Add the tool rack
Nail a board E 10 in wide to the back of the bench and fasten a 2 1/2 in board F on top of it at right angles; both 7/8 in thick and 3 1/2 ft long. Bore holes or cut notches in F to hold tools.
วัสดุสำหรับขั้นตอนนี้:
แผ่นไม้สน2 7/8 in, 3 1/2 ft ตะปู1 ชิ้น
เครื่องมือที่ต้องใช้:
สว่านมือหมุนพร้อมดอกเลื่อยมือค้อน5
5
Fit the vise
Fit the vise
Fasten an iron bench screw in a 2 x 6 in block 12 in long. Mortise two guide rails 7/8 x 1 1/2 in and 20 in long into the block; they slide in mortises in a 2 x 4 piece L bolted under the top, which holds the bench-screw nut between the two mortises. Nail L to a top crosspiece and to a 2 x 4 piece P bolted under the top at the end (Fig. 3).
วัสดุสำหรับขั้นตอนนี้:
ไม้สนแปรรูป1 2 x 6 block, 2 x 4 pieces, guide rails สกรูโต๊ะช่างสำหรับงานแกะไม้1 ชิ้นสลักเกลียวหัวกลม1 for L and Pตะปู1 ชิ้น
เครื่องมือที่ต้องใช้:
เลื่อยมือสิ่วเจาะเดือยสว่านมือหมุนพร้อมดอกประแจเลื่อนค้อนวัสดุ
7- 1 2 x 6 block, 2 x 4 pieces, guide railsตัวยึดตำแหน่ง
- 1 for L and Pตัวยึดตำแหน่ง
- 1 2 x 12 in, 3 1/2 ftตัวยึดตำแหน่ง
- 2 7/8 in, 3 1/2 ftตัวยึดตำแหน่ง
- 1 longตัวยึดตำแหน่ง
- 2 ชิ้นตัวยึดตำแหน่ง
- ตัวยึดตำแหน่ง
พิมพ์เขียวนี้สร้าง

CC0 สาธารณสมบัติ
พิมพ์เขียวนี้เผยแพร่ภายใต้ CC0 คุณสามารถคัดลอก แก้ไข แจกจ่าย และใช้งานผลงานนี้เพื่อวัตถุประสงค์ใดก็ได้ โดยไม่ต้องขออนุญาต
สนับสนุนเมกเกอร์โดยซื้อสินค้าผ่านพิมพ์เขียวของพวกเขา ซึ่งพวกเขาจะได้รับ ค่าคอมมิชชันเมกเกอร์ ที่ผู้ขายกำหนด หรือสร้างเวอร์ชันใหม่ของพิมพ์เขียวนี้และรวมเป็นการเชื่อมต่อในพิมพ์เขียวของคุณเพื่อแบ่งรายได้