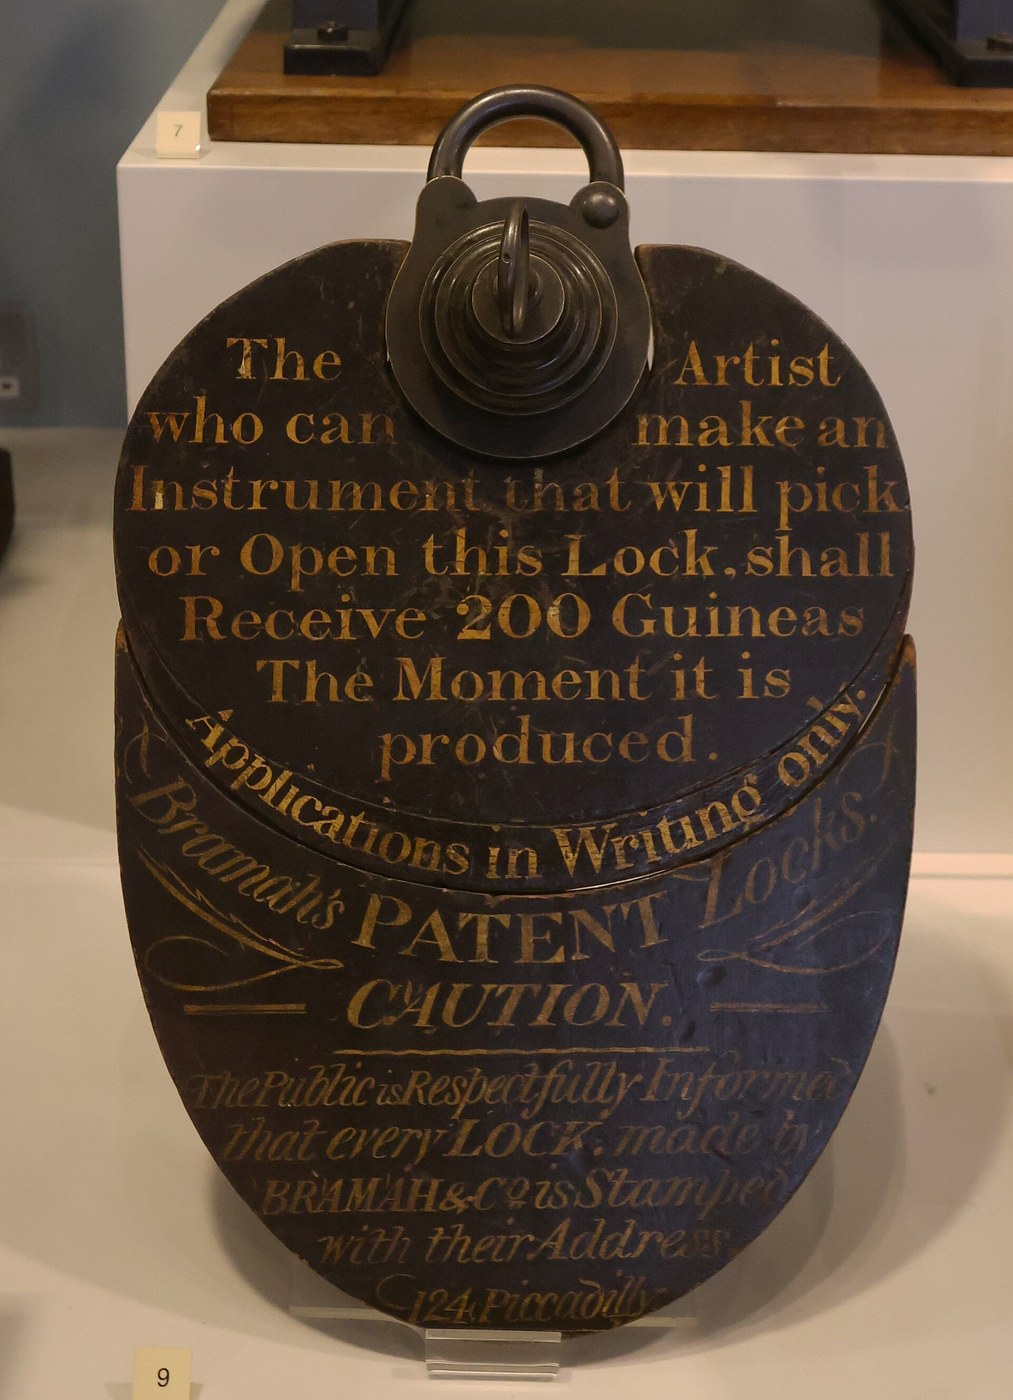


Bramah Lock
Every lock before this one had a flat key turning wards. Joseph Bramah's lock of 1784 used a small cylindrical key with slots cut in its end, pressing a ring of spring-loaded sliders each to its own precise depth. Only when every slider sits at exactly the right height can the locking plate turn.
The security is in the arithmetic and in the manufacturing. With up to eighteen sliders the number of combinations runs into hundreds of millions — but that is meaningless unless the sliders are made accurately enough that a picker cannot feel one setting itself. Bramah's real invention was not the lock; it was making a lock whose tolerances were beyond hand fitting, which pushed him into building the machine tools to produce it.
This blueprint builds a simplified working model: six sliders, a cylindrical key, and a plate that turns only on the correct combination.
Talimatlar
Understand the principle before cutting metal
Understand the principle before cutting metal
Sliders sit in radial slots around a central axis, each pushed outward by a spring. Each has a notch. Only when every notch is aligned on one circle can the plate rotate past them. The key's job is to push each slider to exactly that depth — no further.
Work at double scale
Work at double scale
Build the model twice the size of a real Bramah lock. Full size demands tolerances of hundredths of a millimetre; at double scale the mechanism is the same and the fits are achievable by hand.
Gerekli aletler:
 Cetvel
Turn the barrel
Turn the barrel
Turn a brass barrel with a central bore for the key and a flat face for the slider slots. Everything else references this bore, so it must be concentric.
Bu adım için malzemeler:
 Pirinç Çubuk1 adet
Cut six radial slider slots
Cut six radial slider slots
Cut six evenly spaced slots radiating from the bore. Index them accurately — an unevenly spaced slot means a key that can only be cut by trial and error.
Gerekli aletler:
 İğne Eğe Takımı
Make six sliders
Make six sliders
File six flat sliders that move freely in their slots without side play. Any slop lets a slider sit at more than one height, which destroys the whole security argument.
Bu adım için malzemeler:
 Pirinç Levha1 adet
Cut one notch in each slider
Cut one notch in each slider
File a notch across each slider at a different distance from its inner end. Those six distances are the combination — write them down before you lose track.
Fit a spring behind each slider
Fit a spring behind each slider
Fit a light spring pushing each slider inward toward the bore, so that with no key present every slider is at its rest position. Bramah's original used a single central spring; later rebuilds used one spring per slider, which is easier to make work.
Make the locking plate
Make the locking plate
Make a plate that rotates around the barrel and carries a lug running in the path of the sliders. It can only turn when the lug can pass through all six notches at once.
Prove it is locked
Prove it is locked
Assemble without a key and try to turn the plate. It must not move at any position. If it turns, a notch is accidentally aligned with the rest position — recut that slider.
Turn the tubular key blank
Turn the tubular key blank
Turn a hollow cylindrical key that slides into the bore with a close fit and a locating notch so it can only enter one way round. Orientation matters — six sliders in the wrong order is a wrong key.
Cut the key to your recorded depths
Cut the key to your recorded depths
Cut six slots into the end of the key, each to the depth that pushes its slider until the notch lines up. Cut shallow and test — you can always remove more, never put it back.
Fit one slider at a time
Fit one slider at a time
Assemble with a single slider and its key slot, confirm the plate turns, then add the next. Debugging six wrong depths at once is close to impossible; one at a time it is straightforward.
Test a deliberately wrong key
Test a deliberately wrong key
Cut a second key with one slot 1 mm too deep. It must not open the lock. Over-pushing a slider fails exactly like under-pushing it — the notch has to be at the line, not past it, and that is what makes this lock hard to pick by feel.
Feel for the thing a picker feels
Feel for the thing a picker feels
Put light turning pressure on the plate and probe one slider. In a loose model you can feel it set. Now tighten the fits and try again — the feedback disappears. That difference is the entire practical security of the design, and it is a manufacturing property, not a design one.
History & Context
History & Context
1784, and a challenge in a window. Joseph Bramah patented the lock in 1784 and set up at 124 Piccadilly, London. In 1790 the firm put a Challenge Lock in the shop window with a reward of 200 guineas for anyone who could open it. It sat there, unopened, for decades.
1851, and the American who opened it. At the Great Exhibition of 1851 the American locksmith Alfred Charles Hobbs picked the Challenge Lock — after roughly fifty-one hours of work spread over sixteen days. He collected the prize. That result is usually reported as the lock's defeat; it is at least as fair to read fifty-one hours of expert attention as a demonstration that the design was extraordinarily good. The exhibition's other famous casualty, the Chubb detector lock, took Hobbs far less time.
What the lock did to manufacturing. The design demanded parts more precise than skilled hand-filing could produce economically. Bramah and his employee Henry Maudslay built machine tools to make them — and Maudslay went on to become one of the founders of precision engineering. The lock is one of the clearest cases in industrial history of a product requirement forcing the invention of the means to make it.
A note on the surviving Challenge Lock. The lock has been rebuilt since Hobbs picked it. It originally had 18 iron sliders and one central spring; it was rebuilt with 13 steel sliders each with its own spring. Anyone describing "the lock Hobbs picked" is describing an object that no longer exists in that form — a detail routinely dropped from the story.
And why this blueprint describes construction only. How a lock is made is engineering. How a lock is defeated is not covered here, and that line does not move for historical interest.
Malzemeler
2- 1 adetYer Tutucu
- 1 adetYer Tutucu
CC0 Kamu Malı
Bu plan CC0 lisansıyla yayınlanmıştır. İzin almadan kopyalayabilir, değiştirebilir, dağıtabilir ve herhangi bir amaçla kullanabilirsiniz.
Planı üzerinden ürün satın alarak Maker'ı destekleyin, böylece Maker Komisyonu Satıcılar tarafından belirlenen komisyonu kazanırlar veya bu Planın yeni bir versiyonunu oluşturun ve gelir paylaşımı için kendi Planınıza bağlantı olarak ekleyin.