Building a Roman Stone Arch Bridge — Spanning Rivers with Voussoirs and Cofferdams
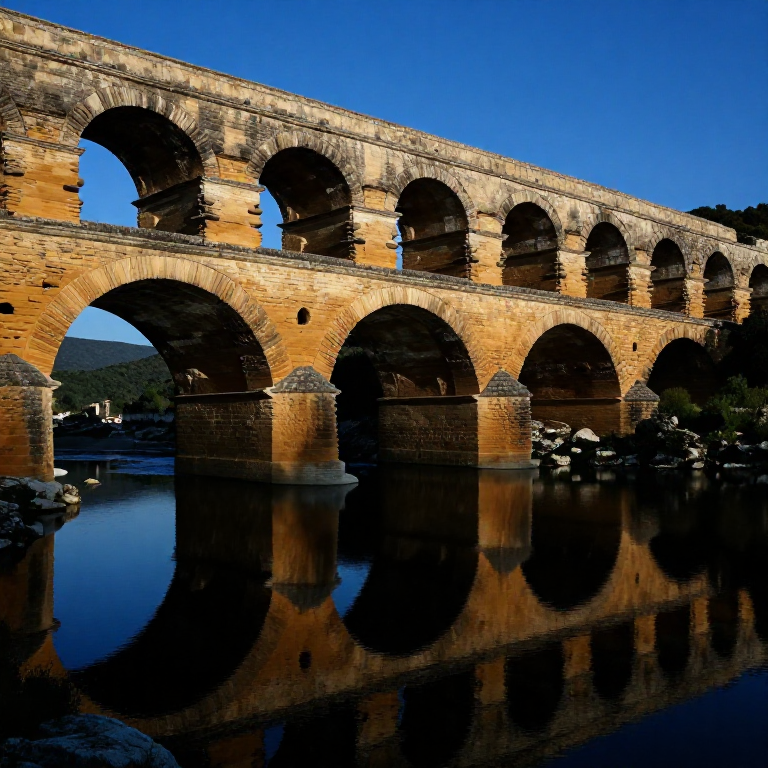
Roman stone arch bridges are among the most enduring engineering achievements in human history. The Pont du Gard in southern France, built around 19 BCE, still carries the road across the Gardon River gorge at 49 metres above the water — a height that was not exceeded in bridge engineering for nearly a thousand years. The Alcántara bridge in Spain, completed 106 AD, spans 194 metres across the Tagus River with six semicircular arches, each 28 metres in diameter. Both are still structurally sound and load-bearing after 2,000 years, without any significant repair to the original Roman masonry.
The Roman arch bridge works entirely in compression. The semicircular arch converts the vertical load of traffic and its own weight into diagonal forces that travel along the arch to the abutments (end supports) or piers (intermediate supports). Since stone is extremely strong in compression but weak in tension, and since a perfect arch carries all loads in pure compression with no tension, stone arches can sustain enormously heavy loads indefinitely. The failure mode of a stone arch is not crushing but rather separation at the haunch — the diagonal outward thrust from the arch crown tries to spread the arch feet apart. Massive abutments and buttressed piers resist this thrust.
The defining challenge of Roman bridge construction was building in a river. The Romans solved this using cofferdams — temporary watertight enclosures pumped dry with Archimedean screw pumps, allowing masons to work on dry land at the pier foundations. The cofferdam technique, combined with pozzolanic underwater concrete, allowed the Romans to found bridge piers on solid rock or on deep pile-reinforced beds even in fast-flowing rivers. This hydraulic engineering — not the arch geometry itself — was the most sophisticated and least understood aspect of Roman bridge construction.
Talimatlar
Survey the crossing and determine span geometry
Survey the crossing and determine span geometry
Survey the river crossing using a groma to establish the centreline and a chorobates to measure water surface elevation and bank heights. Measure the river width at the crossing point at several times during the year — use the maximum flood width for design. Probe the riverbed with iron rods to locate bedrock or firm gravel: the pier foundations must reach stable, non-scourable ground. For a river 30 metres wide with bedrock at 3 metres depth, a single-span semicircular arch of 30-metre diameter is feasible. A semicircular arch of span S rises to a crown height of S/2 — a 30-metre arch rises 15 metres above the spring line. If the banks are not that high, use a segmental (less-than-semicircular) arch or multiple smaller spans with intermediate piers.
Bu adım için malzemeler:
 Hemp Cord50 metre
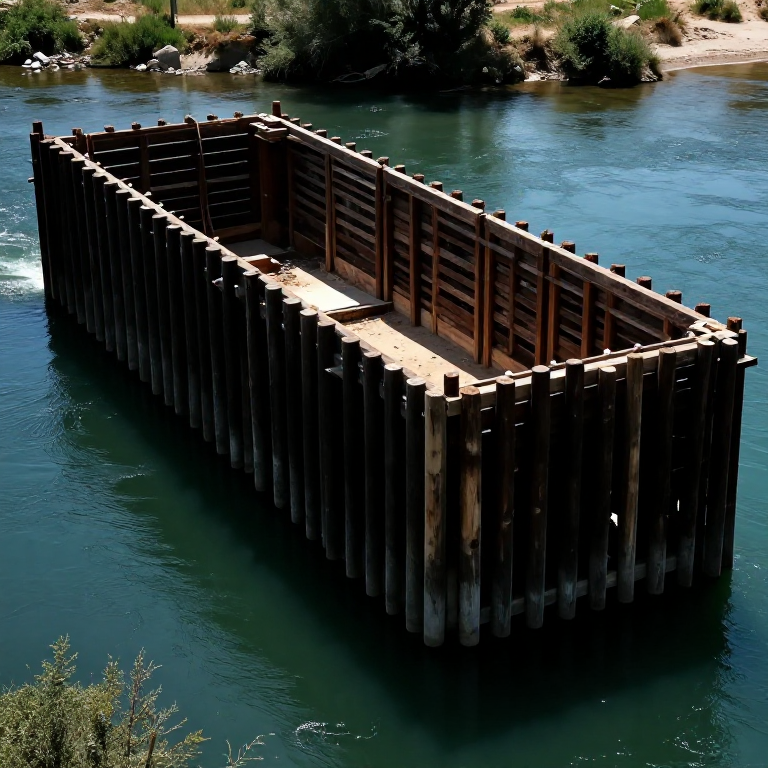
Drive timber piles for the cofferdam walls
Drive timber piles for the cofferdam walls
For each pier location, drive two concentric rings of timber piles into the riverbed using a pile-driving frame (a heavy weight lifted by a pulley and dropped onto the pile head). The inner ring defines the working area; the outer ring (approximately 1 metre outside the inner) creates a gap for clay backfill. Piles should be driven to bedrock or at least 2 metres into firm gravel. Use straight-grained oak or alder piles approximately 15 cm in diameter and 4–5 metres long — alder is preferred because it does not rot in permanently waterlogged conditions. Drive piles at 20 cm centres around the perimeter of the pier plan (which should be 30–50% larger than the finished pier to allow for working room).
Bu adım için malzemeler:
 Hardwood Block30 adet
Gerekli aletler:
 Hammer (2 kg)
Pack clay between the pile rows to seal the cofferdam
Pack clay between the pile rows to seal the cofferdam
Fill the space between the inner and outer pile rings with puddled clay — clay thoroughly kneaded with water to remove air pockets and create a nearly impermeable mass. Lower the clay in buckets and tamp it in layers using long poles pushed down between the piles. The clay key must reach from the riverbed to above the intended working water level. Test the seal by observing inflow rate: a well-sealed cofferdam reduces river water infiltration to a manageable seep rather than a torrent. No cofferdam is perfectly watertight, but the goal is to reduce inflow to what an Archimedean screw pump can handle continuously.
Bu adım için malzemeler:
 Clay500 kg
Pump out the cofferdam using Archimedean screw pumps
Pump out the cofferdam using Archimedean screw pumps
Deploy Archimedean screw pumps (cochleae) inside the cofferdam to lower the water level. A Roman cochlea consists of a helical wooden screw fitted inside a close-fitting cylindrical wooden tube, turned by a man walking on the outer surface or by a treadmill. Each pump lifts water 3–4 metres per stage — for deeper cofferdams, use pumps in series (one discharging into the intake of the next). Julius Caesar's engineers are recorded dewatering Massilia harbour using Roman pumps. Maintain pumping continuously — shifts of workers day and night — until the riverbed inside the cofferdam is exposed and the water level is at least 30 cm below the foundation level.
Excavate to bedrock and clean the foundation
Excavate to bedrock and clean the foundation
Working inside the dry cofferdam, excavate the riverbed sediment down to bedrock or dense gravel. Remove all loose material — sand, silt, and organic debris — from the founding surface. On bedrock, cut a level shelf and key the first masonry course into the rock by cutting recesses 5–10 cm deep into the bedrock surface. On gravel foundations (where bedrock is too deep to reach economically), drive additional short timber piles in a dense grid pattern across the entire pier footprint to consolidate the gravel and reduce settlement. Cap the piles with a timber grillage of crossed hardwood beams that distributes the pier load across all piles.
Gerekli aletler:
 Shovel
Lay the foundation courses in pozzolanic concrete
Lay the foundation courses in pozzolanic concrete
Pour the lowest foundation courses in opus caementicium — pozzolanic lime-volcanic ash concrete with rubble aggregate. Pozzolanic concrete sets and hardens underwater (the pozzolana reacts with lime in the presence of water), making it uniquely suited for below-water-level construction. Pour the concrete in 30 cm horizontal layers, tamping each layer with iron rods to eliminate voids. Continue pouring until the foundation mass rises above the normal river level. The foundation must be wider than the pier above it — typically 1–1.5 metres on each side — to distribute the arch thrust load across the foundation area without exceeding the soil's bearing capacity.
Bu adım için malzemeler:
 Calcium Carbonate (Crushed Limestone)100 kg
 Coarse Sand60 kg
Build the pier masonry in dressed stone courses
Build the pier masonry in dressed stone courses
Build the pier above the foundation in carefully dressed stone masonry — large rectangular blocks of limestone, sandstone, or granite laid in regular horizontal courses in opus quadratum style (squared blocks without mortar, their weight alone holding them in place). Each course is set in a thin bed of lime mortar. The pier face should be given a pointed cutwater on the upstream face (a triangular projection in plan) to split the river flow and reduce hydraulic pressure on the pier. The downstream face is sometimes given a similar tail-water to reduce turbulence. Build the pier to the intended spring-line elevation — the top of the pier is where the arch begins.
Erect the timber centring for the arch
Erect the timber centring for the arch
Build a semicircular timber centring (falsework) spanning from one pier (or abutment) to the next. The centring must support the full weight of all the arch voussoirs until the keystone is placed — for a 15-metre span, this can be 200–400 tonnes. Build it from heavy timber frames spaced at 1-metre intervals, each cut to the arch's radius, covered with close-set lagging planks. Support the centring on horizontal timber beams spanning between the piers, themselves supported by vertical timber falsework columns either driven into the riverbed or founded on the cofferdams. Coat the lagging surface with tallow to allow the voussoirs to slide slightly as the centring deflects under load — preventing the arch from cracking.
Bu adım için malzemeler:
Hardwood Block40 adet Iron Nails200 adet
Cut and dress the voussoir stones
Cut and dress the voussoir stones
Cut the arch voussoirs (wedge-shaped blocks) from hard stone — limestone or granite preferred. Each voussoir has two parallel faces (the intrados and extrados, the inner and outer arch faces) inclined toward the arch centre, and two rectangular side faces. For a semicircular arch of 15-metre radius using 30 voussoirs, each voussoir subtends 6 degrees of arc. The taper angle (the angle between the bed faces) is therefore 6 degrees. The intrados face length (visible under the arch) should be approximately 50 cm; the voussoir depth (radial dimension) should be at least span/30 = 50 cm for structural adequacy. Dress the bed faces flat and square — they must bear fully across the entire face area, not rock on a high spot that concentrates stress.
Place the voussoirs on the centring, working from both sides
Place the voussoirs on the centring, working from both sides
Lower voussoirs from barges or scaffolding onto the centring, placing them from both abutments toward the crown simultaneously. Each stone is bedded in a thin mortar joint — some Roman arches were laid completely dry, relying on stone weight alone, but mortar joints improve the arch's ability to accommodate slight differential settlement without cracking. Check each stone's radial alignment using a cord stretched from the arch centre point. The stones must follow the theoretical arch curve without steps or projections on the intrados face. Keep both sides at equal height at all times — building one side significantly ahead of the other creates unbalanced loading that can tilt the centring and collapse the partially-built arch.
Place the keystone and release the arch from the centring
Place the keystone and release the arch from the centring
The keystone — the final voussoir at the crown — is the most critical single stone. It must fit exactly into the remaining gap with parallel (or slightly converging) bed joints on each side. Any gap larger than 5 mm must be shimmed with thin stone pieces or extra mortar. Drive the keystone into position with a wooden mallet — it should be a firm press fit. Once the keystone is set in mortar, the arch is complete and self-supporting in compression. Lower the centring very slowly over 48 hours (using the sand-box method: drain sand from boxes supporting the centring timbers) to transfer load gradually from centring to arch. Monitor the arch closely during this process for any cracking or movement.
Build the spandrel walls and road surface
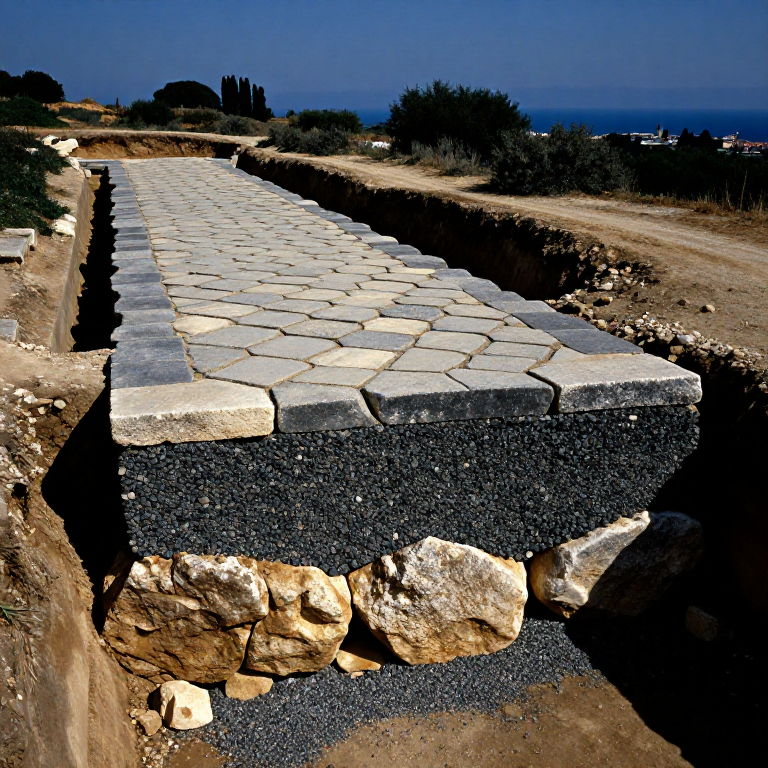
Build the spandrel walls and road surface
Fill the triangular spandrel spaces (between the arch extrados and the bridge deck level) with rubble concrete or cut stone. This fill transfers road traffic loads into the arch and also adds mass to the haunches, which improves arch stability under asymmetric loading (e.g. a heavy vehicle on one side only). Build vertical spandrel walls up from the arch extrados on each side to the parapet height. Fill the space between the spandrel walls with graded stone and concrete, levelled to the road surface profile. Lay the road surface in the same manner as a via strata: foundation stones, rubble, gravel nucleus, and paving slabs, all with a slight camber for drainage. Build parapet walls along both edges for safety and aesthetics.
Remove the cofferdam after pier construction is complete
Remove the cofferdam after pier construction is complete
Once the pier masonry is complete and cured and the cofferdam is no longer needed, remove the inner pile rows and clay fill. Pull the piles upward using timber gin poles and rope purchases (pulley systems). Any piles that cannot be pulled out are sawn off below the anticipated scour depth so they do not obstruct river flow. The river re-enters the previously dewatered area. The pier foundation concrete, now fully cured, is in its permanent below-water condition. Roman pozzolanic concrete continues to strengthen in saltwater or freshwater environments — ancient Roman harbour structures show evidence of continued crystallisation strengthening the concrete for hundreds of years after construction.
Malzemeler
6- 70 adetYer Tutucu
- Yer Tutucu
- Yer Tutucu
- 200 adetYer Tutucu
Bağlı Plan Malzemeleri
İlgili Blueprint'ler
Bu blueprint'ler bilgi paylaşır — teknikler, malzemeler veya ilkeler
Related blueprints
Other builds that share materials, tools, or techniques with this one.
CC0 Kamu Malı
Bu plan CC0 lisansıyla yayınlanmıştır. İzin almadan kopyalayabilir, değiştirebilir, dağıtabilir ve herhangi bir amaçla kullanabilirsiniz.
Planı üzerinden ürün satın alarak Maker'ı destekleyin, böylece Maker Komisyonu Satıcılar tarafından belirlenen komisyonu kazanırlar veya bu Planın yeni bir versiyonunu oluşturun ve gelir paylaşımı için kendi Planınıza bağlantı olarak ekleyin.