İşbirliği
SANAT
GÜZELLİK & SAĞLIK
ZANAAT
KÜLTÜR & TARİH
EĞLENCE
ÇEVRE
YİYECEK & İÇECEK
TERS MÜHENDİSLİK
BİLİMLER
SPOR
TEKNOLOJİ
GİYİLEBİLİR ÜRÜNLER
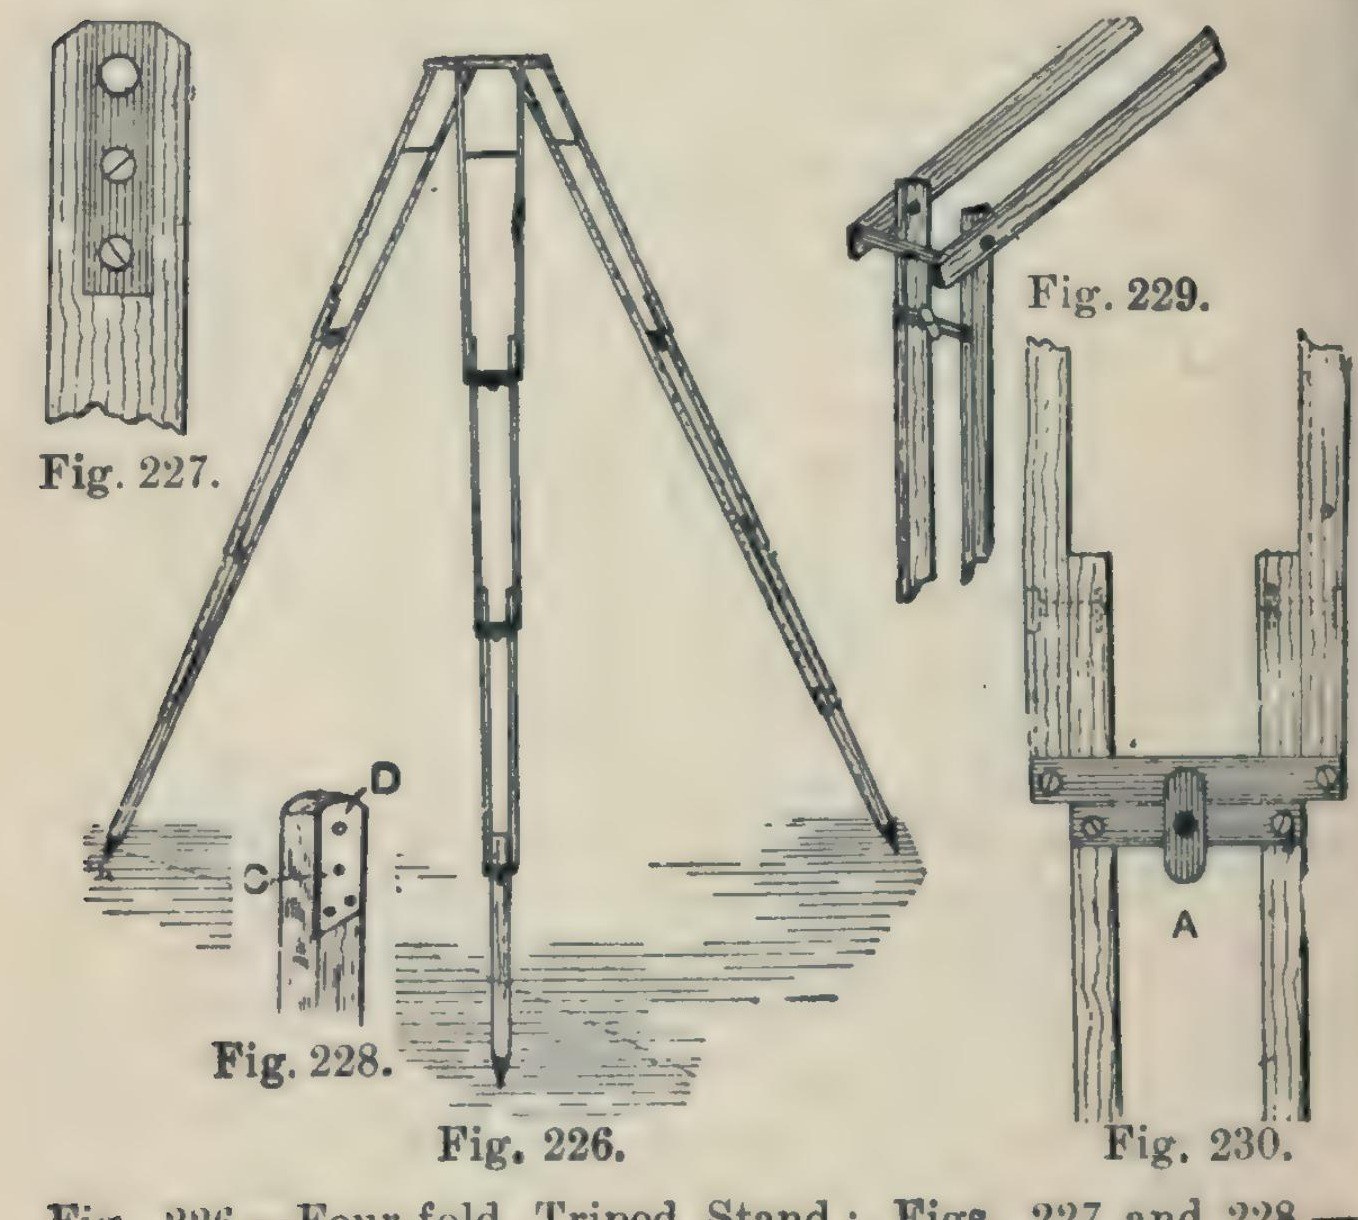


Camera Tripod: a Four-Fold Ash Tripod Stand (Hasluck, 1902)
A light, compact folding camera stand: three legs, each of seven ash laths riveted so it folds in four, locked open by brass buttons, on a triangular ash top with brass pins and a hole for the camera screw.
Hasluck says the same method makes stands that fold in three or two.
Source: Paul N. Hasluck, Photographic Cameras and Accessories (1902), pp. 153-157. Picture: Figs. 226-230 of the book.
Orta
Unknown
Talimatlar
1
1
Cut the ash laths
Cut the ash laths
Cut laths of good ash, true and square or the stand won't be rigid, and round the edges slightly: six 17 1/4 x 5/8 x 3/8 in, six 16 x 5/8 x 3/8 in, six 15 1/2 x 5/8 x 3/8 in, and three 14 x 5/8 x 5/8 in.
Bu adım için malzemeler:
 Dişbudak tahta1 21 laths
Gerekli aletler:
 Sırtlı testere
 Blok rende
2
2
Fit the top ends and stretcher
Fit the top ends and stretcher
On each 17 1/4 in lath let in flush a 1/16 in brass plate, 1 1/4 in long, with a 3/16 in hole 1/4 in from the top, held by two countersunk brass screws; bore the wood to match and take off the top corners. On one lath of each pair cut a groove inside, about 3/16 in deep and 3 1/2 in long, starting 2 in from the top, and hinge a 1/8 in brass rod stretcher in it on a pin. On the other lath cut a curved groove 1 1/2 in long, 3/16 in wide, with a small hole at the bottom where the rod catches.
Bu adım için malzemeler:
 Pirinç Levha1 1/16 in plates
 Ahşap vidalar1 small brass screws
 Pirinç Çubuk1 1/8 in stretcher
Gerekli aletler:
 Demir Testeresi Gövdesi ve Ağızları
 Metal Eğe
 El matkabı
 Marangoz keskileri
 Düz tornavida
3
3
Bore and rivet the legs
Bore and rivet the legs
Bore the rivet holes: in the long laths 1 3/4 in from the lower end, counterbored so the copper rivet head sits flush, then 1/8 in through; in the 16 in and 15 1/2 in laths 1/2 in and 1 3/4 in from the ends; in each 14 in piece 1/2 in from one end, and taper its other end for a pointed iron shoe or a steel point and ferrule. Rivet the 21 laths into three legs with 1/8 in copper rivets and washers: a 16 in lath inside each 17 1/4 in one, a 15 1/2 in lath inside that, the 14 in foot between the last pair. Rivets flush, just tight enough to fold but not loose.
Bu adım için malzemeler:
 Bakır perçinler1 1/8 in, with washers
 Bilinmeyen metal3 iron shoes or steel points
Gerekli aletler:
 Kol matkabı ve ucuEl matkabı
 Perçin çekici
4
4
Add cross strips and lock buttons
Add cross strips and lock buttons
Screw 1/16 in brass strips across the bottom ends of each pair of laths (Fig. 229). Under them screw strips carrying a small brass button riveted at the centre; turned, the button hooks over the strip above and locks the joint open (Fig. 230).
Bu adım için malzemeler:
Pirinç Levha1 cross strips, buttonsAhşap vidalar1 adetGerekli aletler:
Demir Testeresi Gövdesi ve AğızlarıMetal EğeDüz tornavidaPerçin çekici5
5
Make the top
Make the top
Plane ash to 1/2 in and draw an equilateral triangle with 8 1/2 in sides. Bisect the angles; 2 in from each corner draw a line at right angles, go 1/2 in in along the sides, and mark three rectangles 2 7/8 x 3/4 in; cut the outline (Fig. 231). Fix a 3/16 in brass rod, one end tapered, across each rectangle, bored 3/8 in from the outer edge and projecting about 1/2 in, for the legs to hang on. Bore a 1/4 in hole in the centre for the camera screw and glue felt on top.
Bu adım için malzemeler:
Dişbudak tahta1 topPirinç Çubuk3 3/16 in pins Yün keçe1 adet
 Hayvansal tutkal1 adet
Gerekli aletler:
Blok rendeSırtlı testereKol matkabı ve ucuEl matkabı6
6
Finish
Finish
Glasspaper and varnish the wood, and lacquer the brass.
Bu adım için malzemeler:
 Gomalak vernik1 varnish
 Bilinmeyen malzeme1 brass lacquer
Gerekli aletler:
 Zımpara Kağıdı
Malzemeler
10- 1 topYer Tutucu
- 1 cross strips, buttonsYer Tutucu
- 1 adetYer Tutucu
- 3 3/16 in pinsYer Tutucu
- 1 1/8 in, with washersYer Tutucu
- 3 iron shoes or steel pointsYer Tutucu
- 1 adetYer Tutucu
- 1 adetYer Tutucu
- 1 varnishYer Tutucu
- 1 brass lacquerYer Tutucu
Gerekli Aletler
10- Yer Tutucu
- Yer Tutucu
- Yer Tutucu
- Yer Tutucu
- Yer Tutucu
- Yer Tutucu
- Yer Tutucu
- Yer Tutucu
- Yer Tutucu
- Yer Tutucu
Bu planla yapılan

CC0 Kamu Malı
Bu plan CC0 lisansıyla yayınlanmıştır. İzin almadan kopyalayabilir, değiştirebilir, dağıtabilir ve herhangi bir amaçla kullanabilirsiniz.
Planı üzerinden ürün satın alarak Maker'ı destekleyin, böylece Maker Komisyonu Satıcılar tarafından belirlenen komisyonu kazanırlar veya bu Planın yeni bir versiyonunu oluşturun ve gelir paylaşımı için kendi Planınıza bağlantı olarak ekleyin.