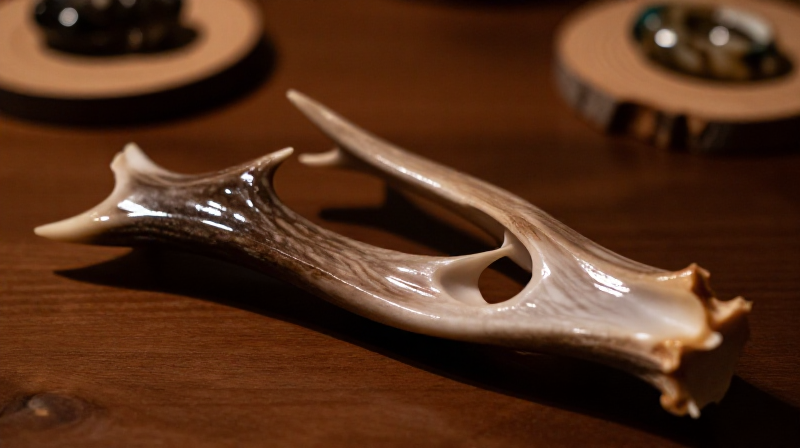


Cutting Decorative Deer Antler Slices — Polished Rounds for Display and Jewelry
A cross-section slice of deer antler reveals a striking natural pattern — the hard, glossy cortex ring surrounding an intricate network of cancellous bone that looks like fine lacework under polish. Each slice is unique in diameter, colour, and internal pattern. Polished antler slices make attractive coasters, pendants, Christmas ornaments, and display pieces.
This blueprint covers cutting thin rounds from a deer antler beam, wet-sanding to a high polish, optionally drilling a hanging hole, and sealing with linseed oil and beeswax to preserve the natural grain pattern.
Talimatlar
Select the beam section
Select the beam section
Choose the thickest part of the main beam for the largest slices — the lower beam near the coronet (the bumpy ring at the base) can be 50-70 mm in diameter on a mature white-tailed deer. For pendants, thinner tine sections (15-25 mm) work well. Avoid cracked or sun-bleached antler.
Bu adım için malzemeler:
 Geyik boynuzu kesiti1 adet
 Geyik1 adet
Saw thin rounds
Saw thin rounds
Clamp in a bench vise and cut slices 6-10 mm thick with a fine-toothed hacksaw. Thicker slices (8-10 mm) work for coasters and ornaments; thinner ones (6 mm) for pendants. Saw slowly and evenly to keep both faces parallel. Mark cut lines with a pencil for uniform thickness.
Gerekli aletler:
 Tezgah Mengenesi
 Demir Testeresi
Sand and polish both faces
Sand and polish both faces
Sand flat on sandpaper laid on a hard surface. Start at 120 grit to flatten saw marks, then 220, 400, and finally 800 grit for a high polish. Wet-sand at 400+ grit — water keeps the dust down and produces a smoother finish. The cortex ring polishes to a glassy sheen; the spongy centre shows an intricate bone-grain pattern.
Bu adım için malzemeler:
 Zımpara Kağıdı1 yaprakZımpara Kağıdı1 yaprakZımpara Kağıdı1 yaprakZımpara Kağıdı1 yaprak
Drill a hanging hole for pendants
Drill a hanging hole for pendants
For pendants or ornaments, drill a 2 mm hole near the edge of the cortex ring. Position it in the thickest part of the cortex so it does not crack through to the spongy centre. Drill at low speed on a scrap board backing. Skip this step for coasters or display pieces.
Gerekli aletler:
 Kablosuz Matkap
 Matkap Ucu Takımı
Seal with oil and wax
Seal with oil and wax
Apply boiled linseed oil to both faces with a cloth, let it soak in for 10 minutes, then wipe dry. Once the oil dries (24 hours), buff with a thin layer of beeswax for a protective sheen. The oil deepens the natural colour contrast between cortex and core; the wax prevents the spongy centre from absorbing moisture or staining.
Bu adım için malzemeler:
 Kaynatılmış Bezir Yağı30 ml
 Bal Mumu Peleti15 g
Malzemeler
8- 1 adetYer Tutucu
- 1 adetYer Tutucu
- 1 yaprakYer Tutucu
- 1 yaprakYer Tutucu
- 1 yaprakYer Tutucu
- 1 yaprakYer Tutucu
- Yer Tutucu
- 15 gYer Tutucu
Gerekli Aletler
4- Yer Tutucu
- Yer Tutucu
- 1 vendor sell this, none ship to you yetYer Tutucu
- Yer Tutucu
Bağlı Plan Malzemeleri

İlgili Blueprint'ler
Bu blueprint'ler bilgi paylaşır — teknikler, malzemeler veya ilkeler
CC0 Kamu Malı
Bu plan CC0 lisansıyla yayınlanmıştır. İzin almadan kopyalayabilir, değiştirebilir, dağıtabilir ve herhangi bir amaçla kullanabilirsiniz.
Planı üzerinden ürün satın alarak Maker'ı destekleyin, böylece Maker Komisyonu Satıcılar tarafından belirlenen komisyonu kazanırlar veya bu Planın yeni bir versiyonunu oluşturun ve gelir paylaşımı için kendi Planınıza bağlantı olarak ekleyin.