Baking Sourdough Bread from Scratch
Talimatlar
Preparing the Levain (Starter Check)
Preparing the Levain (Starter Check)
The Float Test
Your starter is ready to use when it passes the float test: drop a small spoonful into a glass of room-temperature water. If it floats, the starter has produced enough CO₂ gas to leaven bread. If it sinks, feed it and wait 4-8 more hours.
Timing
Feed your starter 4-8 hours before you plan to mix the dough. A good feeding schedule:
- Evening before: Feed starter (50g starter + 50g flour + 50g water)
- Next morning: Starter should be doubled and bubbly → start mixing
What is a Sourdough Starter?
A sourdough starter is a stable culture of wild Lactobacillus bacteria and wild yeast (primarily Saccharomyces and Candida species). The bacteria produce lactic and acetic acid (the sour flavor), while the yeast produces CO₂ (the rise). This symbiosis has been used since ancient Egypt — archaeological evidence dates sourdough bread to at least 3700 BCE.
Gerekli aletler:
 Digital kitchen scale
 Large mixing bowl
 Bench scraper
 Dutch oven (4-5 quart, cast iron or enameled)
 Bread lame or razor blade
 Banneton/proofing basket (or bowl with floured towel)
Autolyse and Mixing
Autolyse and Mixing
Autolyse (30-60 minutes)
- Weigh 500g bread flour and 375g water (room temperature, 24-26°C / 75-78°F) into a large bowl.
- Mix until no dry flour remains — it will be shaggy and rough. Don't knead.
- Cover and rest for 30-60 minutes.
Why autolyse? Flour enzymes (amylase and protease) begin breaking down starches and developing gluten without mechanical work. The dough becomes easier to handle and develops better extensibility.
Adding Starter and Salt
- After autolyse, add 100g active starter and 10g salt to the dough.
- Mix by hand: wet your hand, reach under the dough, and fold it over itself. Rotate bowl and repeat. Squeeze the dough through your fingers to incorporate the additions.
- Continue for 3-5 minutes until starter and salt are fully integrated. The dough will feel wet and sticky — this is normal at 75% hydration.
Baker's Math Summary
| Ingredient | Weight | Baker's % |
|---|---|---|
| Bread flour | 500g | 100% |
| Water | 375g | 75% |
| Starter (100% hydration) | 100g | 20% |
| Salt | 10g | 2% |
| Total dough | 985g |
Bu adım için malzemeler:
 Active sourdough starter (100% hydration)100 g
 Water (filtered, room temperature)0.38 kg
Bulk Fermentation with Stretch-and-Folds
Bulk Fermentation with Stretch-and-Folds
Stretch-and-Fold Technique
Instead of kneading, we develop gluten structure through a series of stretch-and-fold sets during bulk fermentation:
- Wet your hand. Reach under one side of the dough, stretch it up as far as it will go without tearing, and fold it over to the opposite side.
- Rotate the bowl 90° and repeat. Do all 4 sides — that's one set.
- Perform 4-6 sets, spaced 30 minutes apart during the first 2-3 hours of bulk fermentation.
- After the last set, leave the dough undisturbed for the remaining bulk time.
Bulk Fermentation Timing
Total bulk time depends on temperature:
| Dough Temperature | Bulk Fermentation Time |
|---|---|
| 24-26°C (75-78°F) | 4-5 hours |
| 21-23°C (70-74°F) | 5-7 hours |
| 18-20°C (64-68°F) | 8-10 hours |
How to Know Bulk Is Done
The dough should have:
- Increased in volume by 50-75% (not doubled — that's over-fermented)
- Visible bubbles on the surface and sides
- A domed, smooth top
- Jiggly, airy texture when you shake the bowl
Over-fermentation (flat, sticky, no structure) is the #1 beginner mistake. If ambient temperature is high (>26°C), bulk ferments faster than you expect.
Shaping and Cold Retard
Shaping and Cold Retard
Pre-shape
- Turn the dough out onto a lightly floured work surface (use rice flour — it doesn't absorb into the dough as easily).
- Using the bench scraper, gently fold the dough into a rough round shape. Don't degas it — you want to keep those fermentation bubbles.
- Bench rest 20-30 minutes uncovered. The dough relaxes, making final shaping easier.
Final Shape (Batard/Boule)
- Lightly flour the top of the dough. Flip it over (floured side down).
- For a boule (round): Fold the bottom third up, fold the left and right sides to center, then roll the top down to the bottom, creating surface tension. Use your hands to rotate the dough on the counter, tucking the bottom seam underneath.
- The surface should feel taut — like a drum. Surface tension is what gives the loaf its shape during baking.
Cold Retard (12-18 hours)
- Place the shaped dough seam-side up into a banneton (or bowl with floured towel).
- Cover with plastic wrap or a plastic bag.
- Refrigerate at 3-5°C (38-41°F) for 12-18 hours.
Why cold retard? Slow, cold fermentation develops complex flavors (acetic acid increases at cold temperatures, contributing tang). The dough also firms up, making it easier to score and load into the oven.
Scoring and Baking
Scoring and Baking
Oven Setup
- Place the Dutch oven (with lid) in a cold oven.
- Preheat to 260°C / 500°F (or your oven's maximum). Heat for 45-60 minutes — the Dutch oven must be thoroughly hot.
Scoring
- Take the dough from the fridge — bake it cold (easier to score, better oven spring).
- Turn it out onto parchment paper (seam-side down now).
- Using the bread lame at a 30° angle to the surface, make a swift, confident slash about 1cm deep. A single curved slash (ear) or a cross pattern both work.
- Commit to the cut — hesitation creates ragged edges. One smooth motion.
Baking Schedule
- Carefully place the dough (on parchment) into the screaming-hot Dutch oven. Replace lid immediately.
- Lid ON: 20 minutes at 260°C / 500°F. The trapped steam keeps the crust soft and elastic, allowing maximum oven spring. The crust will be pale.
- Remove lid. Reduce to 230°C / 450°F. Bake 20-25 minutes more until the crust is deep golden-brown to dark amber. Don't under-bake — a pale loaf will have a gummy interior.
- Internal temperature should reach 96-99°C / 205-210°F (use an instant-read thermometer if you have one).
Cooling
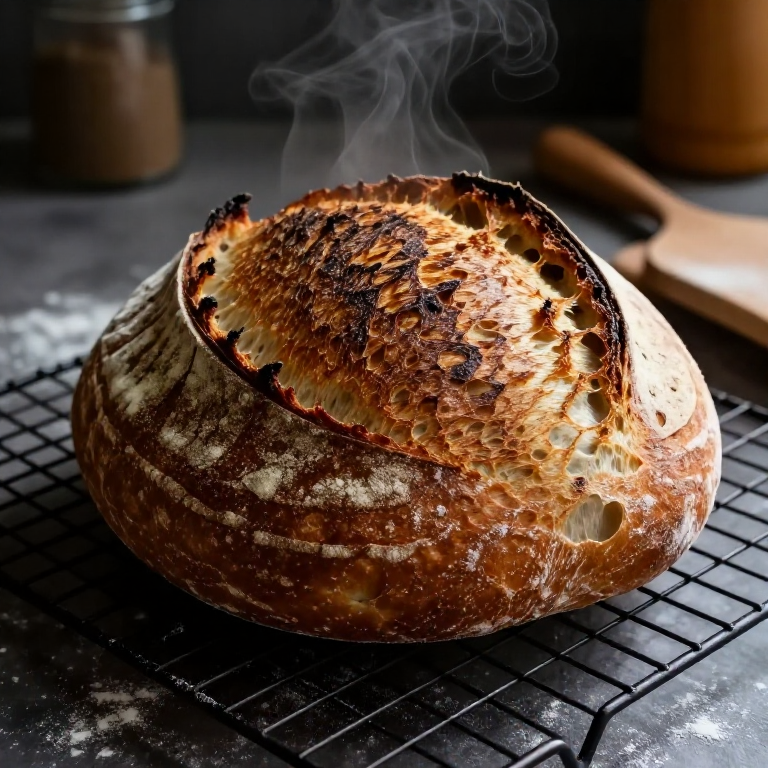
Remove from Dutch oven and cool on a wire rack for at least 1 hour — ideally 2. The bread is still baking internally (starch is setting, moisture is redistributing). Cutting too early = gummy, under-set crumb. Listen for the "singing" — crackling sounds as the crust contracts.
Malzemeler
4- 500 gYer Tutucu
- Yer Tutucu
- Yer Tutucu
- Yer Tutucu
Gerekli Aletler
6- Yer Tutucu
- Yer Tutucu
- Yer Tutucu
- Yer Tutucu
- Yer Tutucu
- Yer Tutucu
Related blueprints
Other builds that share materials, tools, or techniques with this one.


CC0 Kamu Malı
Bu plan CC0 lisansıyla yayınlanmıştır. İzin almadan kopyalayabilir, değiştirebilir, dağıtabilir ve herhangi bir amaçla kullanabilirsiniz.
Planı üzerinden ürün satın alarak Maker'ı destekleyin, böylece Maker Komisyonu Satıcılar tarafından belirlenen komisyonu kazanırlar veya bu Planın yeni bir versiyonunu oluşturun ve gelir paylaşımı için kendi Planınıza bağlantı olarak ekleyin.