
SANAT
GÜZELLİK & SAĞLIK
ZANAAT
KÜLTÜR & TARİH
EĞLENCE
ÇEVRE
YİYECEK & İÇECEK
TERS MÜHENDİSLİK
BİLİMLER
SPOR
TEKNOLOJİ
GİYİLEBİLİR ÜRÜNLER
Metal Band Saw: Horizontal Saw on a Welded Steel Frame
Martin

Oluşturan

Martin

23. Ekim 2026NO
9
0
0
0
0

Metal Band Saw: Horizontal Saw on a Welded Steel Frame

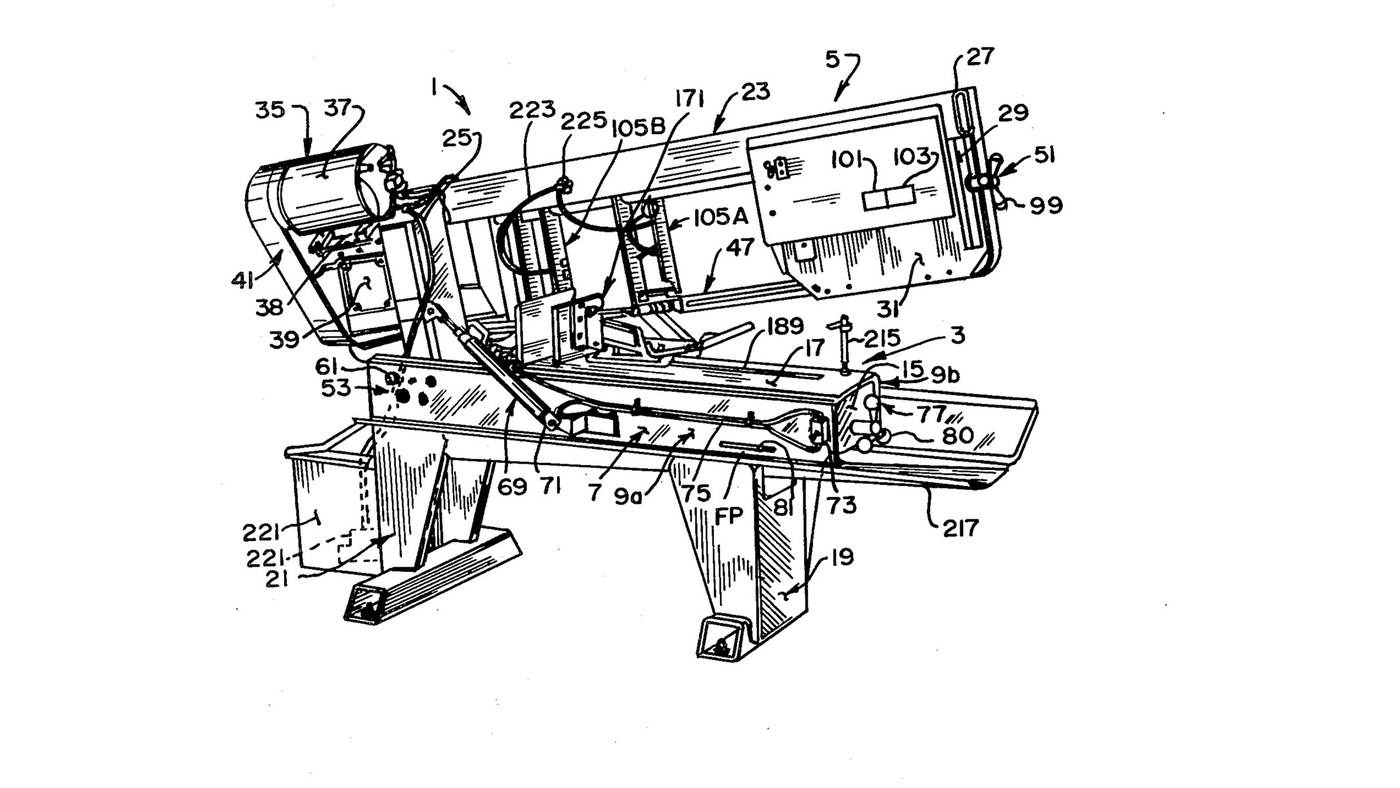
Curtis Eccardt's horizontal power band saw (Emerson Electric, US 4,364,294, 1982), built from welded steel channel and tube instead of iron castings to cut its cost. The saw head swings down on trunnions over the bed; a hydraulic cylinder with a valve sets how fast it feeds, a spring counterbalances it, and a spring tensioner shows the blade tension on a scale. Two guides with rollers twist the blade's lower run 90° so its teeth face down into the work, and carbide inserts hold it there. The patent gives no sizes, speeds or ratings; the welder and wrenches are ours. The picture: the patent's Fig. 1.
İleri
4 days

Talimatlar

1

Weld the bed

Stand two steel channels (9a, 9b) parallel, webs upright and flanges facing in, and weld gussets (15) between their webs. Bolt a bed plate (17) across the top flanges as the work surface. Ours: MIG welder, drill press for the bolt holes.

Bu adım için malzemeler:

Çelik U profilÇelik U profil2 adet
Yumuşak çelik plakaYumuşak çelik plaka1 adet
Altı köşe cıvata - sınıf 8.8Altı köşe cıvata - sınıf 8.81 adet

Gerekli aletler:
MIG kaynak makinesiMIG kaynak makinesi
Sütunlu MatkapSütunlu Matkap
Kurbağacık anahtarKurbağacık anahtar
2

Weld and bolt on the legs

Weld formed sheet-steel legs onto horizontal floor members to make front and rear leg weldments (19, 21), and bolt them under the bed.

Bu adım için malzemeler:

Çelik sacÇelik sac1 adet
Çelik boru profilÇelik boru profil1 adet
Altı köşe cıvata - sınıf 8.8Altı köşe cıvata - sınıf 8.81 adet

Gerekli aletler:

MIG kaynak makinesiMIG kaynak makinesi
Kurbağacık anahtarKurbağacık anahtar
3

Weld the head

Weld a head post (25) of square or rectangular steel tube square to a head beam (27) of rectangular tube. Weld a bracket leg (29) down from the beam's outer end, and fix support plates at both ends (31, 33).

Bu adım için malzemeler:

Çelik boru profilÇelik boru profil1 adet
Yumuşak çelik plakaYumuşak çelik plaka1 adet

Gerekli aletler:

MIG kaynak makinesiMIG kaynak makinesi
4

Fit the trunnions and align the pivot

Fix a shaft through the head post with its ends out as trunnions (55a, 55b), in bushings in two bearing blocks (59a, 59b) bolted inside the channel webs. Each block has one close-fit bolt hole and three oversize ones: shift the blocks until the pivot is parallel to the bed plate, then torque the bolts. A set screw (67) takes out end play.

Bu adım için malzemeler:

Çelik milÇelik mil1 adet
Metal burçMetal burç2 adet
Rulman yatağıRulman yatağı2 adet
Altı köşe cıvata - sınıf 8.8Altı köşe cıvata - sınıf 8.88 adet
Çukur uçlu setuskurÇukur uçlu setuskur1 adet

Gerekli aletler:

Sütunlu MatkapSütunlu Matkap
Tork AnahtarıTork Anahtarı
5

Mount motor, belt drive and gearbox

Mount the electric motor (37) on a plate (38) pivoted on the head beam, and couple it by a multi-speed belt and pulleys (41) to a gearbox (39). Fit the drive wheel (43) on the gearbox output shaft.

Bu adım için malzemeler:

Elektrik motoruElektrik motoru1 adet
Yumuşak çelik plakaYumuşak çelik plaka1 adet
Tahrik kayışıTahrik kayışı1 adet
MakaraMakara1 adet
Dişli kutusuDişli kutusu1 adet
Şerit testere kasnağıŞerit testere kasnağı1 adet

Gerekli aletler:

Kurbağacık anahtarKurbağacık anahtar
6

Build the idler tensioner

Weld an idler yoke (87) of rolled steel plate, pivot it on the head beam with a pin (89), and cantilever the idler axle from it with the idler wheel (45) on bearings (85). A threaded rod (91) pulls the yoke through a coil spring (93) held between compression plates and a U-bolt (97); a knob (99) turns the rod. An indicator (101) on the spring reads the tension on a scale (103).

Bu adım için malzemeler:

Yumuşak çelik plakaYumuşak çelik plaka1 adet
Preslenen çelik pimPreslenen çelik pim1 adet
Çelik milÇelik mil1 adet
Şerit testere kasnağıŞerit testere kasnağı1 adet
Bilyalı RulmanBilyalı Rulman1 adet
Dişli milDişli mil1 adet
Coil SpringCoil Spring1 adet
U cıvatasıU cıvatası1 adet
Kumanda düğmesiKumanda düğmesi1 adet

Gerekli aletler:

MIG kaynak makinesiMIG kaynak makinesi
Kurbağacık anahtarKurbağacık anahtar
7

Build the two blade guides

In each guide channel (111) mount two guide rollers (115a, 115b) on ball bearings on eccentric bushings, one fixed and one adjusted to the blade thickness. Add a carbide thrust insert (133) on the blade's back edge and two carbide side inserts (137a fixed, 137b on a sprung swing bracket set by a bolt and knob). Clamp the guides on two bar tracks (107).

Bu adım için malzemeler:

Kılavuz makarasıKılavuz makarası4 adet
Bilyalı RulmanBilyalı Rulman4 adet
Eksantrik burçEksantrik burç4 adet
Karbür uçKarbür uç6 adet
Coil SpringCoil Spring2 adet
Kumanda düğmesiKumanda düğmesi2 adet
Çelik boru profilÇelik boru profil1 adet

Gerekli aletler:

Kurbağacık anahtarKurbağacık anahtar
8

Fit the blade and set the tension

By hand, run the endless blade (47) round the drive and idler wheels and through both guides; the rollers twist its lower run about 90° so the teeth face down. Turn the tension knob until the scale shows the tension you want.

Bu adım için malzemeler:

Şerit testere bıçağıŞerit testere bıçağı1 adet
9

Fit the feed cylinder and counterbalance

Connect a hydraulic cylinder (71) between bed channel and head post above the trunnions, filled with oil and piped through tubing (75) to a control valve (73): the valve sets the feed rate and, closed, holds the head. Fit a coil spring (78) on a threaded linkage (79) between an end gusset and the head post below the trunnions, adjusted by a knob (80), to counterbalance the head.

Bu adım için malzemeler:

Hidrolik silindirHidrolik silindir1 adet
Hidrolik yağHidrolik yağ1 batch
Hidrolik boruHidrolik boru1 adet
Akış kontrol valfiAkış kontrol valfi1 adet
Coil SpringCoil Spring1 adet
Dişli milDişli mil1 adet
Kumanda düğmesiKumanda düğmesi1 adet

Gerekli aletler:

Kurbağacık anahtarKurbağacık anahtar
10

Bolt on the vice

Bolt the quick-acting vice to the bed plate to clamp the work square under the blade.

Bu adım için malzemeler:

Makine MengenesiMakine Mengenesi1 adet
Altı köşe cıvata - sınıf 8.8Altı köşe cıvata - sınıf 8.81 adet

Gerekli aletler:

Kurbağacık anahtarKurbağacık anahtar

Malzemeler

29

Gerekli Aletler

4

CC0 Kamu Malı

Bu plan CC0 lisansıyla yayınlanmıştır. İzin almadan kopyalayabilir, değiştirebilir, dağıtabilir ve herhangi bir amaçla kullanabilirsiniz.

Planı üzerinden ürün satın alarak Maker'ı destekleyin, böylece Maker Komisyonu Satıcılar tarafından belirlenen komisyonu kazanırlar veya bu Planın yeni bir versiyonunu oluşturun ve gelir paylaşımı için kendi Planınıza bağlantı olarak ekleyin.

Tartışma

(0)

Giriş yapın tartışmaya katılmak için

Yorumlar yükleniyor...