İşbirliği
SANAT
GÜZELLİK & SAĞLIK
ZANAAT
KÜLTÜR & TARİH
EĞLENCE
ÇEVRE
YİYECEK & İÇECEK
TERS MÜHENDİSLİK
BİLİMLER
SPOR
TEKNOLOJİ
GİYİLEBİLİR ÜRÜNLER
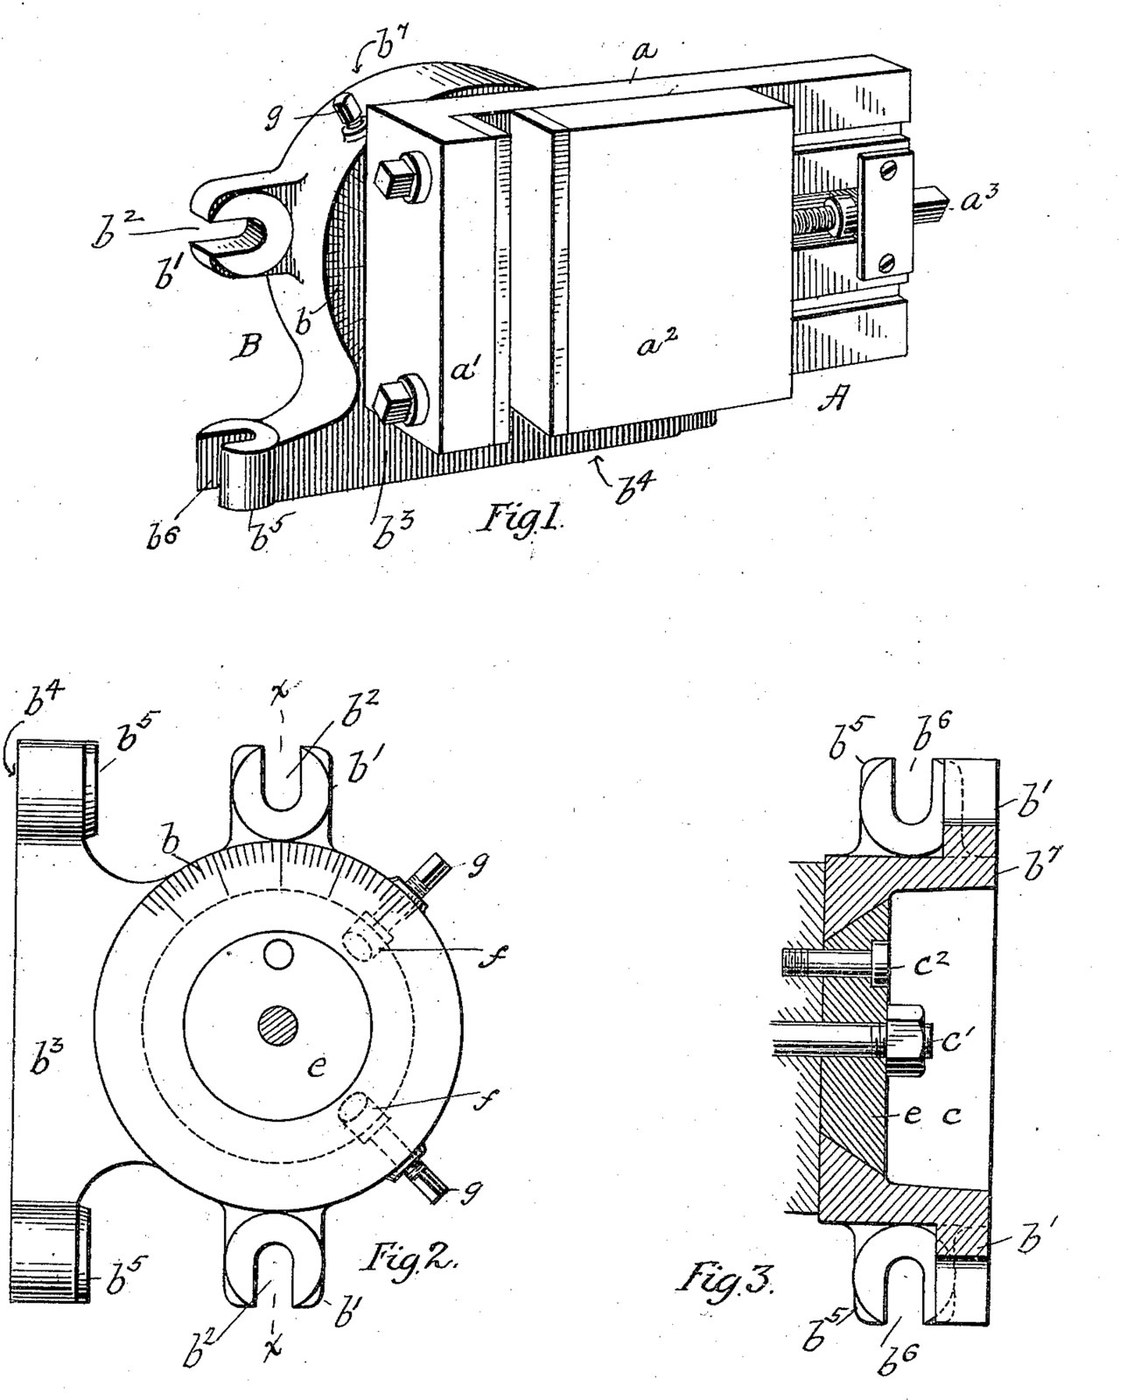


Milling Vise: Swivelled on a Two-Face Base with a Cone Seat and Locking Shoes (McClellan, US 652,441)
A milling vise holds the work on the table of a milling machine: a fixed jaw, a jaw moved by a screw, and a base that lets the vise swivel to any angle. E. J. McClellan (US 652,441, 1900) turns the vise on a cone-shaped disk in a matching seat in a cylindrical base, reads the angle on a scale, and locks it with two shoes screwed against the cone.
His base has two planed faces at right angles, each with its own bolt slots, so the vise can be bolted to the table lying flat or standing upright.
Source: E. J. McClellan, "Milling-Machine Vise", US Patent 652,441 (1900). Picture: its Figs. 1-3.
İleri
Unknown
Talimatlar
1
1
Read McClellan
Read McClellan
"With such a construction it is possible to support the vise in one plane only, which plane is horizontal; but it is often found desirable to mount the vise in an upright position upon the slide in order to use the machine to the best advantage".
2
2
Make the base
Make the base
Make a cylindrical block. Plane one end face square to its axis to fit the machine table, with two ears at opposite points, slotted for bolts parallel to the axis. Give it a side extension with a second planed face at right angles to the first and parallel to the axis, with its own slotted ears, so the base can be bolted down on its end or on its side. Mark a scale round part of the opposite end face. Sizes, metal and how the scale is cut are not given.
Bu adım için malzemeler:
 Bilinmeyen metal1 base
Gerekli aletler:
 Metal planya tezgâhı
 Eğeler (El Eğesi)
 Bilinmeyen ölçüler
 Bilinmeyen şekillendirme yöntemi
3
3
Cut the cone seat
Cut the cone seat
Bore a large central opening through the base and turn the end next to the scale into a conical seat, narrowest at the scaled face. Turn a disk with a matching conical edge. Drill two radial holes into the seat, ninety degrees apart, fit a shoe in each whose face forms part of the cone, and tap the holes behind them for adjusting screws.
Bu adım için malzemeler:
Bilinmeyen metal1 diskBilinmeyen metal2 shoesGerekli aletler:
 Metal Torna Tezgâhı
 Sütunlu Matkap
 Matkap Ucu Takımı
 Kılavuz ve pafta takımı
4
4
Make the vise
Make the vise
Make a plate carrying a fixed jaw, and a second plate as the sliding jaw, fitted to slide on the first and moved by a screw. Put an index mark on the vise to read against the base scale. The vise may be of any good construction; its sizes and the screw's thread are not given.
Bu adım için malzemeler:
Bilinmeyen metal1 plate and fixed jawBilinmeyen metal1 sliding jawBilinmeyen metal1 screwGerekli aletler:
Metal planya tezgâhıMetal Torna TezgâhıSütunlu MatkapMatkap Ucu TakımıKılavuz ve pafta takımıBilinmeyen ölçüler5
5
Assemble and set
Assemble and set
Pass the disk into its seat from below and bolt it to the vise plate with a centre bolt and an off-centre bolt. Bolt the base to the table on whichever face suits the job. To set an angle, slacken the bolts, swivel the vise to the scale, and screw the two shoes hard against the cone to lock it.
Bu adım için malzemeler:
 Altıköşe cıvata takımı1 centre and off-centre bolts
Gerekli aletler:
 Kurbağacık anahtar
Malzemeler
2- 1 screwYer Tutucu
- 1 centre and off-centre boltsYer Tutucu
Gerekli Aletler
9- Yer Tutucu
- Yer Tutucu
- Yer Tutucu
- Yer Tutucu
- Yer Tutucu
- Yer Tutucu
- Yer Tutucu
- Yer Tutucu
- Yer Tutucu
Bu planla yapılan

CC0 Kamu Malı
Bu plan CC0 lisansıyla yayınlanmıştır. İzin almadan kopyalayabilir, değiştirebilir, dağıtabilir ve herhangi bir amaçla kullanabilirsiniz.
Planı üzerinden ürün satın alarak Maker'ı destekleyin, böylece Maker Komisyonu Satıcılar tarafından belirlenen komisyonu kazanırlar veya bu Planın yeni bir versiyonunu oluşturun ve gelir paylaşımı için kendi Planınıza bağlantı olarak ekleyin.