İşbirliği
SANAT
GÜZELLİK & SAĞLIK
ZANAAT
KÜLTÜR & TARİH
EĞLENCE
ÇEVRE
YİYECEK & İÇECEK
TERS MÜHENDİSLİK
BİLİMLER
SPOR
TEKNOLOJİ
GİYİLEBİLİR ÜRÜNLER
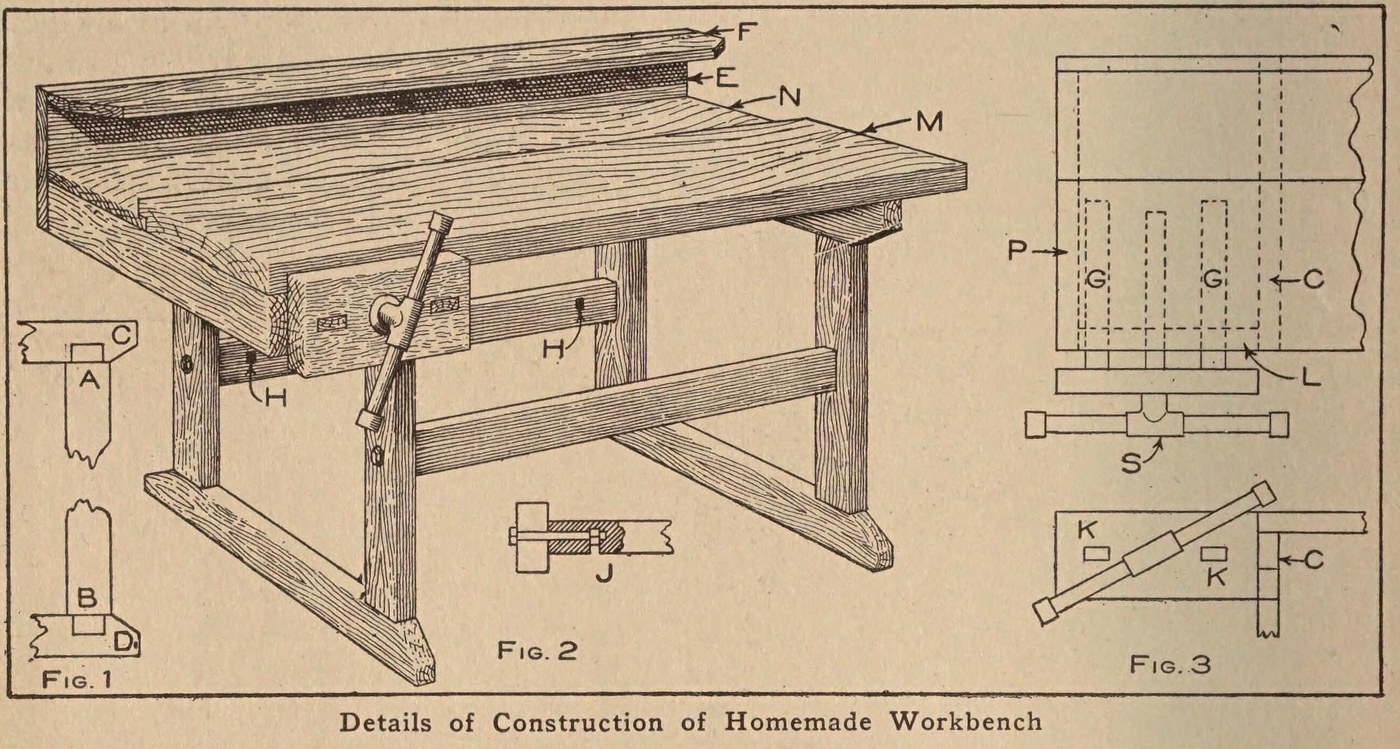


Workbench: a Pine Bench with a Plank Top and Vise (Boy Mechanic, 1913)
A boy's first workshop bench: two mortised pine leg frames bolted to braces, a 3 1/2 ft top of one 2 x 12 in plank with a back board, a tool rack behind, and a wooden vise on an iron bench screw.
Source: C. E. McKinney, Jr., 'Homemade Workbench', The Boy Mechanic, Book 1 (1913), pp. 442-443. Picture: Figs. 1-3 of the book.
Orta
Unknown
Talimatlar
1
1
Make the two leg frames
Make the two leg frames
Cut four 2 x 4 in pine legs 23 in long with a tenon on each end 1/2 in thick, 3 1/2 in wide and 1 1/2 in long (Fig. 1, A and B). Cut four crosspieces of the same stock 20 in long, mortised in the narrow edge 1 1/4 in from each end, and slope their corners from the leg out to the middle. Fit each pair of legs to a pair of crosspieces to make the two supports.
Bu adım için malzemeler:
 Çam kereste1 2 x 4 in: legs, crosspieces
Gerekli aletler:
 El Testeresi
 Zıvana yuvası kalemi
 Çekiç
2
2
Brace them together
Brace them together
Join the supports with two 2 x 4 in braces 24 in long, ends sawn square. Bore through each leg and 4 in into the centre of each brace end, bore an intersecting hole on the back of each brace for the nut, and draw each joint tight with a 3/8 x 6 in bolt (Fig. 2, J). A cross brace on the back stops rocking when planing.
Bu adım için malzemeler:
Çam kereste1 2 x 4 in: braces Kare boyunlu yuvarlak başlı cıvata4 3/8 x 6 in
Gerekli aletler:
El Testeresi Kol matkabı ve ucu
 Kurbağacık anahtar
3
3
Fit the plank top
Fit the plank top
Make the main top M from one 2 x 12 in plank 3 1/2 ft long. Rabbet its back edge 1/2 in to take a back board N of the same length, 8 1/2 in wide and 7/8 in thick. Screw the top to the top crosspieces with long screws.
Bu adım için malzemeler:
 Sert ağaç kalası1 2 x 12 in, 3 1/2 ft
 Çam tahta1 back board
 Ahşap vidalar1 long
Gerekli aletler:
El Testeresi Blok rende
 Düz tornavida
4
4
Add the tool rack
Add the tool rack
Nail a board E 10 in wide to the back of the bench and fasten a 2 1/2 in board F on top of it at right angles; both 7/8 in thick and 3 1/2 ft long. Bore holes or cut notches in F to hold tools.
Bu adım için malzemeler:
Çam tahta2 7/8 in, 3 1/2 ft Çiviler1 adet
Gerekli aletler:
Kol matkabı ve ucuEl TesteresiÇekiç5
5
Fit the vise
Fit the vise
Fasten an iron bench screw in a 2 x 6 in block 12 in long. Mortise two guide rails 7/8 x 1 1/2 in and 20 in long into the block; they slide in mortises in a 2 x 4 piece L bolted under the top, which holds the bench-screw nut between the two mortises. Nail L to a top crosspiece and to a 2 x 4 piece P bolted under the top at the end (Fig. 3).
Bu adım için malzemeler:
Çam kereste1 2 x 6 block, 2 x 4 pieces, guide rails Oymacılık tezgâh vidası1 adetKare boyunlu yuvarlak başlı cıvata1 for L and PÇiviler1 adet
Gerekli aletler:
El TesteresiZıvana yuvası kalemiKol matkabı ve ucuKurbağacık anahtarÇekiçMalzemeler
7- 1 2 x 6 block, 2 x 4 pieces, guide railsYer Tutucu
- 1 for L and PYer Tutucu
- 1 2 x 12 in, 3 1/2 ftYer Tutucu
- 2 7/8 in, 3 1/2 ftYer Tutucu
- 1 longYer Tutucu
- 2 adetYer Tutucu
- 1 adetYer Tutucu
Bu planla yapılan

CC0 Kamu Malı
Bu plan CC0 lisansıyla yayınlanmıştır. İzin almadan kopyalayabilir, değiştirebilir, dağıtabilir ve herhangi bir amaçla kullanabilirsiniz.
Planı üzerinden ürün satın alarak Maker'ı destekleyin, böylece Maker Komisyonu Satıcılar tarafından belirlenen komisyonu kazanırlar veya bu Planın yeni bir versiyonunu oluşturun ve gelir paylaşımı için kendi Planınıza bağlantı olarak ekleyin.