Співпраця
МИСТЕЦТВО
КРАСА ТА ЗДОРОВ'Я
РЕМЕСЛО
КУЛЬТУРА ТА ІСТОРІЯ
РОЗВАГИ
СЕРЕДОВИЩЕ
ЇЖА ТА НАПІЇ
ЗБОРНА ІНЖЕНЕРІЯ
НАУК
СПОРТ
ТЕХНОЛОГІЯ
НОСИМО
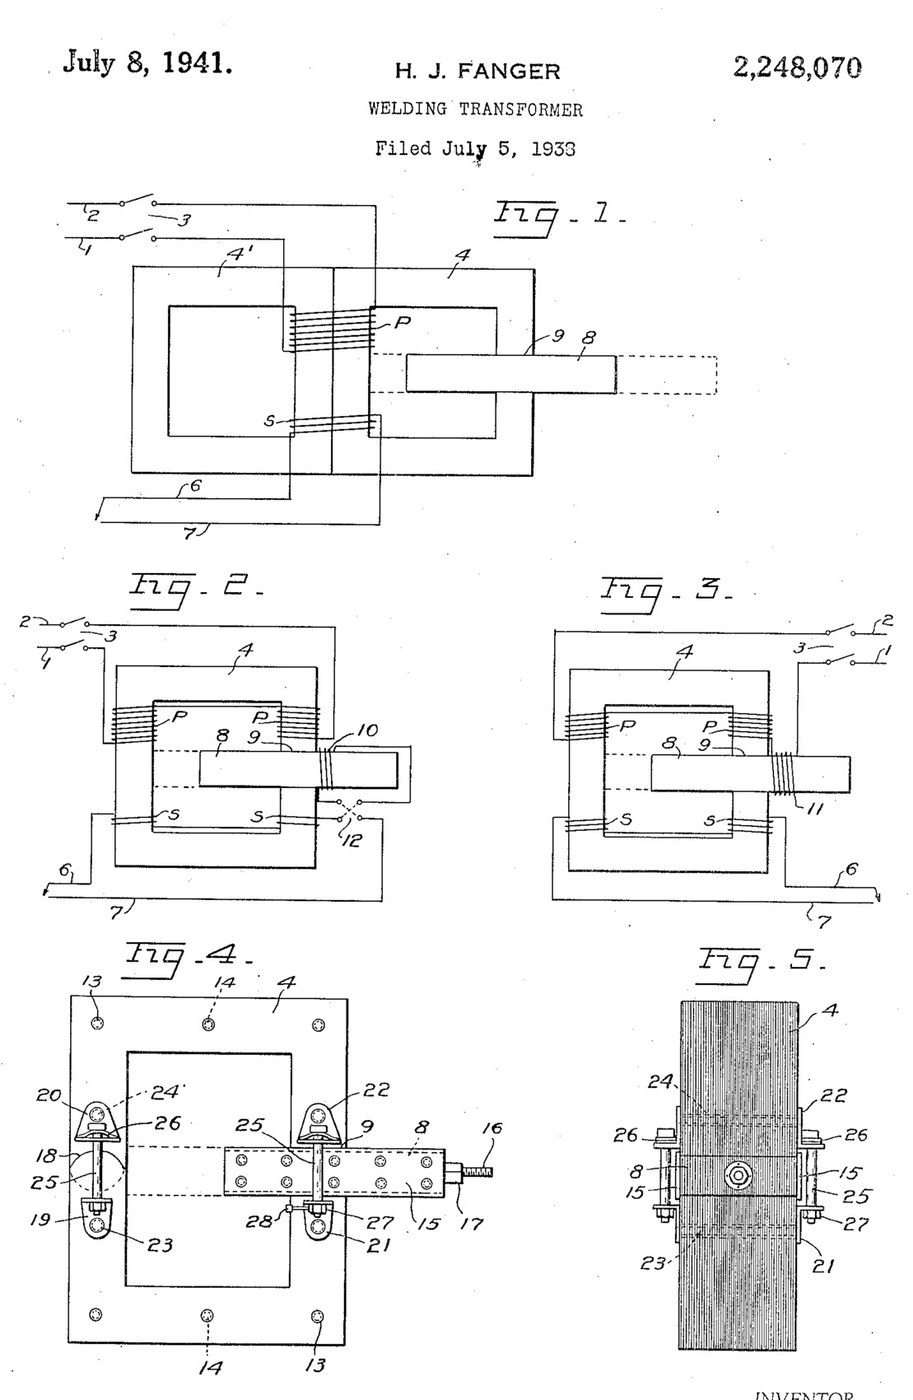


Arc Welder: AC Transformer with a Sliding Shunt Core (Fanger, US 2,248,070)
An AC arc welder is a step-down transformer whose current can be turned up and down. H. J. Fanger (US 2,248,070, 1941) cuts a gap through one leg of a laminated ring core and slides a laminated iron shunt bar through it: pushed in, it carries flux past the secondary and lowers the welding current; pulled out, the current rises.
For arc welding he gives about 60 to 68 volts open circuit, 15 to 200 amps, dropping to 38 or 40 volts at the working arc, with a small coil on the shunt bar in series with the secondary.
Source: H. J. Fanger, "Welding Transformer", US Patent 2,248,070 (filed 1938, granted 1941). Picture: its Figs. 1-5.
Просунутий
Unknown
Інструкції
1
1
Read Fanger
Read Fanger
"With arc welding, infinite control of the volume of the secondary current, between maximum and minimum is obtained by adjustment of the slidable shunt core without altering the welding characteristics of the current, also better ignition of the arc is had at a given voltage, and greater stability of the arc".
2
2
Stack the core
Stack the core
Build a single rectangular ring core of insulated iron laminations, held together with brass (or insulated) bolts or rivets in insulating tubes (Fig. 4). Cut a gap straight through one leg, accurately machined and finished, and make a circular joint through the opposite leg with the segments staggered to overlap in successive laminations. Core size, lamination iron and thickness are not given (ours: the tools).
Матеріали для цього кроку:
 Невідомий метал1 iron laminations
 Набір шестигранних болтів1 brass bolts
 Невідомий ізоляційний матеріал1 insulating tubes
Необхідні інструменти ({count})
 Ножиці по металу
 Свердлильний верстат
 Набір свердел
 Напилки (ручний напилок)
 Невідомі розміри
3
3
Make the shunt bar
Make the shunt bar
Make the sliding shunt section of the same laminated iron, a snug fit in the gap with its laminations edge-to-edge with the core's, and long enough to fill the gap at every position. Sheath both sides with a slightly wider plate of Bakelite that overlaps the edges of the gap to guide it. Fit a threaded rod on its outer end, working in a nut fixed to the section (or move it by hand, with calibration marks along one edge).
Матеріали для цього кроку:
Невідомий метал1 shunt laminations Бакеліт2 side platesНабір шестигранних болтів1 brass bolts
 Шпилька різьбова1 штука
 Шестигранна гайка1 штука
Необхідні інструменти ({count})
Свердлильний верстатНабір сверделНапилки (ручний напилок)4
4
Wind the coils
Wind the coils
Wind the primary and secondary windings on both legs of the core (Fig. 2), in series or in parallel to suit the line voltage and the current wanted. Wind a small auxiliary coil round the shunt bar's path, fixed so the bar slides through it, and connect it in series with the secondary through a reversing switch (some jobs weld better with the current through it one way). Turns and wire sizes are not given.
Матеріали для цього кроку:
 Мідний дріт1 insulation and size not given
Необхідні інструменти ({count})
Невідомі розміри5
5
Spring the joints
Spring the joints
On both sides of the gap and of the circular joint fit pairs of confronting angle plates, held by brass bolts in insulating sleeves and drawn together by spring bolts whose heads rest on slightly arched spring plates, so the joints close snugly on the sliding bar. A small lever on the gap-joint nut gives a half turn to release the bar for moving. The angle-plate material is not given.
Матеріали для цього кроку:
 Невідомий матеріал4 angle platesНабір шестигранних болтів1 brass and spring boltsНевідомий ізоляційний матеріал1 sleeves
 Смуга пружинної сталі1 arched spring platesШестигранна гайка4 штук
Необхідні інструменти ({count})
Свердлильний верстатНабір свердел Розвідний ключ
6
6
Connect and set
Connect and set
Connect the primary to the line through a line switch, and the secondary leads to the electrode holder and the work. Pull the shunt bar out for more current, push it in for less: Fanger gives about 60-68 volts open circuit and 15-200 amps, dropping to 38-40 volts at the arc.
Матеріали для цього кроку:
 Вимикач живлення1 line switch
Необхідні інструменти ({count})
Розвідний ключМатеріали
10- 1 shunt laminationsЗаповнювач
- 1 brass and spring boltsЗаповнювач
- 1 sleevesЗаповнювач
- 2 side platesЗаповнювач
- 1 штукаЗаповнювач
- 5 штукЗаповнювач
- 1 insulation and size not givenЗаповнювач
- 4 angle platesЗаповнювач
- 1 arched spring platesЗаповнювач
- 1 line switchЗаповнювач
За цим кресленням виготовляють

CC0 Суспільне надбання
Це креслення випущено під ліцензією CC0. Ви можете вільно копіювати, змінювати, поширювати та використовувати цю роботу для будь-яких цілей без запиту дозволу.
Підтримайте мейкера, купуючи продукти через його креслення, де він отримує Комісію мейкера встановлену вендорами, або створіть нову ітерацію цього креслення та включіть його як зв'язок у власне креслення для розподілу доходу.