Співпраця
МИСТЕЦТВО
КРАСА ТА ЗДОРОВ'Я
РЕМЕСЛО
КУЛЬТУРА ТА ІСТОРІЯ
РОЗВАГИ
СЕРЕДОВИЩЕ
ЇЖА ТА НАПІЇ
ЗБОРНА ІНЖЕНЕРІЯ
НАУК
СПОРТ
ТЕХНОЛОГІЯ
НОСИМО


Pigeon House for 20 Birds: Swastika Compartments, Sliding Shutters and a Gable Roof on a Post (Boy Mechanic, 1919)
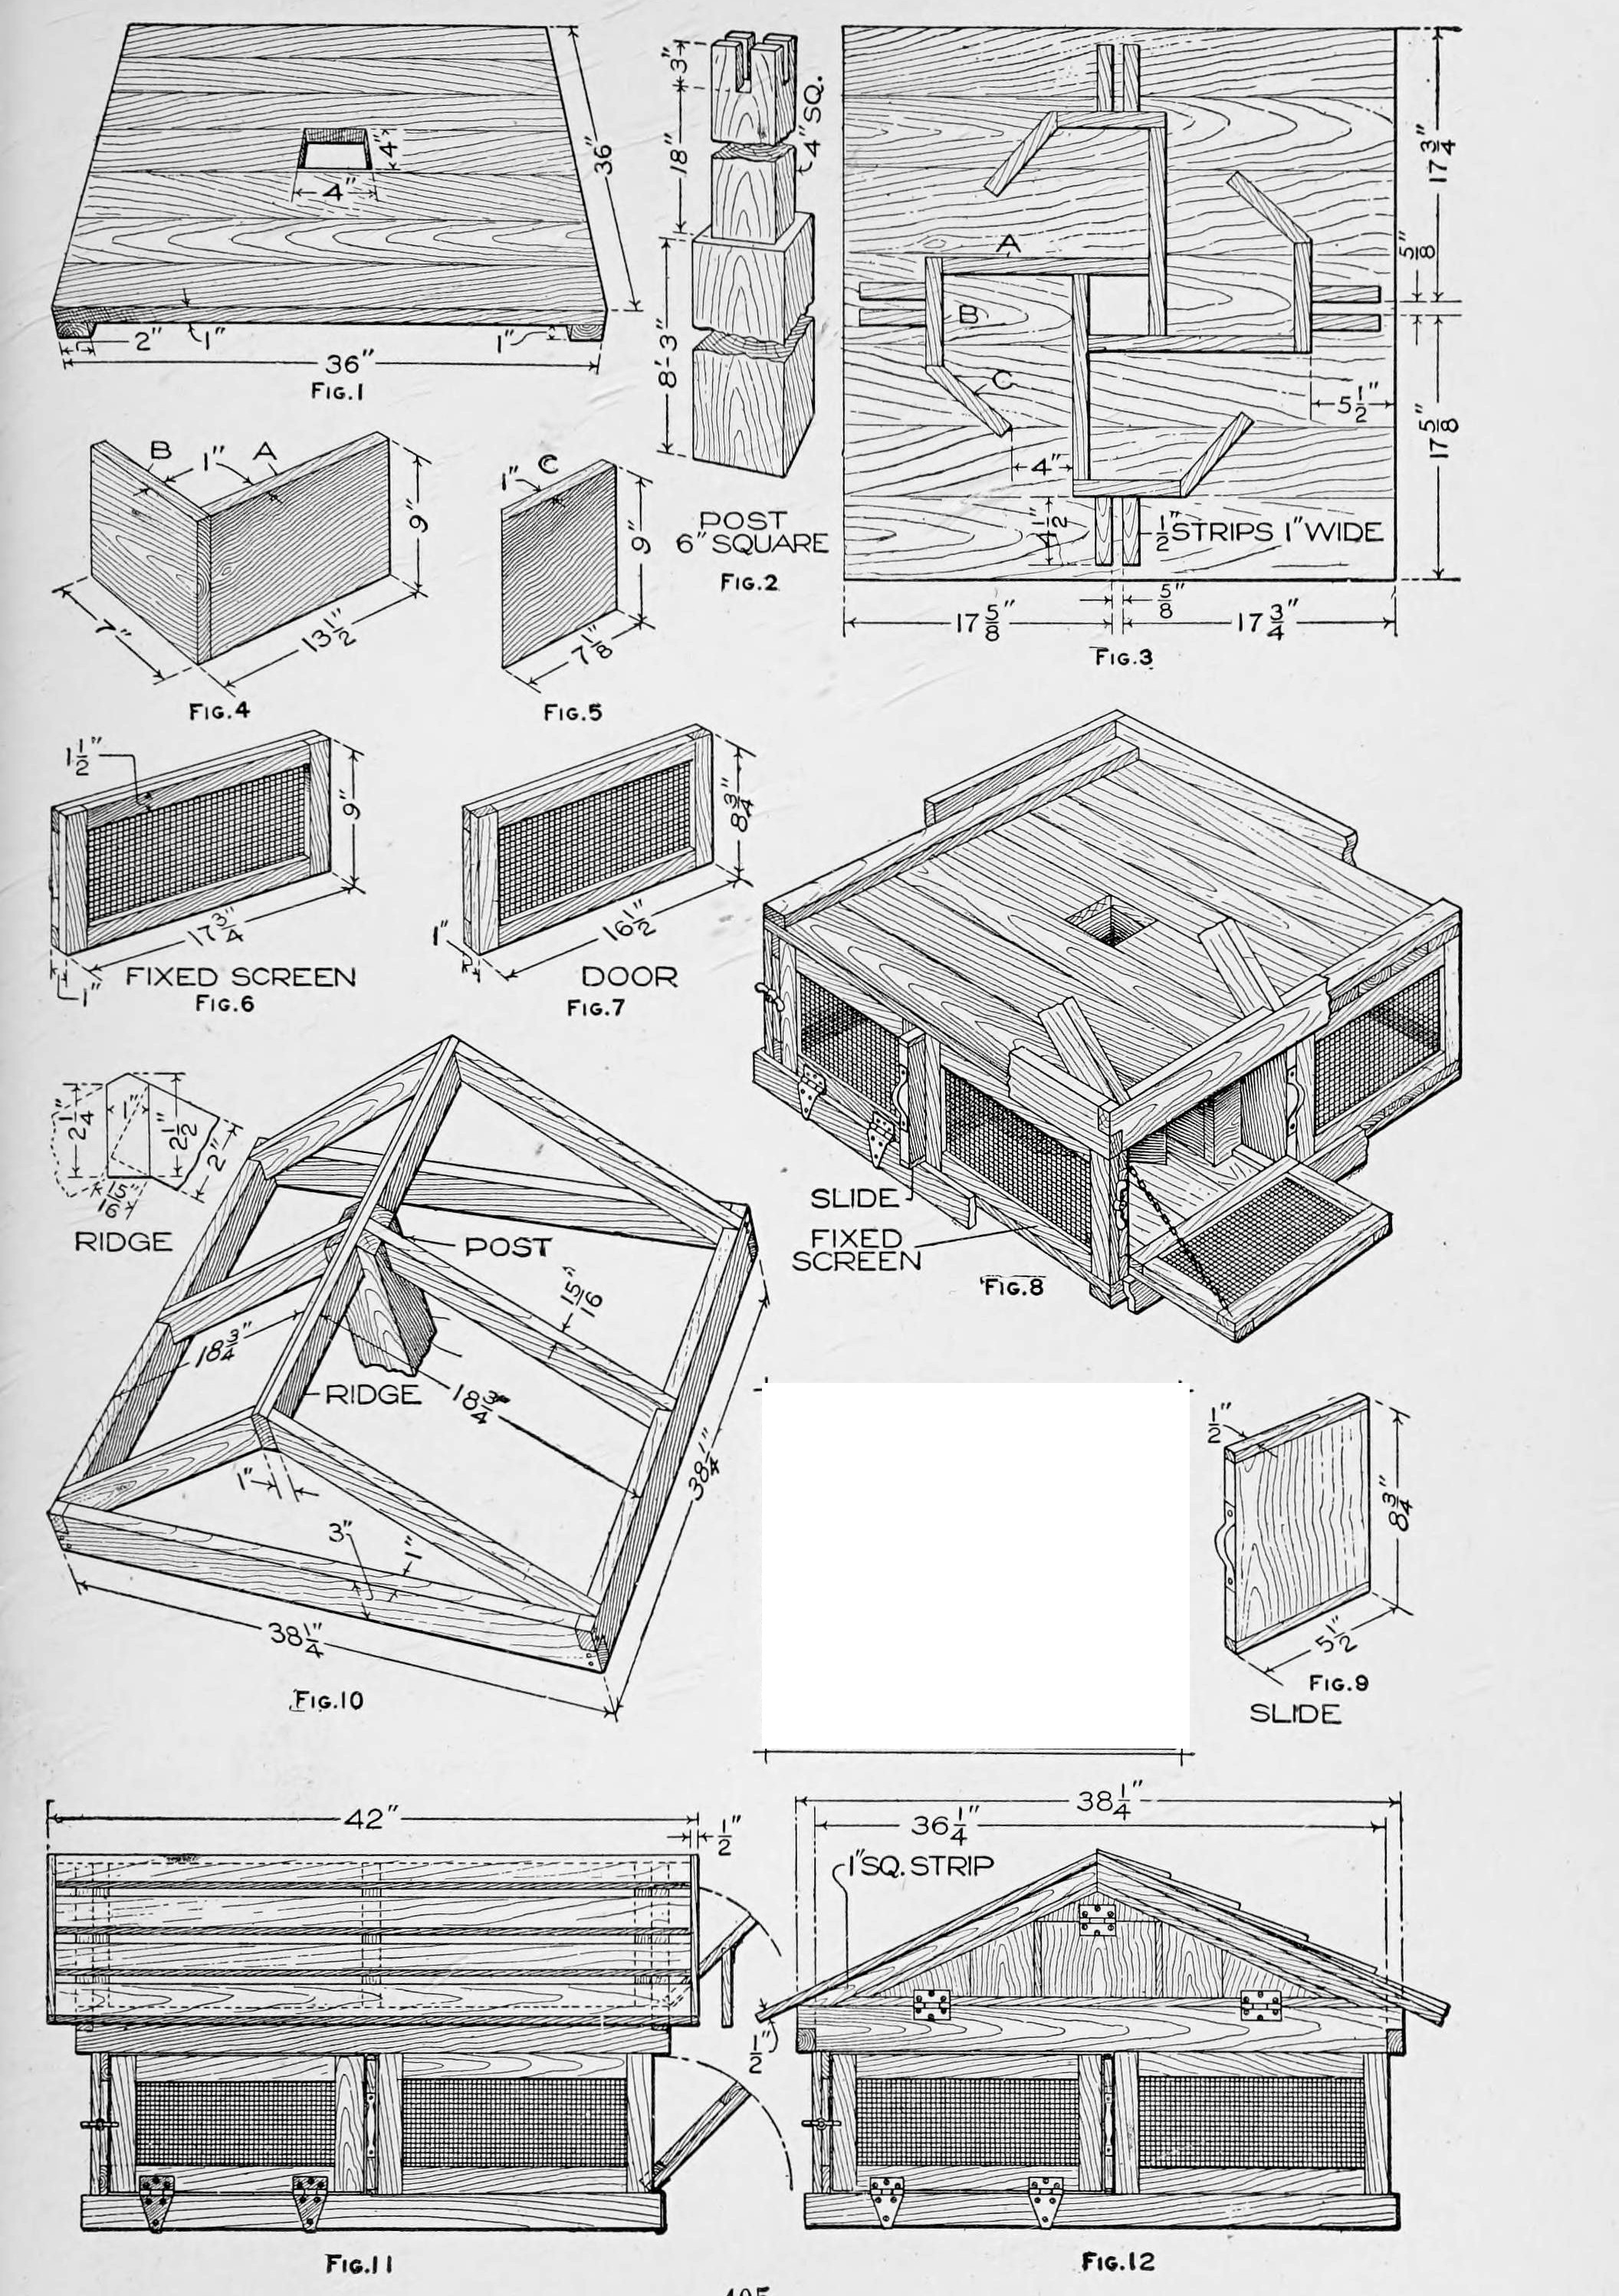
Robert Baker's pigeon house from The Boy Mechanic, Book 3 (1919), mostly from box wood: a 36 in square lower story on a 6 in post, divided into four compartments by pinwheel (swastika-pattern) partitions, with wire-mesh screens, hinged doors and sliding shutters, under a removable framed and shingled gable roof. It houses 20 pigeons.
Середній
Several days
Інструкції
1
1
Parts in centimetres
Parts in centimetres
Завантаження блокнота Jupyter…
2
2
Read The Boy Mechanic, Book 3
Read The Boy Mechanic, Book 3
"The house described will accommodate 20 pigeons, and additional stories of the same type may be added to provide for more."
3
3
Make the floor, ceiling and post
Make the floor, ceiling and post
Make floor and ceiling alike, 36 in square of boards on cleats screwed on (or nails clinched), each with an accurate 4 in square centre hole (Fig. 1). Cut the post 6 in square, about 9 ft long, with a 4 in square shoulder at the top to fit the holes (Fig. 2); cut the notches for the ridge and centre rafters only when the roof boards are ready.
Матеріали для цього кроку:
 Соснова дошка6 штук
 Сосновий пиломатеріал1 штука
 Шурупи по дереву1 штука
Необхідні інструменти ({count})
 Ручна пилка
 Стамески
 Коловорот із перкою
 Лобзикова пилка
 Столярний косинець
 Рулетка
4
4
Build the compartments
Build the compartments
Make four each of the pieces A, B and C, 9 in high of 1 in stuff, exactly to Figs. 4 and 5 (A/B legs 13-1/2 and 7 in, C 7-1/8 in). Mark 4 in from one end of each A, pair the pieces with the line even with the end of the other and nail, then fit the pairs into a 4 in square at the centre. Fit each C to a B at an angle, trim the corners, nail, and nail B-C to the ends of A to complete the pattern (Fig. 3). Fix it over the floor hole with nails or screws through the floor, and nail two strips exactly 4-1/2 in long beside each opening to guide the slides. Fix the ceiling on top, cleats up, with its strips the same way.
Матеріали для цього кроку:
Соснова дошка3 штук Цвяхи1 штука
Необхідні інструменти ({count})
Ручна пилка МолотокСтолярний косинець
 Олівець
5
5
Make screens, doors and slides
Make screens, doors and slides
Build fixed screens (17-3/4 by 9 in) and doors (16-1/2 by 8-3/4 in) of 1/2 in wood with 1/2 in square-mesh wire grating fixed between the pieces; screens stand 1/4 in higher than the doors and are fastened between ceiling and floor as braces. Hang the doors on combination strap hinges bent over the baseboard (or butts covered by it) with catches and chains; nail on 2-1/2 in baseboards. Make each slide of three pieces so it will not warp: a 7-3/4 in main piece with 1/2 in square strips on the ends (8-3/4 by 5-1/2 in), with a band-iron handle drilled for screws.
Матеріали для цього кроку:
Соснова дошка2 штук Оцинкована дротяна сітка1 штука
 Залізна накладна завіса4 штук
 Гачок і петля4 штук
 Тонкий ланцюжок1 штука
 Смуга з маловуглецевої сталі1 штукаЦвяхи1 штукаШурупи по дереву1 штука
Необхідні інструменти ({count})
Ручна пилкаМолоток Ножиці
 Ручний дриль
 Слюсарні лещата
 Викрутка пласка
6
6
Frame and cover the roof
Frame and cover the roof
Build the plate of pieces 3 in wide, 1/4 in larger inside than the ceiling so it fits snugly over it, with halved corners nailed both ways (Fig. 10). Lay out the end rafters full size on paper or a board, fit them first, then the others and the ridge. Nail rough boards 1/2 in apart, projecting 2 in past the plate ends, with a 1/2 in strip over their ends, and shingle or cover with tar paper. Nail a 1 in strip under each roof end and fit the gables, one with a door, the other with a screened opening the same size.
Матеріали для цього кроку:
Соснова дошка4 штук Дерев'яна ґонта1 штукаЦвяхи1 штукаОцинкована дротяна сітка1 штукаЗалізна накладна завіса2 штук
Необхідні інструменти ({count})
Ручна пилкаМолотокСтолярний косинецьОлівець7
7
Set it up
Set it up
Set the post, put the lower story over its shoulder, cut the post-top notches to the ridge and centre rafters and seat the roof story on the lower one. The roof story lifts off for cleaning; for added stories put a post at each corner.
Необхідні інструменти ({count})
 ЛопатаРучна пилкаСтамески
8
8
Troubleshooting
Troubleshooting
Pigeon house troubleshooting.
Flow
Loading...
9
9
History and honest limits
History and honest limits
From "A Pigeon House" by Robert Baker, in **The Boy Mechanic, Book 3**, Popular Mechanics, 1919 (Project Gutenberg 71856; checked on the archive.org scan boymechanic0003unse, pp. 403-405). The text calls the post about 9 ft; Fig. 2 marks 8 ft 3 in, 18 in and 3 in. The tools and metric figures are ours.
Матеріали
10- 6 штукЗаповнювач
- 1 штукаЗаповнювач
- 2 штукЗаповнювач
- 3 штукЗаповнювач
- 2 штукЗаповнювач
- 4 штукЗаповнювач
- 4 штукЗаповнювач
- 1 штукаЗаповнювач
- 1 штукаЗаповнювач
- 1 штукаЗаповнювач
Необхідні інструменти
13- Заповнювач
- Заповнювач
- Заповнювач
- Заповнювач
- Заповнювач
- 1 vendor sell this, none ship to you yetЗаповнювач
- Заповнювач
- 1 vendor sell this, none ship to you yetЗаповнювач
- Заповнювач
- Заповнювач
- Заповнювач
- Заповнювач
- Заповнювач
За цим кресленням виготовляють
Пов'язані креслення
Ці креслення діляться знаннями — техніки, матеріали або принципи
CC0 Суспільне надбання
Це креслення випущено під ліцензією CC0. Ви можете вільно копіювати, змінювати, поширювати та використовувати цю роботу для будь-яких цілей без запиту дозволу.
Підтримайте мейкера, купуючи продукти через його креслення, де він отримує Комісію мейкера встановлену вендорами, або створіть нову ітерацію цього креслення та включіть його як зв'язок у власне креслення для розподілу доходу.