
Співпраця
МИСТЕЦТВО
КРАСА ТА ЗДОРОВ'Я
РЕМЕСЛО
КУЛЬТУРА ТА ІСТОРІЯ
РОЗВАГИ
СЕРЕДОВИЩЕ
ЇЖА ТА НАПІЇ
ЗБОРНА ІНЖЕНЕРІЯ
НАУК
СПОРТ
ТЕХНОЛОГІЯ
НОСИМО
Four-Passenger Coasting Bobsled: Iron-Shod Ash Runners, Hinged Rear Sled and Hoop Steering Wheel (Boy Mechanic, 1915)
Woody

Створено

Woody

13. листопад 2026NO
6
0
0
0
0

Four-Passenger Coasting Bobsled: Iron-Shod Ash Runners, Hinged Rear Sled and Hoop Steering Wheel (Boy Mechanic, 1915)

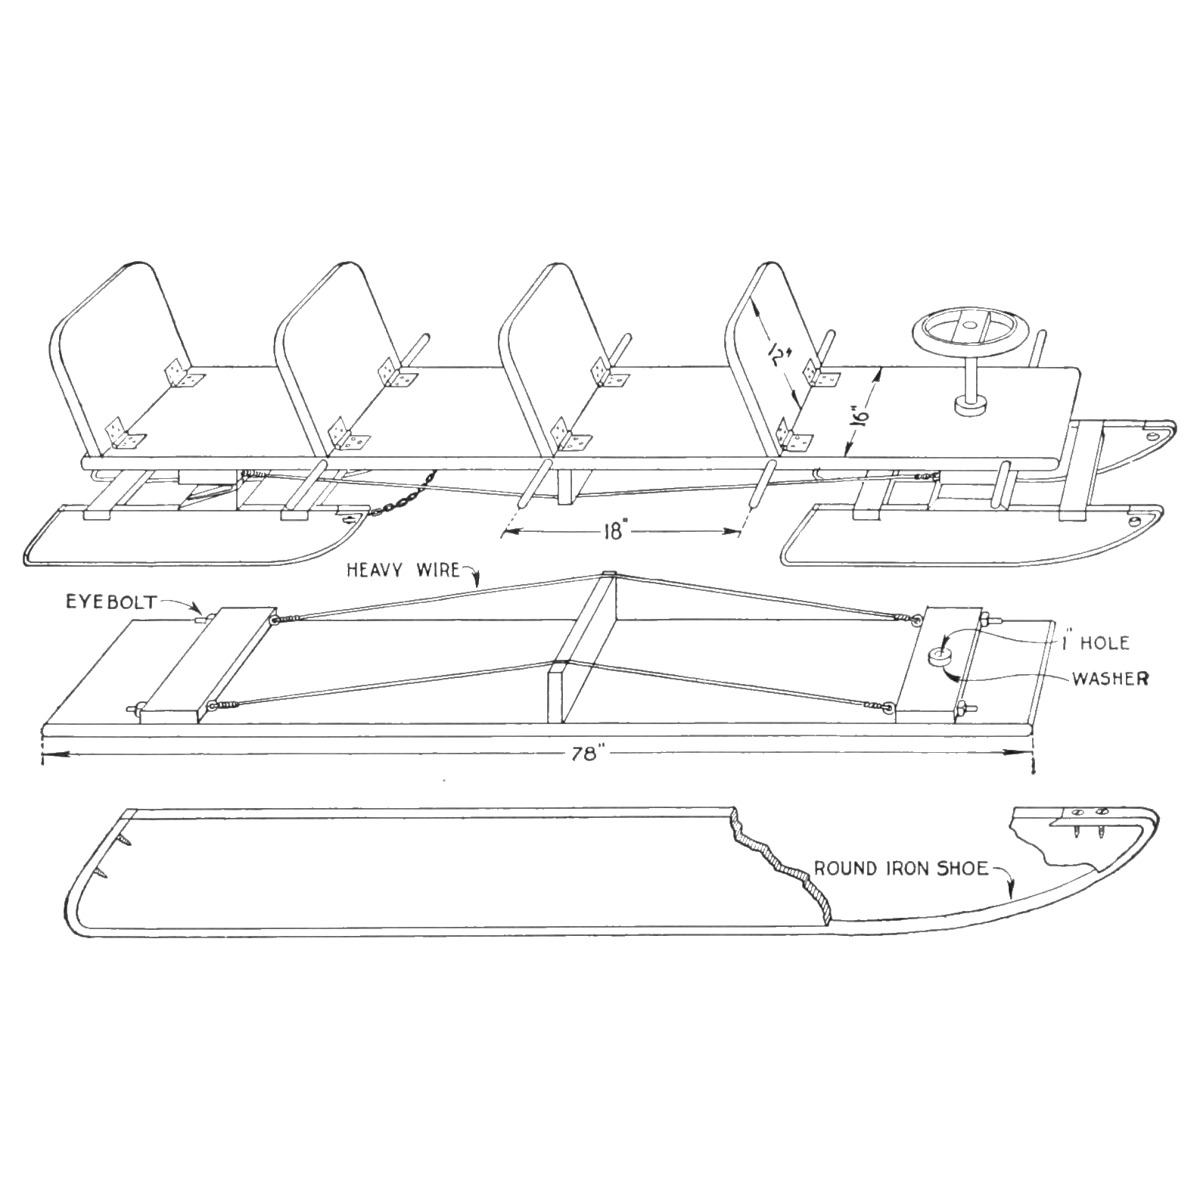
R. H. Allen's four-passenger coasting bob from The Boy Mechanic, Book 2 (1915): a 6-1/2 ft top board with four hinged seat backs, carried on two short sleds with ash runners shod in 5/8 in round iron. The rear sled rocks on a wedge and hinges to follow the ground; the front sled steers by a broom-handle post and a wheel made from a nail-keg hoop. Every size is his.
Середній
About 3 days

Інструкції

1

His list of materials in centimetres

Завантаження блокнота Jupyter…
2

Read The Boy Mechanic, Book 2

"Any wood may be used for the sled, except for the runners, which should be made of ash." His list of materials: 1 top 6-1/2 ft x 16 in x 1-1/4 in; 4 runners 22 x 4 x 1 in; 4 crosspieces 16 x 3 x 1 in; 3 pieces 16 x 5 x 2 in; 1 piece 16 x 5 x 1 in; 1 shore 16 x 3 x 1 in; 4 seat backs 12 x 16 x 1 in; 1 dowel 3 ft x 1 in; 4 rods 5/8 in x 30 in; 4 eyebolts 1/2 x 6 in; 3 hinges 5 in strap; 8 hinges 3 in strap.
3

Shape and shoe the runners

Cut one ash runner to shape and use it as the pattern for the other three. Cut a groove about 1/4 in deep along the under edge to take the curve of a 5/8 in round iron rod. Bend each rod to fit in the groove, up the back of the runner and over the top at the front; flatten the ends and drill two holes in each for wood screws (a blacksmith can flatten them, he says). Screw the irons on.

Матеріали для цього кроку:

Дошка з твердої деревиниДошка з твердої деревини1 штука
Круглий залізний прутокКруглий залізний пруток4 штук
Шурупи по деревуШурупи по дереву1 штука

Необхідні інструменти ({count})

Ручна пилкаРучна пилка

Лобзикова пилкаЛобзикова пилка
СтамескиСтамески
Вугільний горнВугільний горн
КовадлоКовадло
Ковальський молотКовальський молот
Слюсарні лещатаСлюсарні лещата
Ручний дрильРучний дриль
ОлівецьОлівець
4

Build the two sleds

Notch the top edges of each pair of runners for the 16 x 3 in crosspieces, near the ends, so the crosspieces lie flush with the runner tops and the notches of each pair line up. Fit them snugly, fasten with long, slim wood screws, and stiffen each joint inside with a small metal brace.

Матеріали для цього кроку:

Соснова дошкаСоснова дошка1 штука
Шурупи по деревуШурупи по дереву1 штука
Кутова пластинаКутова пластина8 штук

Необхідні інструменти ({count})

Ручна пилкаРучна пилка
СтамескиСтамески
Ручний дрильРучний дриль
5

Make the rocking rear joint

Cut a heavy 2 x 5 in crosspiece sloping across its width, from 2 in thick at one edge to a feather edge at the other. Fix the three large strap hinges to the sloping face, and fasten the piece solidly on the rear sled's runners with its centre 8 in from their front ends. This lets the rear sled rock but not turn sideways.

Матеріали для цього кроку:

Соснова дошкаСоснова дошка1 штука
Залізна накладна завісаЗалізна накладна завіса3 штук
Шурупи по деревуШурупи по дереву1 штука

Необхідні інструменти ({count})

Ручна пилкаРучна пилка
Ручний рубанокРучний рубанок
Ручний дрильРучний дриль
6

Mount the front sled crosspiece

Fasten the supporting crosspiece on top of the front sled's runners with its centre 11 in from their front ends.

Матеріали для цього кроку:

Соснова дошкаСоснова дошка1 штука
Шурупи по деревуШурупи по дереву1 штука

Необхідні інструменти ({count})

Ручний дрильРучний дриль

РулеткаРулетка
7

Brace the top board

Round both ends of the top board and plane it smooth. Underneath, fit two crosspieces, each with two 1/2 in holes bored through its width near the ends for the eyebolts: one with its centre 12 in from the rear end, the other 8 in from the front. Screw them on. Set the shore in the centre of the board, run wires over it between the eyebolts, and draw the eyebolts up until the wire is taut over the shore, so the long board cannot sag.

Матеріали для цього кроку:

Соснова дошкаСоснова дошка1 штука
Рим-болтРим-болт4 штук
Залізний дрітЗалізний дріт1 штука
Шурупи по деревуШурупи по дереву1 штука

Необхідні інструменти ({count})

Ручна пилкаРучна пилка
Ручний рубанокРучний рубанок
Коловорот із перкоюКоловорот із перкою
РулеткаРулетка
8

Fit the seat backs and foot rests

Round the top corners of the four backs and cut the bottom ends at a slight angle for a slant. Hinge them to the top board with the small strap hinges every 18 in, starting at the rear. Bore 1 in holes about 1 in deep in the edges of the top board every 18 in, beginning about 5 in from the front, and drive in pins 4 in long cut from the dowel, as foot rests.

Матеріали для цього кроку:

Соснова дошкаСоснова дошка1 штука
Залізна накладна завісаЗалізна накладна завіса8 штук
Шканти з твердої деревиниШканти з твердої деревини1 штука
Шурупи по деревуШурупи по дереву1 штука

Необхідні інструменти ({count})

Ручна пилкаРучна пилка
Коловорот із перкоюКоловорот із перкою
РулеткаРулетка
9

Make the steering

Cut a broom handle to 18 in and fasten one end in a hole bored centrally in the 5 in crosspiece of the front sled. Bore a hole in the top board through the centre of the crosspiece underneath; put two metal washers on the stick and run it up through the hole, then fasten a hardwood collar to it just above the board so the top cannot lift off the sled. For the wheel, fasten a piece of wood across a nail-keg hoop, cover the hoop with garden hose and wrap it with twine; bore the centre of the crosspiece to fit the broom handle and screw it on.

Матеріали для цього кроку:

МітлаМітла1 штука
Плоска шайбаПлоска шайба2 штук
Дошка з твердої деревиниДошка з твердої деревини1 штука
Залізний обручЗалізний обруч1 штука
Гумовий шлангГумовий шланг1 штука
Джутовий шпагатДжутовий шпагат1 штука
Шурупи по деревуШурупи по дереву1 штука

Необхідні інструменти ({count})

Ручна пилкаРучна пилка
Коловорот із перкоюКоловорот із перкою
Ручний дрильРучний дриль
10

Join the sleds and fit the ropes

Fasten the rear sled to the top board with screws through the free wings of the hinges into the crosspiece. Bore holes in the front ends of all runners and attach a chain or rope: the rear one's loop to the underside of the top board, the front one for drawing the sled.

Матеріали для цього кроку:

Шурупи по деревуШурупи по дереву1 штука
Залізний ланцюгЗалізний ланцюг1 штука

Необхідні інструменти ({count})

Коловорот із перкоюКоловорот із перкою
Ручний дрильРучний дриль
11

Troubleshooting

Bobsled troubleshooting.

Flow

Loading...
12

History and honest limits

From "Four-Passenger Coasting Bobsled" by R. H. Allen, in **The Boy Mechanic, Book 2**, Popular Mechanics, 1915 (Project Gutenberg 44585; checked on the archive.org scan boymechanicbook200chic2, pp. 24-26). The runner shape comes from his drawing, not from figures. The scan calls the steering collar a hardwood collar; the Gutenberg text drops "hardwood". The tools and metric figures are ours.

Матеріали

15

Необхідні інструменти

12

За цим кресленням виготовляють

Пов'язані креслення

Ці креслення діляться знаннями — техніки, матеріали або принципи
CC0 Суспільне надбання

Це креслення випущено під ліцензією CC0. Ви можете вільно копіювати, змінювати, поширювати та використовувати цю роботу для будь-яких цілей без запиту дозволу.

Підтримайте мейкера, купуючи продукти через його креслення, де він отримує Комісію мейкера встановлену вендорами, або створіть нову ітерацію цього креслення та включіть його як зв'язок у власне креслення для розподілу доходу.

Обговорення

(0)

Увійти щоб приєднатися до обговорення

Завантаження коментарів...