Співпраця
МИСТЕЦТВО
КРАСА ТА ЗДОРОВ'Я
РЕМЕСЛО
КУЛЬТУРА ТА ІСТОРІЯ
РОЗВАГИ
СЕРЕДОВИЩЕ
ЇЖА ТА НАПІЇ
ЗБОРНА ІНЖЕНЕРІЯ
НАУК
СПОРТ
ТЕХНОЛОГІЯ
НОСИМО
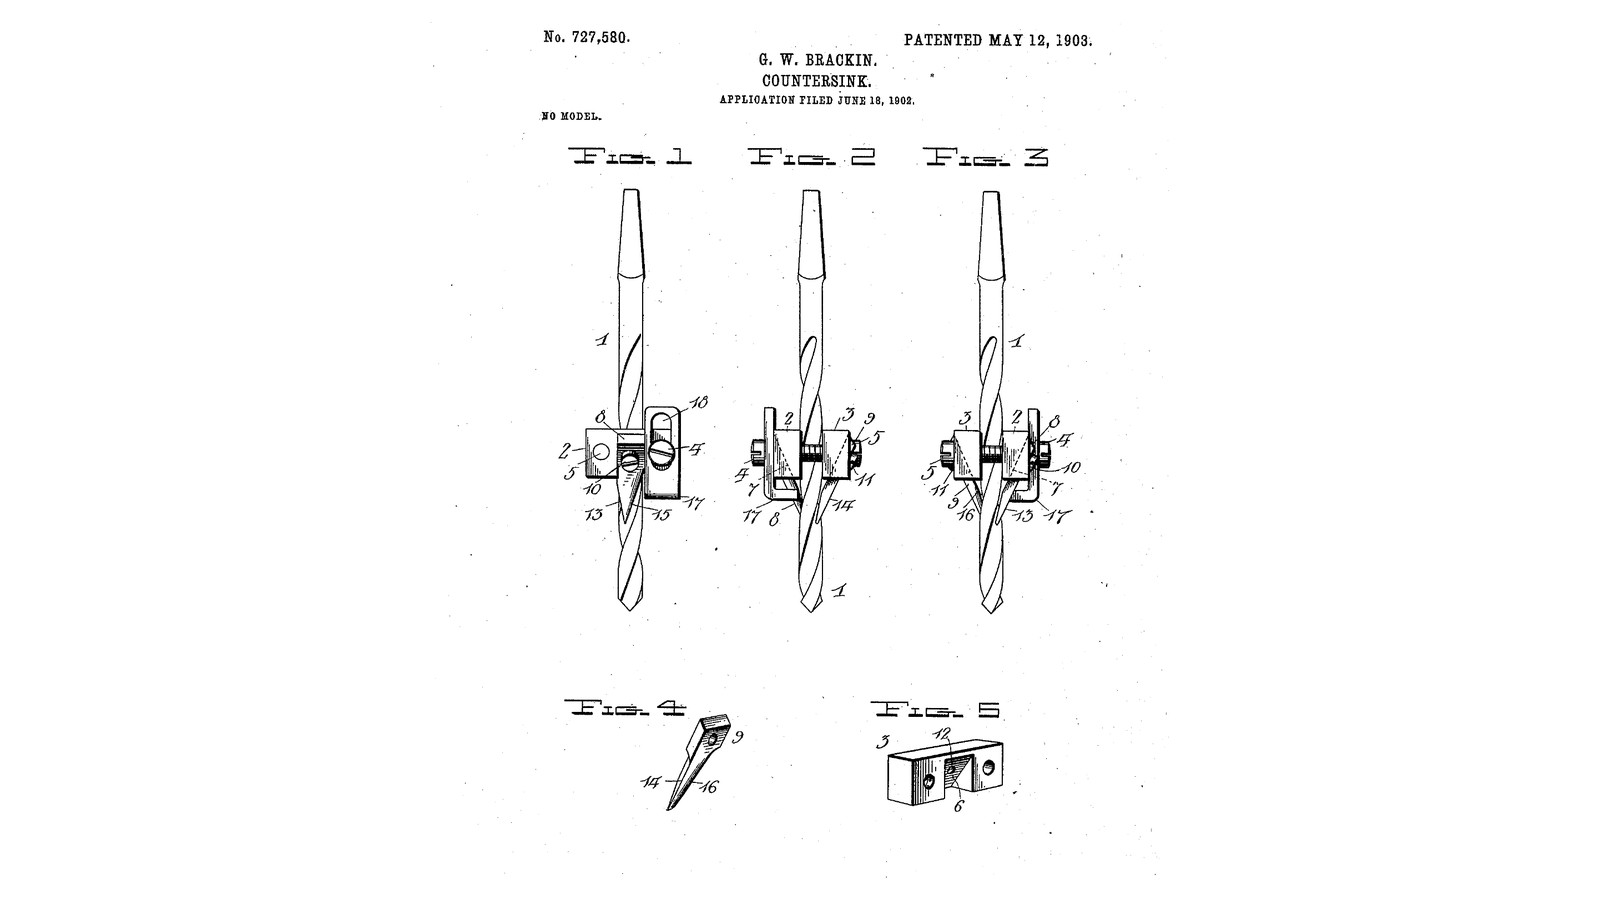


Clamp-On Countersink: Two Blocks Screwed Round Any Drill, Twin Cutters Countersink the Hole as It Is Bored (Brackin, 1903)
George W. Brackin of Philadelphia received US 727,580, dated 12 May 1903, for a countersink that clamps onto a drill or auger bit. Two blocks are screwed together across the bit at any point along it. A twin cutter is screwed into an inclined seat in each block, its point reaching into the bit's flutes. As the bit bores, the cutters arrive and cut the cone for the screw head without taking the bit out. A slotted stop sets how deep it goes, so it gauges the hole too.
We make three for 4, 5 and 6 mm drills. The patent gives no sizes; every size here is ours.
Середній
About 1 day
Інструкції
1
1
Setting it on the bit
Setting it on the bit
Завантаження блокнота Jupyter…
2
2
Read US 727,580
Read US 727,580
"From Figs. 2 and 3 it will be observed that the lower ends of the inclined cutters project slightly into the twists or helical channels of the drill, and this fact permits the cutters to enter the hole bored and then commence cutting away the edge of the hole as the tool is rotated."
3
3
Clamping blocks 2 and 3
Clamping blocks 2 and 3
For each attachment cut two blocks 40 x 12 x 10 mm from square bar. In each, 6 mm from one end drill a 4.5 mm plain hole and 6 mm from the other end drill 3.3 mm and tap M4, through the 12 mm face, so the two blocks screw together with the plain hole of one over the tapped hole of the other. Across the middle of each block's outer face file a seat 6 mm wide, sloping down and in at 45 degrees, and drill and tap M4 in it for the cutter's screw.
Матеріали для цього кроку:
 Квадратний пруток із м'якої сталі1 штука
Необхідні інструменти ({count})
 Ножівка по металу
 Слюсарні лещата
 Рисувалка
 Кернер
 Свердлильний верстат
 Набір свердел
 Набір мітчиків і плашок
 Коловорот для мітчиків
 Набір напилків
 Транспортир
 Цифровий штангенциркуль 6 дюймів
4
4
Twin cutters 8 and 9
Twin cutters 8 and 9
Cut four cutters 22 mm long from 3 x 6 mm carbon steel strip. Drill each 4.5 mm for its screw at the top, and grind the lower end to a point with a straight cutting edge 13 on its leading side and a rounded back 15, as his Fig. 4. Harden: heat to a cherry red, until a magnet no longer sticks, quench in water, rub bright, and draw to a light straw colour.
Матеріали для цього кроку:
 Стрічка з вуглецевої сталі1 штука
Необхідні інструменти ({count})
Ножівка по металуСвердлильний верстатНабір свердел Настільний точильний станок
 Горно
 Ковальські кліщі
 Невеликий магніт
 Гартівна діжка
 Вода
 Точильний камінь
 Зварювальні рукавиці
 Захисні окуляри
5
5
Stop 17 and assembly
Stop 17 and assembly
Bend a strip of 3 mm flat bar into an L, its upright 30 mm long with a 4.5 mm slot 18 15 mm long, its foot 20 mm. Screw a cutter into each block's seat. Put the blocks either side of the drill, the stop's slot under one clamping screw, and screw them together until they grip the drill, the cutters' points just in the flutes and their edges leading as the drill turns.
Матеріали для цього кроку:
 Смуга з маловуглецевої сталі1 штука
 Машинні гвинти4 штук
Необхідні інструменти ({count})
Ножівка по металуСлюсарні лещатаСвердлильний верстатНабір сверделНабір напилків Набір викруток
6
6
Bore and countersink
Bore and countersink
Set the drill's point the hole's depth below the stop's foot and the cutters for the screw head's size (the notebook gives both). Drill into hardwood until the stop touches: the hole is at depth and its mouth countersunk. Check a screw sits flush.
Необхідні інструменти ({count})
 Акумуляторний дрильНабір свердел
 Дошка з твердої деревиниЦифровий штангенциркуль 6 дюймівЗахисні окуляри
7
7
Troubleshooting
Troubleshooting
Clamp-on countersink troubleshooting.
Flow
Loading...
8
8
History and honest limits
History and honest limits
**George W. Brackin** of Philadelphia, US 727,580, dated 12 May 1903, filed 18 June 1902. He claimed "the rectangular clamping-blocks arranged parallel to each other, clamping-screws passing through the said blocks near their ends", each block "provided exteriorly at its middle point with a cutter-seat inclined downwardly and inwardly", and "duplicate and interchangeable cutters" screwed into them. His was for wood, with the note that the cutters could be hardened for metal; ours are hardened. He gives no sizes or angle; every size here is ours.
Матеріали
4- Заповнювач
- 1 штукаЗаповнювач
- 1 штукаЗаповнювач
- 4 штукЗаповнювач
Необхідні інструменти
23- Заповнювач
- Заповнювач
- Заповнювач
- Заповнювач
- Заповнювач
- Заповнювач
- Заповнювач
- Заповнювач
- Заповнювач
- Заповнювач
- Заповнювач
- Заповнювач
- Заповнювач
- Заповнювач
- Заповнювач
- Заповнювач
- Заповнювач
- Заповнювач
- Заповнювач
- Заповнювач
- Заповнювач
- 1 vendor sell this, none ship to you yetЗаповнювач
- Заповнювач
За цим кресленням виготовляють

Пов'язані креслення
Ці креслення діляться знаннями — техніки, матеріали або принципи
CC0 Суспільне надбання
Це креслення випущено під ліцензією CC0. Ви можете вільно копіювати, змінювати, поширювати та використовувати цю роботу для будь-яких цілей без запиту дозволу.
Підтримайте мейкера, купуючи продукти через його креслення, де він отримує Комісію мейкера встановлену вендорами, або створіть нову ітерацію цього креслення та включіть його як зв'язок у власне креслення для розподілу доходу.