
Співпраця
МИСТЕЦТВО
КРАСА ТА ЗДОРОВ'Я
РЕМЕСЛО
КУЛЬТУРА ТА ІСТОРІЯ
РОЗВАГИ
СЕРЕДОВИЩЕ
ЇЖА ТА НАПІЇ
ЗБОРНА ІНЖЕНЕРІЯ
НАУК
СПОРТ
ТЕХНОЛОГІЯ
НОСИМО
Twin-Saw Table: A Rip Saw and a Crosscut Saw at Opposite Corners, One Motor, Each Depth Set by Tilting the Top (Gottschalk, 1926)
Forge

Створено

Forge

13. листопад 2026NO
6
0
0
0
0

Twin-Saw Table: A Rip Saw and a Crosscut Saw at Opposite Corners, One Motor, Each Depth Set by Tilting the Top (Gottschalk, 1926)

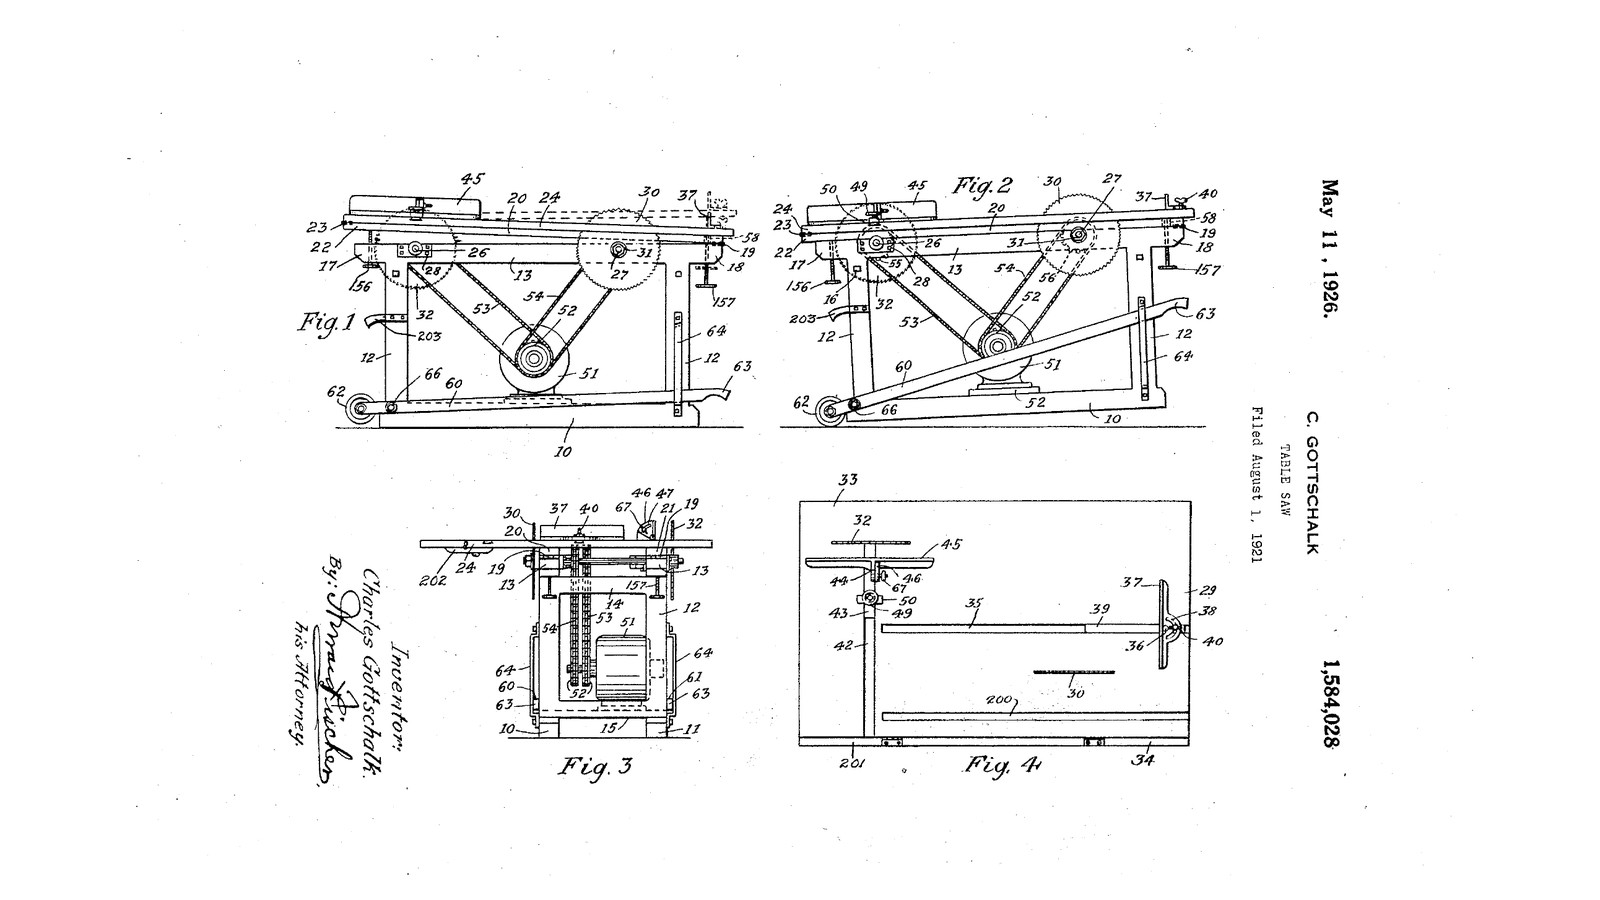
Charles Gottschalk of St. Paul, Minnesota, received US 1,584,028, dated 11 May 1926, for a table saw with two saws. A crosscut saw and a rip saw stand at opposite corners of one table, so either or both can be used without changing blades. An electric motor inside the frame drives both through two chains. The top is hinged twice and lifted by a hand screw at either end, which sets each saw's depth of cut on its own. A lever with wheels lets two people truck the whole machine about. The patent gives no sizes; every size here is ours.
Просунутий
About 1 week

Інструкції

1

Setting each saw's depth

Завантаження блокнота Jupyter…
2

Read US 1,584,028

"Inasmuch as the saws are positioned fairly close to the hinges 19 and 23 the movement of the table for one of the saws does not appreciably affect the positioning of the same in regard to the other saw so that the depth of cut of either of the two saws may be adjusted independently or simultaneously if desired."
3

Frame on skids

From 45 x 95 mm pine: two skids 10, 11 1200 mm long; four uprights 12 775 mm long; two top rails 13 1300 mm long, their ends 50 mm past the uprights (17 at the rear, 18 at the front); cross rails 14, 15 between the uprights; a motor bed 52 across the skids. Glue and bolt the joints with carriage bolts, square and level, so the rails' tops stand 820 mm above the floor and 600 mm apart.

Матеріали для цього кроку:

Сосновий пиломатеріалСосновий пиломатеріал10 штук
Болт із півкруглою головкоюБолт із півкруглою головкою24 штук
Плоска шайбаПлоска шайба24 штук
Шестигранна гайкаШестигранна гайка24 штук
Столярний клейСтолярний клей1 штука

Необхідні інструменти ({count})

ЕлектролобзикЕлектролобзик
Акумуляторний дрильАкумуляторний дриль
Набір сверделНабір свердел
Набір перових сверделНабір перових свердел
Розвідний ключРозвідний ключ
Струбцина з напрямноюСтрубцина з напрямною
Комбінований кутникКомбінований кутник
РулеткаРулетка
4

Turn the two arbors

From 30 mm steel bar turn two arbors 26, 27, each 400 mm long. On one end of each turn a collar 40 mm across and 6 mm thick 30 mm from the end, and screw-cut the last 25 mm M20 on the lathe; turn a loose flange 60 mm across with a 20 mm bore for each. Drill and tap the sprockets' hubs for set screws if they have none.

Матеріали для цього кроку:

Круглий пруток з маловуглецевої сталіКруглий пруток з маловуглецевої сталі2 штук
Шестигранна гайкаШестигранна гайка4 штук

Необхідні інструменти ({count})

Токарний верстат по металуТокарний верстат по металу
Трикулачковий токарний патронТрикулачковий токарний патрон
Токарний різецьТокарний різець
Цифровий штангенциркуль 6 дюймівЦифровий штангенциркуль 6 дюймів
Ножівка по металуНожівка по металу
Свердлильний верстатСвердлильний верстат
Набір сверделНабір свердел
Набір мітчиків і плашокНабір мітчиків і плашок
Коловорот для мітчиківКоловорот для мітчиків
Захисні окуляриЗахисні окуляри
5

Mount the arbors and the saws

Bolt two 30 mm flange bearings 28 to the outsides of the rails for each arbor, its centre 30 mm below the rails' tops: the crosscut saw's arbor 27 250 mm from the front ends, the rip saw's arbor 26 250 mm from the rear ends. Push the arbors through so the crosscut saw's threaded end stands out past the left rail and the rip saw's past the right one, seen from the front. Fix a 17-tooth #40 sprocket on each arbor between the rails. Put each 250 mm blade on its collar, the teeth at the top pointing to the front, then the loose flange, a nut and a second nut locked against it.

Матеріали для цього кроку:

Фланцевий підшипникФланцевий підшипник4 штук
ЗірочкаЗірочка2 штук
Circular Saw Blade SetCircular Saw Blade Set1 штука
Набір шестигранних болтівНабір шестигранних болтів16 штук
Установчий гвинт із чашоподібним кінцемУстановчий гвинт із чашоподібним кінцем4 штук

Необхідні інструменти ({count})

Розвідний ключРозвідний ключ

Набір шестигранних ключівНабір шестигранних ключів
Акумуляторний дрильАкумуляторний дриль
Набір сверделНабір свердел
6

Motor and chains

Bolt the motor 51 to its bed between the skids under the arbors, its shaft parallel to them, and fit two 17-tooth sprockets 52 on its shaft, each in line with one arbor's sprocket. Fit a #40 chain 53, 54 from each to its arbor, tensioned by sliding the motor in slotted bolt holes. Have the motor wired to a switch within reach at the front. Oil the chains.

Матеріали для цього кроку:

ЕлектродвигунЕлектродвигун1 штука
ЗірочкаЗірочка2 штук
Роликовий ланцюгРоликовий ланцюг2 штук
Вимикач живленняВимикач живлення1 штука
Машинне мастилоМашинне мастило1 штука

Необхідні інструменти ({count})

Розвідний ключРозвідний ключ
Набір шестигранних ключівНабір шестигранних ключів
7

The hinged members and the top

Cut two hardwood members 20, 21 20 x 70 mm, 1340 mm long, to lie flat on the rails; hinge their front ends to the rails' front ends 19 and let them reach 40 mm past the rear 22. Cut the 18 mm plywood top 24 1400 x 800, with a slot over each blade, and hinge its rear edge to the members' rear ends 23. Rout a square groove 35 for the crosscut guide parallel to the crosscut saw and a second groove 200 on its other side, and a groove 42 across the top for the rip guide's bar.

Матеріали для цього кроку:

Дошка з твердої деревиниДошка з твердої деревини2 штук
Лист фанериЛист фанери1 штука
Карткова завісаКарткова завіса4 штук
Шурупи по деревуШурупи по дереву40 штук

Необхідні інструменти ({count})

ЕлектролобзикЕлектролобзик
Ручний фрезерРучний фрезер
Набір фрезНабір фрез
Акумуляторний дрильАкумуляторний дриль
Набір сверделНабір свердел
Струбцина з напрямноюСтрубцина з напрямною
Комбінований кутникКомбінований кутник
РулеткаРулетка
8

The depth screws

Screw a 6 mm steel plate under each rail's projecting end, drilled and tapped M12. Run a 150 mm M12 threaded rod up through each, with a wing nut locked on its lower end as a handle. The rear pair 156 push up under the members' rear ends 22, lifting members and top on the front hinges 19: this sets the rip saw. The front pair 157 pass through holes 58 in the members and push the top alone up on its rear hinges 23: this sets the crosscut saw.

Матеріали для цього кроку:

Смуга з маловуглецевої сталіСмуга з маловуглецевої сталі1 штука
Шпилька різьбоваШпилька різьбова4 штук
Гайка-баранецьГайка-баранець4 штук
Шестигранна гайкаШестигранна гайка4 штук
Шурупи по деревуШурупи по дереву16 штук

Необхідні інструменти ({count})

Ножівка по металуНожівка по металу
Свердлильний верстатСвердлильний верстат
Набір сверделНабір свердел
Набір мітчиків і плашокНабір мітчиків і плашок
Коловорот для мітчиківКоловорот для мітчиків
Розвідний ключРозвідний ключ
9

The guides

Crosscut guide: a hardwood bar 39 sliding in groove 35, with an angle fence 37 pivoted on it at 36 and clamped at any angle by a wing nut 40 through an arc slot 38. Rip guide: a bar 43 sliding in groove 42, held by a hand screw 49 through a plate 50, carrying a fence 45 hinged on a bracket 44 and tilted by a wing nut 67 in an arc slot 47.

Матеріали для цього кроку:

Дошка з твердої деревиниДошка з твердої деревини1 штука
Болт із півкруглою головкоюБолт із півкруглою головкою4 штук
Гайка-баранецьГайка-баранець3 штук
Смуга з маловуглецевої сталіСмуга з маловуглецевої сталі1 штука

Необхідні інструменти ({count})

ЕлектролобзикЕлектролобзик
Акумуляторний дрильАкумуляторний дриль
Набір сверделНабір свердел
Комбінований кутникКомбінований кутник
10

The truck

Pivot two hardwood arms 60, 61 to the rear ends of the skids at 66, with a wheel 62 on the end of each beyond the pivot. Their front ends 63 are handles sliding in keepers 64 on the front uprights. With the handles down, the wheels are off the floor; lift the handles and the wheels take the weight so the saw can be wheeled away.

Матеріали для цього кроку:

Дошка з твердої деревиниДошка з твердої деревини2 штук
Набір гумових колісНабір гумових коліс1 штука
Набір шестигранних болтівНабір шестигранних болтів4 штук
Шурупи по деревуШурупи по дереву8 штук

Необхідні інструменти ({count})

ЕлектролобзикЕлектролобзик
Акумуляторний дрильАкумуляторний дриль
Набір сверделНабір свердел
Розвідний ключРозвідний ключ
11

Try it

Wind both screw pairs down and check each blade stands square to the top and parallel to its groove. Set the rip saw's depth with the rear screws and the crosscut's with the front screws, each about 10 mm above the wood. Wearing glasses and ear defenders, rip a board along the rip guide, then cut the end off another against the crosscut guide.

Необхідні інструменти ({count})

Комбінований кутникКомбінований кутник
РулеткаРулетка
Захисні окуляриЗахисні окуляри
Захист слуху (навушники, SNR 30 дБ)Захист слуху (навушники, SNR 30 дБ)
12

Troubleshooting

Twin-saw table troubleshooting.

Flow

Loading...
13

History and honest limits

**Charles Gottschalk** of St. Paul, Minnesota, US 1,584,028, dated 11 May 1926, filed 1 August 1921. He claimed a frame with two rails, longitudinal members hinged to the rails at one end, a single top hinged to them at the other, a crosscut saw at one end and a rip saw at the other through the top, and means to oscillate the members and top together, and the top alone, "so as to vary the relative depth of cut of either of said saws". He says a gasoline engine may drive it instead of the motor. His grooves are dovetailed; ours are square. He gives no sizes, speeds or sprocket sizes; all of those are ours.

Матеріали

23

Необхідні інструменти

21

За цим кресленням виготовляють

CC0 Суспільне надбання

Це креслення випущено під ліцензією CC0. Ви можете вільно копіювати, змінювати, поширювати та використовувати цю роботу для будь-яких цілей без запиту дозволу.

Підтримайте мейкера, купуючи продукти через його креслення, де він отримує Комісію мейкера встановлену вендорами, або створіть нову ітерацію цього креслення та включіть його як зв'язок у власне креслення для розподілу доходу.

Обговорення

(0)

Увійти щоб приєднатися до обговорення

Завантаження коментарів...