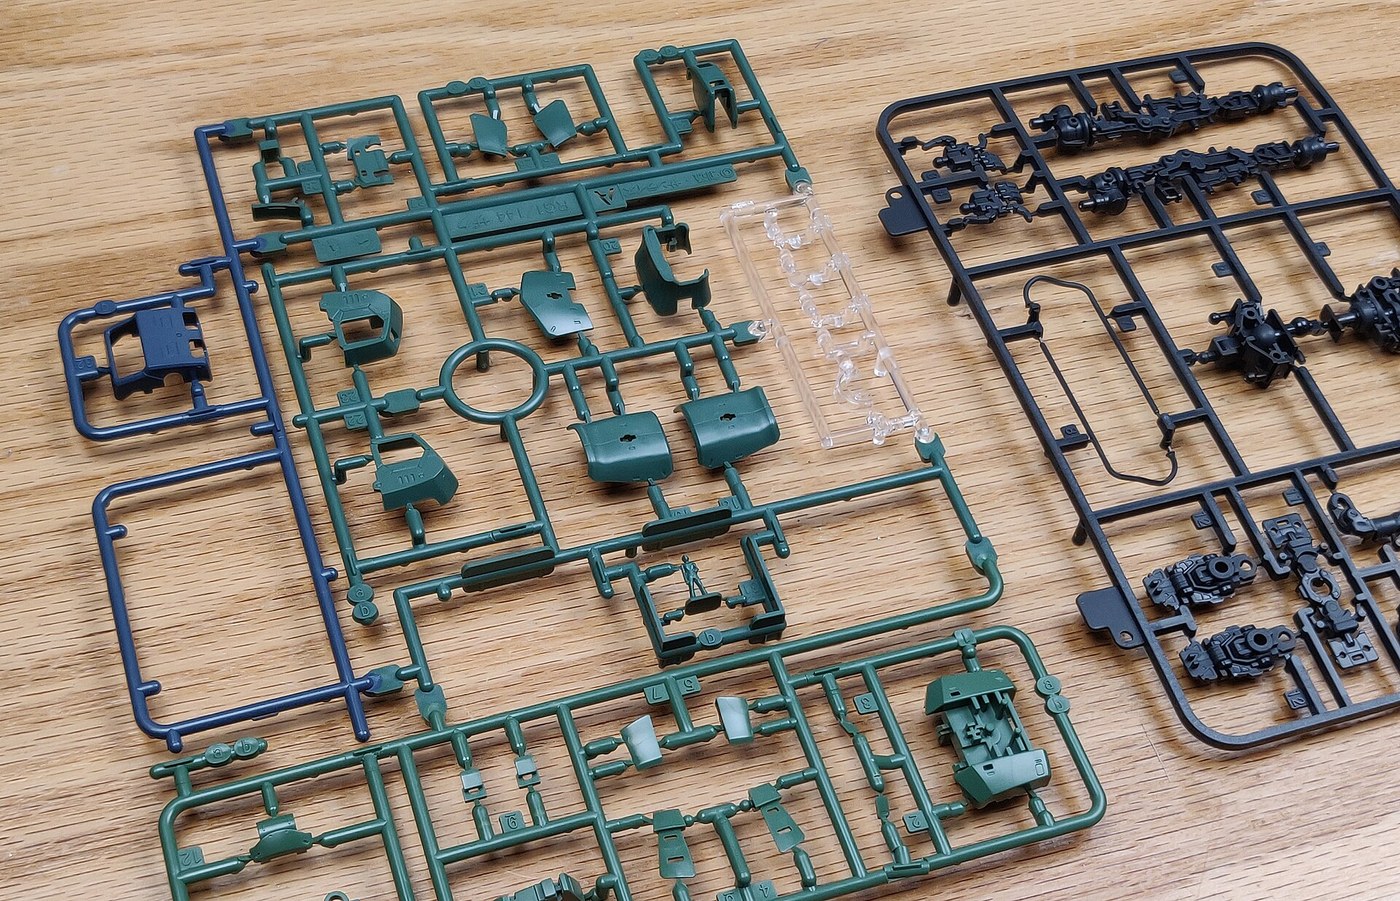


Injection Moulding
Almost every plastic object within reach of you right now was made the same way: melted, forced under pressure into a steel cavity, cooled until solid, ejected. Seconds per part. The reason injection moulding dominates is not that it is cheap — the mould is brutally expensive — it is that the cost of the mould is paid once and the cost per part after that is close to the cost of the pellets.
That single economic fact drives everything. It is why a run of ten is absurd and a run of a million is trivial, why plastic parts are shaped the way they are, and why every one of them carries the same handful of tells: a gate mark where the melt entered, ejector pin circles where it was pushed out, a faint parting line where the two mould halves met, and walls of suspiciously even thickness.
Even thickness is not laziness, it is the central design rule. A thick section cools slower than a thin one, shrinks more as it cools, and pulls the surface in after it — a sink mark. So designers hollow out thick areas and hold them up with ribs, and every wall gets a slight taper — draft — so the part will release rather than grip the steel as it shrinks onto the core.
The process is US patent 133,229 of 19 November 1872, granted to I. Smith Hyatt and John W. Hyatt of Albany, New York: a plunger forcing heated celluloid into a mould, and known at the time as the Hyatt stuffing machine.
Mould some parts on a bench machine, then read the defects.
Інструкції
Read a moulded part before you make one
Read a moulded part before you make one
Take any plastic object and find, on it: the gate mark, the circular ejector pin witnesses, the parting line, the ribs inside, and the draft on the walls.
Measure the wall thickness in three places.
Expect it to be nearly constant.
Every one of those features is a consequence of the process, not a decision about the product. Learning to see them is most of learning the subject.
Необхідні інструменти ({count})
 Цифровий штангенциркуль 6 дюймів
Cut a two-plate mould
Cut a two-plate mould
Machine a simple cavity into an aluminium mould blank: the part shape, a sprue and a short runner feeding a small gate, and a vent slot at the far end of the cavity.
Put 1-2° of draft on every vertical wall and polish in the direction of draw.
The vent is not optional. The cavity is full of air; if it cannot escape, the melt compresses it, and it either short-fills or scorches the plastic at the far corner.
Матеріали для цього кроку:
 Алюмінієва заготовка прес-форми (2-плитна)1 штука
Необхідні інструменти ({count})
 Набір надфілів
Dry the pellets, then shoot
Dry the pellets, then shoot
Dry the pellets as the material specifies before use. Bring the barrel to the material's melt range and let it stabilise.
Clamp the mould, shoot, hold the pressure for a few seconds, cool, and eject.
Wet pellets are the single commonest cause of bad parts. Absorbed moisture flashes to steam in the barrel and shows as silver streaks on the surface and mysterious brittleness in the part.
Матеріали для цього кроку:
 Гранули біорозкладного пластику (PLA)1 пакет
Необхідні інструменти ({count})
 Настільна ливарна машина
Produce every defect on purpose
Produce every defect on purpose
Make one bad part of each kind and keep them labelled. Short shot: too little material or too cold. Flash: too much pressure or poor clamping, melt escaping the parting line. Sink mark: too thick a section. Warp: uneven cooling. Burn: trapped air at the vent.
Write the cause beside each.
A defect library is the most useful thing on a moulding bench. Diagnosis is pattern matching, and you cannot match a pattern you have never seen.
Measure shrinkage
Measure shrinkage
Measure a cavity dimension in the mould, then the same dimension on a cooled part, and again 24 hours later.
Compute shrinkage as a percentage.
Expect the part to be smaller than the cavity, typically a fraction of a per cent to a couple of per cent depending on the polymer, and expect a little more shrinkage overnight.
Every mould is cut oversize by the expected shrinkage — which means a mould is specific to one material, and changing polymer changes the part's dimensions.
Необхідні інструменти ({count})
Цифровий штангенциркуль 6 дюймівWork out where the break-even is
Work out where the break-even is
Add up your mould cost — material and the hours you spent — and your per-part cost in pellets and time. Do the same for 3D printing the identical part.
Plot total cost against quantity for both and find where the lines cross.
Expect printing to win at small numbers and moulding to win beyond the crossover, with the crossover moving sharply right as mould complexity rises.
That graph, not the machine, is why injection moulding exists.
Необхідні інструменти ({count})
 Калькулятор
 Міліметровий папір
History & Context
History & Context
The patent is real and the story behind it is about elephants. John Wesley Hyatt was chasing a prize offered for a substitute for ivory billiard balls, and in 1869 he and his brother improved Alexander Parkes' nitrocellulose material into workable celluloid. Having invented a mouldable plastic, they needed a way to mould it, and US 133,229, granted 19 November 1872 to I. Smith Hyatt and John W. Hyatt of Albany, New York, describes the plunger machine that did it — essentially a large heated hypodermic. It made combs, buttons and knife handles by the million and took genuine commercial pressure off ivory and tortoiseshell.
The single biggest technical improvement came eighty years later. Hyatt's plunger simply pushed cold pellets past a heater, which mixed badly and heated unevenly. James Watson Hendry's reciprocating screw machine of 1946 replaced the plunger with an Archimedean screw that conveys, compresses, melts and mixes the polymer, then slides forward to act as the injection ram. It gave uniform melt, controllable shot size and colour mixing, and essentially every injection moulding machine in the world now works this way.
The mould is the product. A production tool is hardened steel, polished, water-cooled, with ejector systems and sometimes sliding cores to make undercuts — and it can cost as much as a house. That is why the economics are so lopsided, why moulded parts are designed by people thinking constantly about how the tool opens, and why the first question asked of any moulded design is "can it be drawn from the mould in one direction?" The shape of nearly every mass-produced plastic object is a compromise with that question.
Design rules that follow directly from the physics. Uniform wall thickness, because differential cooling causes differential shrinkage. Ribs instead of solid bosses, for the same reason. Draft on every face, because the part shrinks onto the core and grips it. Generous internal radii, because sharp corners concentrate stress and impede flow. Gate placement chosen so the melt fronts meet where a visible weld line — a genuine weak point where two flow fronts merge — does not matter. These are not style guidelines; each one is a defect avoided.
Honest limits and safe practice. Bench machines are low-volume and low-pressure and will not reproduce production surface finish or tolerances. Aluminium moulds wear quickly and are for prototyping, not runs. Molten polymer is around 200 °C and sticks to skin — gloves, eye protection, and never stand over the nozzle. Never inject into a mould that is not properly clamped, and never heat a polymer above its recommended range: overheated plastics degrade and some produce genuinely hazardous decomposition products, PVC in particular releasing hydrogen chloride. Work with ventilation, stick to PLA or PP for learning, and treat an unfamiliar polymer's datasheet as required reading rather than paperwork.
Матеріали
2- Заповнювач
- Заповнювач
Необхідні інструменти
5- Заповнювач
- Заповнювач
- Заповнювач
- Заповнювач
- Заповнювач
Матеріали з пов'язаних креслень

Пов'язані креслення
Ці креслення діляться знаннями — техніки, матеріали або принципи
CC0 Суспільне надбання
Це креслення випущено під ліцензією CC0. Ви можете вільно копіювати, змінювати, поширювати та використовувати цю роботу для будь-яких цілей без запиту дозволу.
Підтримайте мейкера, купуючи продукти через його креслення, де він отримує Комісію мейкера встановлену вендорами, або створіть нову ітерацію цього креслення та включіть його як зв'язок у власне креслення для розподілу доходу.