Співпраця
МИСТЕЦТВО
КРАСА ТА ЗДОРОВ'Я
РЕМЕСЛО
КУЛЬТУРА ТА ІСТОРІЯ
РОЗВАГИ
СЕРЕДОВИЩЕ
ЇЖА ТА НАПІЇ
ЗБОРНА ІНЖЕНЕРІЯ
НАУК
СПОРТ
ТЕХНОЛОГІЯ
НОСИМО
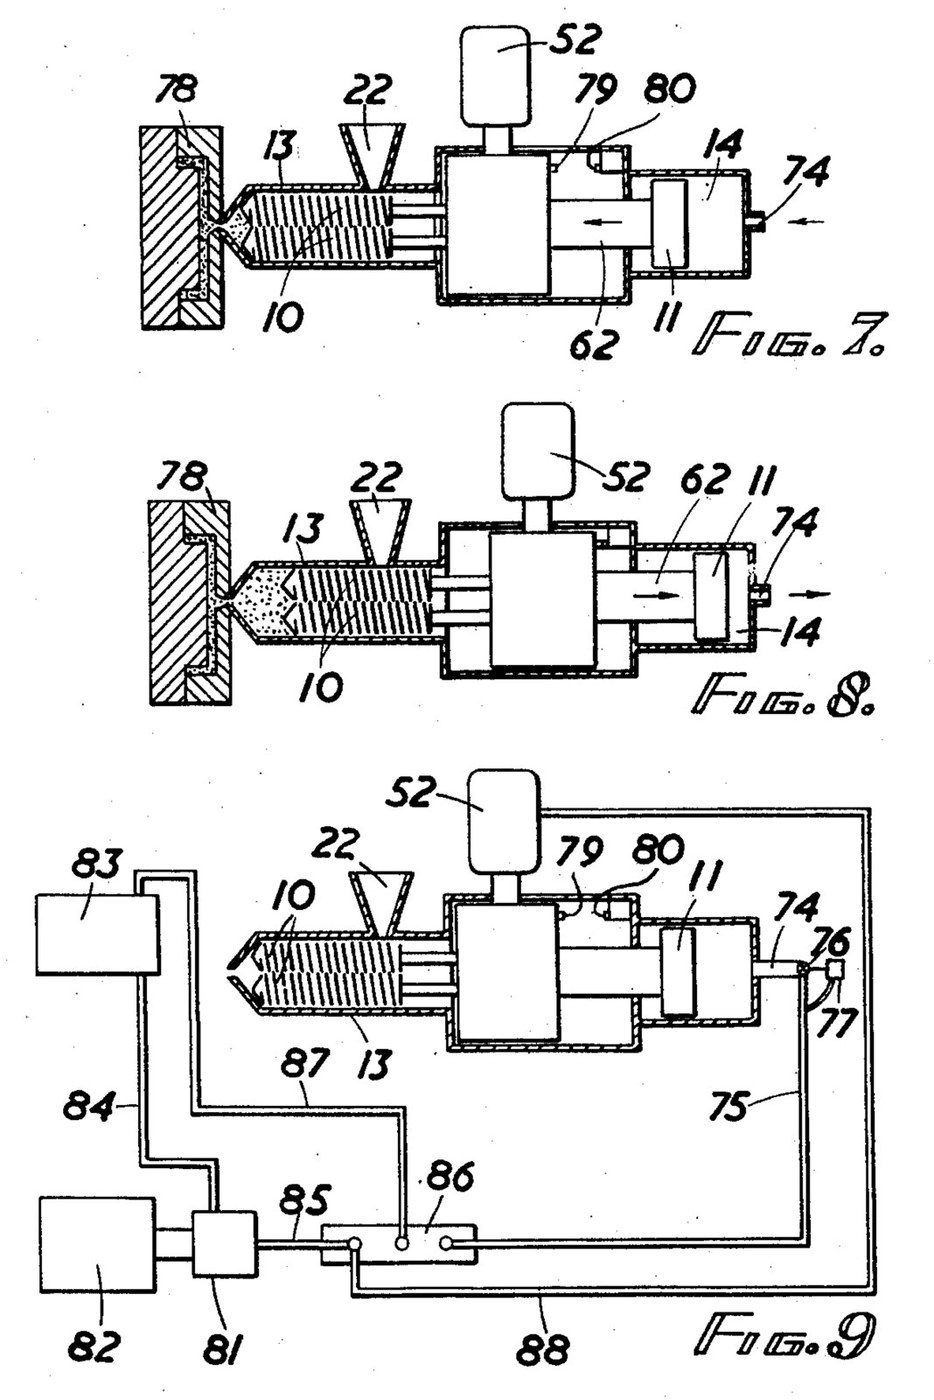


Injection Moulding Machine: Twin Intermeshing Screws as Plasticiser and Ram (Baigent, US 2,916,769)
An injection moulding machine melts plastic granules in a heated barrel and forces the melt into a mould. K. H. Baigent (US 2,916,769, 1959) does both jobs with one pair of intermeshing screws: turning, they melt, mix and pack the plastic at the nozzle; pushed forward by a hydraulic piston, they act as the ram.
Two screws are used because a single screw pushed as a ram lets too much melt flow back along its thread. At the outlet end each of his screws' threads nearly fills the gap in the other's, which seals against backflow.
Source: K. H. Baigent, "Injection Moulding Machines", US Patent 2,916,769 (filed 1957, granted 1959). Picture: its Figs. 7-9.
Просунутий
Unknown
Інструкції
1
1
Read Baigent
Read Baigent
"It has proven, as a practical matter, impossible to use a single screw as both an injection ram and a mixer or plasticiser, since when a single screw is translated forward to force the plastic material through the nozzle, a substantial portion thereof tends to flow backward between the threads of the screw."
2
2
Cut the twin screws
Cut the twin screws
Cut two intermeshing screws of the same outside diameter all along, so they can slide as a ram. Baigent's example: root diameter about 2.05 in., outside diameter about 3.06 in., pitch 1 in. In the outlet section the thread's outer face is about 0.30 in. deep axially with the leading face sloping 13° to the root, so each thread nearly fills the gap in the other screw. In the inlet section cut the leading face back to 31°, leaving 0.15 in., which gives about 1 1/2 times the swept volume of the outlet. Give each screw a splined end with a tapped bore. Screw length and metal are not given.
Матеріали для цього кроку:
 Невідомий метал2 screws
Необхідні інструменти ({count})
 Токарний верстат по металу
 Фрезерний верстат
 Набір мітчиків і плашок
 Невідомі розміри
3
3
Make the barrel
Make the barrel
Bore a barrel (injection chamber) to take both screws side by side. Bolt a nozzle head on its outer end and screw in the injection nozzle. Cut a feed inlet near the other end under a hopper whose throat has a water-cooling jacket, so the granules do not melt before they enter. Wrap the barrel in closely spaced electric resistance heaters, with one more round the nozzle head. Clamp the barrel to its supports on the base. Bore, metal and heater ratings are not given.
Матеріали для цього кроку:
Невідомий метал1 barrel, nozzle head and nozzleНевідомий метал1 hopper and water jacket Нагрівальний елемент2 barrel and nozzle heaters
Необхідні інструменти ({count})
Токарний верстат по металу Свердлильний верстат
 Набір сверделНабір мітчиків і плашокНевідомі розміри
4
4
Build the sliding drive
Build the sliding drive
Build a gear box that slides on guide rails on a slide bed in line with the barrel. Run a hollow drive shaft for each screw in roller bearings, coupled to its screw by a splined sleeve and a tie rod through the shaft. Key a pinion on each shaft; both mesh inside opposite sides of one ring gear with internal teeth, so the screws turn at the same speed in the same direction. Cut worm teeth round the outside of the ring and drive it with a worm on the upright shaft of a hydraulic motor, in ball bearings.
Матеріали для цього кроку:
Невідомий метал1 gear box, shafts, pinions, ring and worm Роликовий підшипник4 штук
 Кульковий підшипник2 штук
Необхідні інструменти ({count})
Токарний верстат по металуФрезерний верстат Зубофрезерний верстат
 Розвідний ключ
5
5
Fit the ram cylinder and hydraulics
Fit the ram cylinder and hydraulics
Bolt a hydraulic cylinder to the frame behind the gear box and bolt its piston rod to the gear box's thrust plate, so screws, gear box and piston slide as one. Feed the cylinder through a spring-loaded check valve, with a second, adjustable check valve on a branch that restricts the return flow: this sets the back pressure the melt must build before the screws are pushed back. An electric motor drives a hydraulic pump from a reservoir, through a solenoid-worked multiway pilot valve that sends oil either to the hydraulic motor or to the cylinder. Put a stop on the gear box and a limit switch where it ends its return stroke, and a time switch for the cooling period. Pressures are not given.
Матеріали для цього кроку:
 Гідроциліндр1 штука
 Зворотний клапан2 штук
 Електромагнітний клапан1 multiway pilot valve
 Електродвигун1 pump drive
 Гідравлічна трубка1 штука
 Гідравлічна олива1 штука
Необхідні інструменти ({count})
Розвідний ключ6
6
Run a cycle
Run a cycle
Close the nozzle with the mould, fill the hopper with granules or powder and switch on the heaters to bring the barrel up to temperature. Start the hydraulic motor: the turning screws melt the plastic and pack it at the nozzle, and are forced back against the counter pressure until the stop trips the limit switch. The pilot valve then stops the motor and drives the piston forward, so the screws ram the melt into the mould. Everything stands still while the article cools; the time switch then restarts the motor for the next shot. How the mould is clamped and opened is not given.
Матеріали
10- 1 gear box, shafts, pinions, ring and wormЗаповнювач
- 2 barrel and nozzle heatersЗаповнювач
- 4 штукЗаповнювач
- Заповнювач
- 1 штукаЗаповнювач
- 2 штукЗаповнювач
- Заповнювач
- 1 pump driveЗаповнювач
- 1 штукаЗаповнювач
- 1 штукаЗаповнювач
Необхідні інструменти
8- Заповнювач
- Заповнювач
- Заповнювач
- Заповнювач
- Заповнювач
- Заповнювач
- Заповнювач
- Заповнювач
За цим кресленням виготовляють
CC0 Суспільне надбання
Це креслення випущено під ліцензією CC0. Ви можете вільно копіювати, змінювати, поширювати та використовувати цю роботу для будь-яких цілей без запиту дозволу.
Підтримайте мейкера, купуючи продукти через його креслення, де він отримує Комісію мейкера встановлену вендорами, або створіть нову ітерацію цього креслення та включіть його як зв'язок у власне креслення для розподілу доходу.