Співпраця
МИСТЕЦТВО
КРАСА ТА ЗДОРОВ'Я
РЕМЕСЛО
КУЛЬТУРА ТА ІСТОРІЯ
РОЗВАГИ
СЕРЕДОВИЩЕ
ЇЖА ТА НАПІЇ
ЗБОРНА ІНЖЕНЕРІЯ
НАУК
СПОРТ
ТЕХНОЛОГІЯ
НОСИМО
Interlocked-Blade Dasher Churn: Each Blade's Round Shank Is Bored Through by the Next, So They Key Each Other in the Hub
Buttercup

Створено

Buttercup

11. листопад 2026IE
5
0
0
0
0

Interlocked-Blade Dasher Churn: Each Blade's Round Shank Is Bored Through by the Next, So They Key Each Other in the Hub

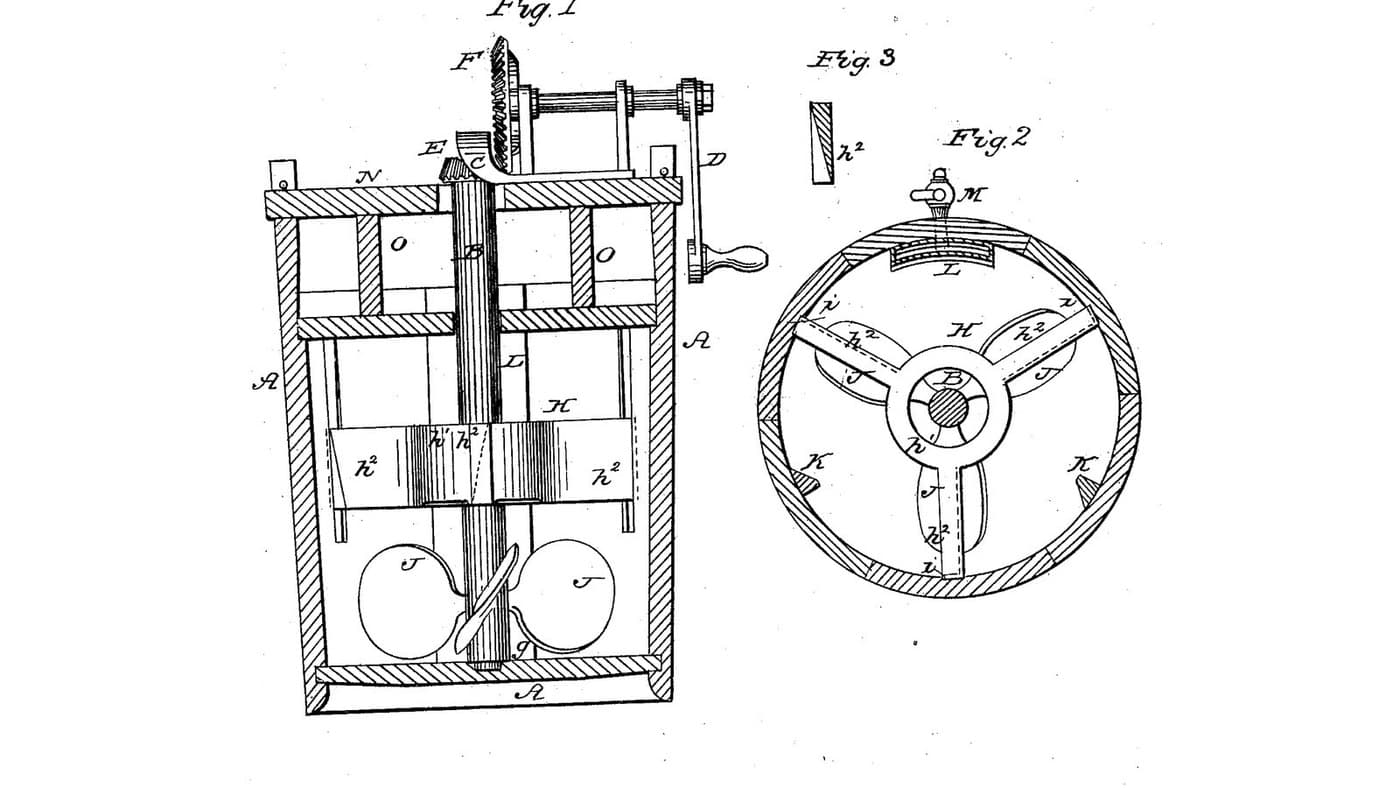
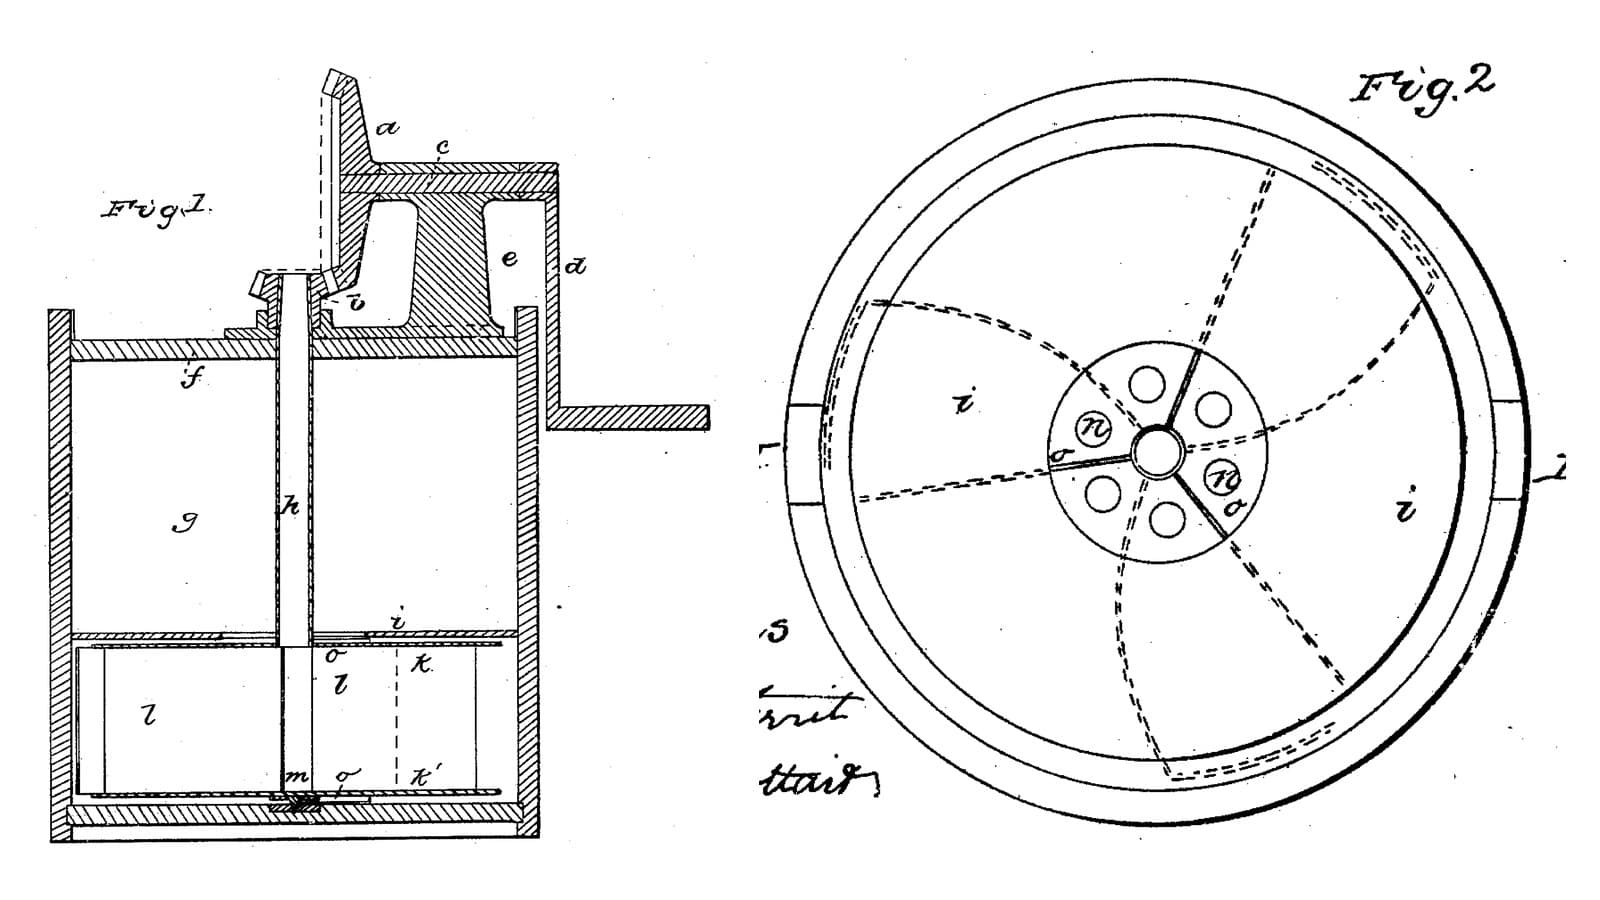
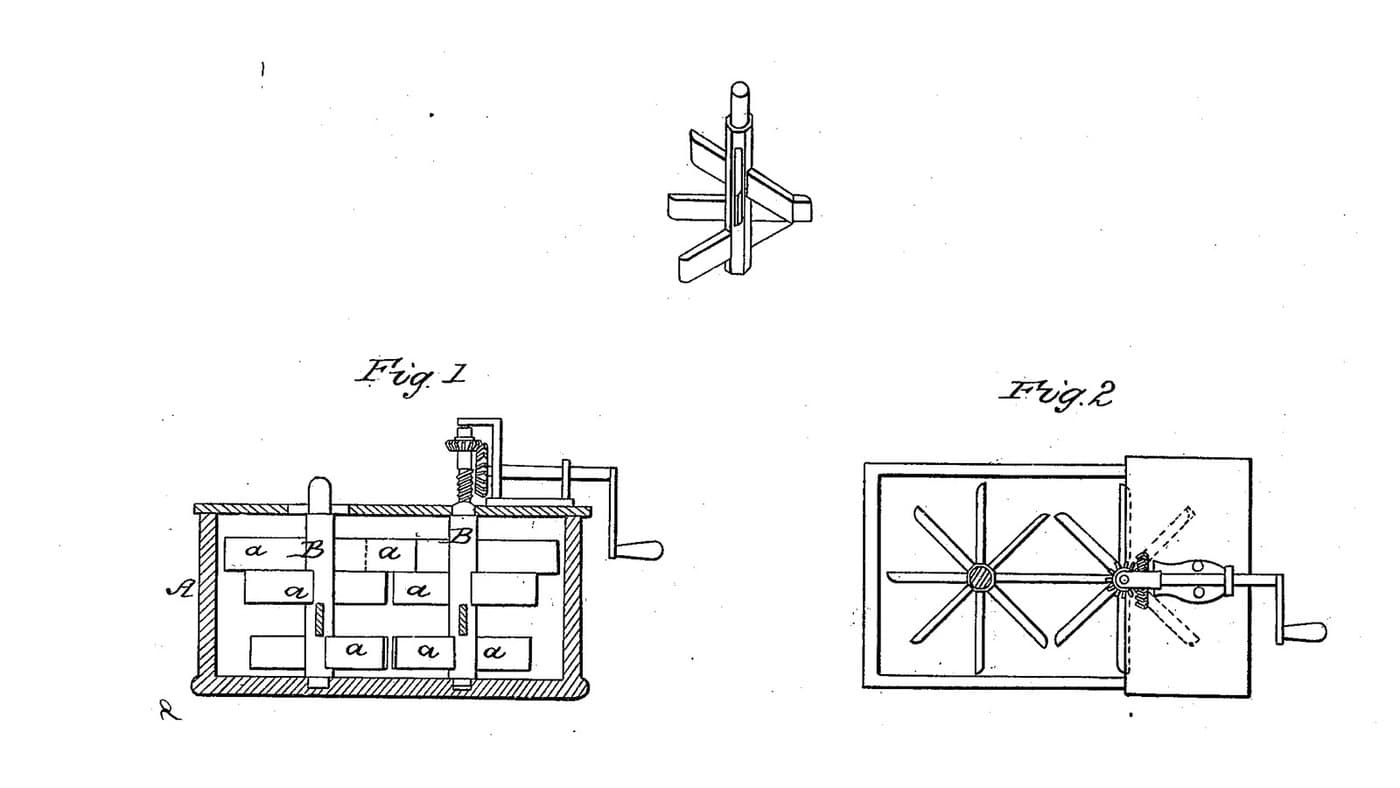
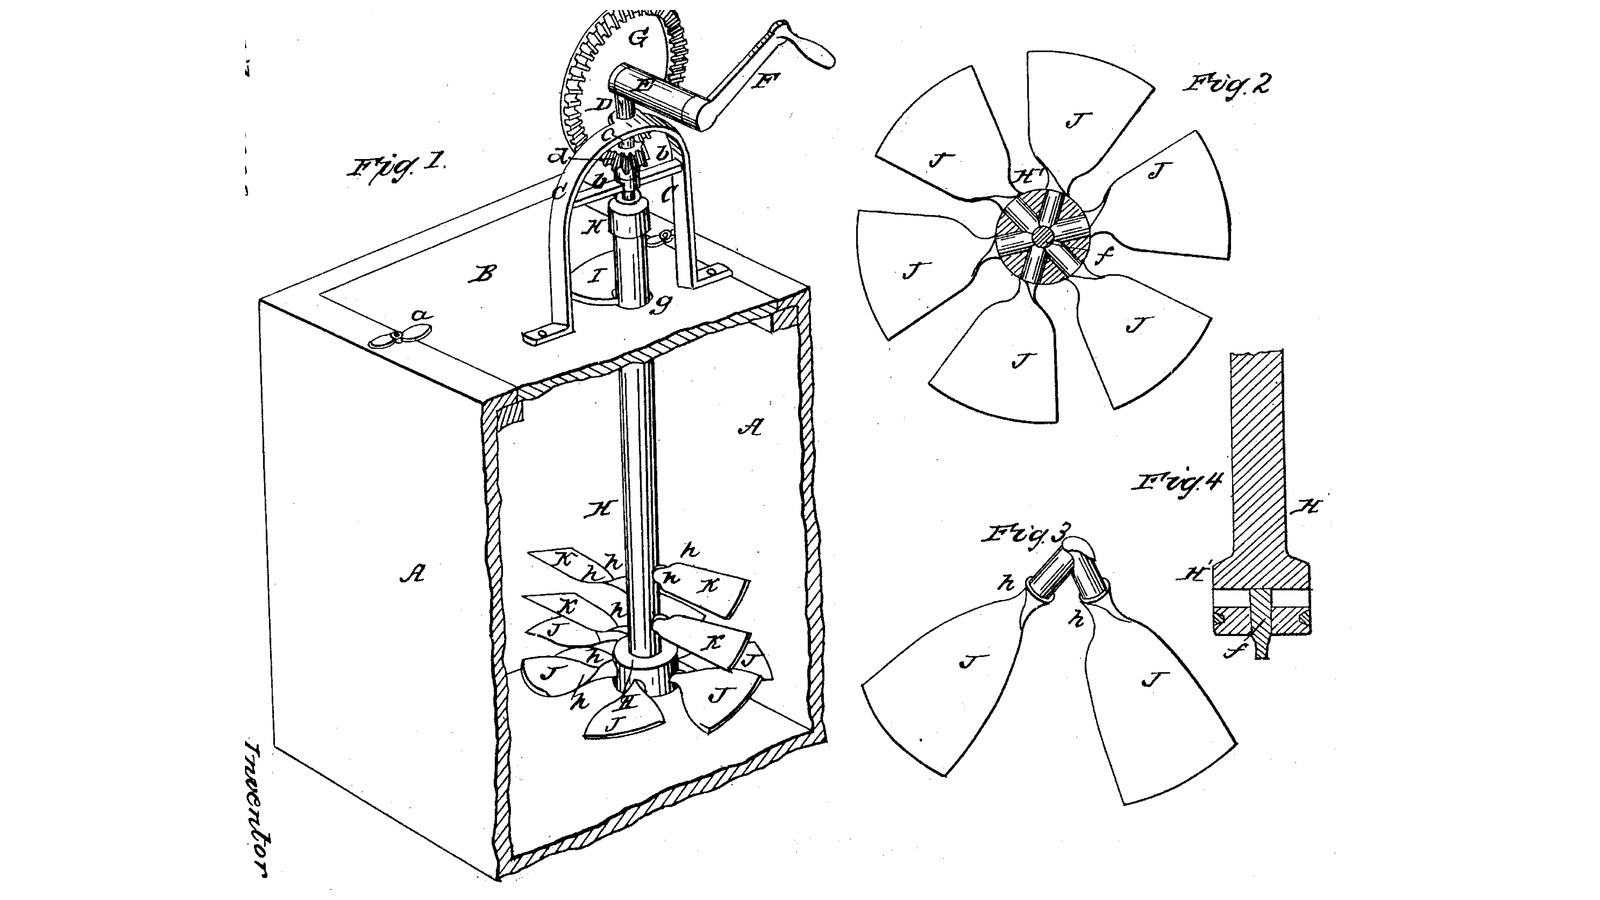
Salem T. Lamb of New Washington, Indiana, received US 30,411, dated 16 October 1860, for fastening the blades of a churn dasher so they never work loose. Each lower blade has a round shank driven into a hole bored to the middle of the hub; boring the next hole cuts the end of the last shank, so every shank keys the one before, and a spindle up the middle locks the set. The dasher turns by a crank and bevel gear on a bracket on the lid, its sloping blades pressing the cream down, and it lifts out through a large opening for cleaning. The patent gives no sizes; every size here is ours.
Середній
About 3 days

Інструкції

1

Where the shanks lock

Завантаження блокнота Jupyter…
2

Sloping blades that drive the cream down, six months before

Lynch's propeller dasher also drives the cream down. Lamb's answer is how to keep such blades tight.
3

Read US 30,411

"Another radial hole is then bored for the next adjacent blade, the boring tool passing through or cutting off the end of the first shank. The second blade with the same preparation as the first one is then driven in or united, its shank fitting against and overlapping the first driven one, so as to answer as a key to it, to prevent it from turning or becoming loose."
4

Box A, lid B, cover I and buttons a

Glue up hardwood for a box A 300 x 300 mm inside and 420 deep, sides 22 mm, joints sealed with silicone sealant. Rout a seat round the top for a 22 mm lid B. Cut an opening in the lid 120 mm wide running from 30 mm behind its centre to 140 mm in front; fit a cover I to it with a 22 mm hole at the centre for the shaft c and a slot from that hole to the cover's back edge, so it can be lifted off past the shaft. Turn two hardwood buttons a on screws at the lid's edge to hold it down.

Матеріали для цього кроку:

Дошка з твердої деревиниДошка з твердої деревини4 штук
Столярний клейСтолярний клей1 штука
Силіконовий герметикСиліконовий герметик1 штука
Шурупи по деревуШурупи по дереву24 штук

Необхідні інструменти ({count})
Циркулярний верстатЦиркулярний верстат
ЕлектролобзикЕлектролобзик
Ручний фрезерРучний фрезер
Набір стамесок по деревуНабір стамесок по дереву
Набір перових сверделНабір перових свердел
Акумуляторний дрильАкумуляторний дриль
Набір сверделНабір свердел
Струбцина з напрямноюСтрубцина з напрямною
Набір викрутокНабір викруток
РулеткаРулетка
5

Staff H, hub and band

Turn a hardwood staff 40 mm across and 375 mm long, with a hub H 76 mm across for its bottom 80 mm, and the top 15 mm turned to 28 mm for the cap. Turn a groove near the hub's foot and press on a ring cut from a stainless tube as the band, so the hub cannot split when it dries. Bore a 10.2 mm hole up the middle of the hub from below, 50 mm deep, for the spindle f.

Матеріали для цього кроку:

Дошка з твердої деревиниДошка з твердої деревини2 штук
Столярний клейСтолярний клей1 штука
Труба з нержавкої сталіТруба з нержавкої сталі1 штука

Необхідні інструменти ({count})

Токарний верстат по деревуТокарний верстат по дереву
Акумуляторний дрильАкумуляторний дриль
Набір сверделНабір свердел
Ножівка по металуНожівка по металу
Напилки (ручний напилок)Напилки (ручний напилок)
6

Blades J and K

Carve six lower blades J from hardwood 8 mm thick: 26 mm wide at the neck widening to 100 mm at the tip, reaching 135 mm from the staff's centre, slightly hollowed on top, each on a round shank 20 mm across and 52 mm long, so it reaches the centre, with a small shoulder i, the blade's twist running out along the neck into the shank as the spiral lines h. Carve six upper blades K the same way, 16 to 60 mm wide, reaching 125 mm, on 14 mm shanks 34 mm long.

Матеріали для цього кроку:

Дошка з твердої деревиниДошка з твердої деревини1 штука

Необхідні інструменти ({count})

Циркулярний верстатЦиркулярний верстат
ЕлектролобзикЕлектролобзик
Набір різьбярських стамесокНабір різьбярських стамесок
Набір стамесок по деревуНабір стамесок по дереву
Токарний верстат по деревуТокарний верстат по дереву
Напилки (ручний напилок)Напилки (ручний напилок)
7

Lock the lower shanks

Bore a 20 mm radial hole level into the hub, 40 mm above its foot, to just past the centre. Coat the first J shank near its shoulder with food-safe silicone sealant (the patent used white lead or other cement) and drive it in with the blade sloped 30 degrees. Bore the next hole 60 degrees round, cutting off the end of the first shank, and drive the next blade so its shank overlaps the first. Go on round all six, each keying the last, every blade sloped the same way. Drive a 10 mm stainless rod 60 mm long up the centre hole through the shanks as the spindle f, leaving 14 mm below the hub.

Матеріали для цього кроку:

Силіконовий герметикСиліконовий герметик1 штука
Пруток із нержавкої сталіПруток із нержавкої сталі1 штука

Необхідні інструменти ({count})

Акумуляторний дрильАкумуляторний дриль
Набір перових сверделНабір перових свердел
Набір сверделНабір свердел
Ножівка по металуНожівка по металу
8

Set the upper blades

Bore three 14 mm radial holes 120 degrees apart into the staff 180 mm above the hub's foot and three more 210 mm up, turned 60 degrees, so the upper blades break spaces with each other and with the lower. Set the K blades in them with sealant, sloped the same way as the J blades.

Матеріали для цього кроку:

Силіконовий герметикСиліконовий герметик1 штука

Необхідні інструменти ({count})

Акумуляторний дрильАкумуляторний дриль
Набір перових сверделНабір перових свердел
9

Print the step

The step on the box's bottom: 60 mm across, 15 high, with a 10.6 mm hole 9 deep for the spindle f. PETG, 0.2 mm layers, 30 % infill, 4 walls.
Файл дизайнуSTLCC0 - Free
10

Print the staff cap

The cap glued on the staff's top: 40 mm across, 30 high, a 28 mm socket 15 deep below and a 12.2 mm square socket above for the foot of shaft c. PETG, 0.2 mm layers, 30 % infill, 4 walls.
Файл дизайнуSTLCC0 - Free
11

Print the crown wheel G

The driving wheel G on the crank shaft: a crown wheel of 42 teeth, module 2.5, 16.2 mm bore. PETG, 0.2 mm layers, 30 % infill, 4 walls.
Файл дизайнуSTLCC0 - Free
12

Print the pinion d

The pinion d on shaft c: 14 teeth, module 2.5, 16.2 mm bore. PETG, 0.2 mm layers, 30 % infill, 4 walls.
Файл дизайнуSTLCC0 - Free
13

Bracket C, shaft c, gears and crank F

Screw two hardwood posts 40 x 40 mm, 200 mm tall, to the lid either side of the opening, 160 mm apart over their inside faces; join them with a cross brace b 60 mm up and a top bar at the top, both bored 16.6 mm over the staff. Cut a 16 mm stainless shaft c 283 mm long, file its foot 12 mm square for 14 mm, and run it down through the bar and brace with the pinion d pinned on it above the bar. Screw two hardwood blocks 50 x 25 x 100 mm on the bar either side of the pinion as the sleeve E, bored 16.6 mm across 75 mm above the bar; run a 16 mm stainless crank shaft 180 mm long through them with the crown wheel G pinned on it meshing d, a shaft collar, and a crank F of mild steel flat bar, 100 mm throw, with a hardwood handle.

Матеріали для цього кроку:

Дошка з твердої деревиниДошка з твердої деревини1 штука
Пруток із нержавкої сталіПруток із нержавкої сталі1 штука
Shaft CollarShaft Collar1 штука
ШплінтШплінт3 штук
Смуга з маловуглецевої сталіСмуга з маловуглецевої сталі1 штука
Шканти з твердої деревиниШканти з твердої деревини1 штука
Столярний клейСтолярний клей1 штука
Шурупи по деревуШурупи по дереву12 штук
Філамент PETGФіламент PETG1 штука

Необхідні інструменти ({count})

3D-принтер FDM3D-принтер FDM
Циркулярний верстатЦиркулярний верстат
Акумуляторний дрильАкумуляторний дриль
Набір сверделНабір свердел
Ножівка по металуНожівка по металу
Напилки (ручний напилок)Напилки (ручний напилок)
Слюсарні лещатаСлюсарні лещата
Струбцина з напрямноюСтрубцина з напрямною
Набір викрутокНабір викруток
14

The build in 3D

FreeCAD model of this build, the box cut open: the step, the staff with its banded hub, the six lower blades on interlocked shanks and the six upper blades, the lid with its opening and cover, and the bracket with shaft c, pinion, crown wheel and crank.
Файл дизайнуBLENDCC0 - Free
15

Churn, gather and lift out

Pour about 20 litres of heavy cream at about 15 °C, checked with the thermometer, into the box. Tilt the dasher in through the opening, set its spindle in the step, swing the staff upright under shaft c so the square enters the cap, and put on the cover and lid. Turn the crank briskly so the blades press the cream down, timing it. When the butter comes, turn on the same way but much slower, so the blades roll it into masses. Take off the cover, lift the dasher slowly while turning it backwards by hand so it slips out through the butter. Gather the butter, pour the buttermilk into a bowl, wash the butter in cold water until it runs clear, salt and weigh it. Scald, wash and air-dry the dasher.

Матеріали для цього кроку:

Жирні вершкиЖирні вершки20 l
Крупна морська сільКрупна морська сіль1 штука
ВодаВода1 штука

Необхідні інструменти ({count})

Термометр зі щупом, що лишається в стравіТермометр зі щупом, що лишається в страві

СекундомірСекундомір
Цифрові кухонні вагиЦифрові кухонні ваги
Велика миска з нержавкої сталіВелика миска з нержавкої сталі
16

Troubleshooting

Interlocked-blade churn troubleshooting.

Flow

Loading...
17

History and honest limits

**Salem T. Lamb** of New Washington, Clark County, Indiana, US 30,411, 16 October 1860, "Fastening Blades of Churn-Dashers". He claimed the "interlocking or overlapping of the shanks of the blades J, so that they shall serve to hold each other firmly in the staff". He set the shanks in white lead or other cement; we use food-safe silicone, as white lead is a lead compound. His hub band was molten metal run into a groove and his gears a cast bracket with bevel wheels; ours are a pressed stainless ring, wooden posts and printed crown gears. The patent gives no sizes; every size here is ours.

Матеріали

14

Необхідні інструменти

20

Файли дизайну

5

CC0 Суспільне надбання

Це креслення випущено під ліцензією CC0. Ви можете вільно копіювати, змінювати, поширювати та використовувати цю роботу для будь-яких цілей без запиту дозволу.

Підтримайте мейкера, купуючи продукти через його креслення, де він отримує Комісію мейкера встановлену вендорами, або створіть нову ітерацію цього креслення та включіть його як зв'язок у власне креслення для розподілу доходу.

Обговорення

(0)

Увійти щоб приєднатися до обговорення

Завантаження коментарів...