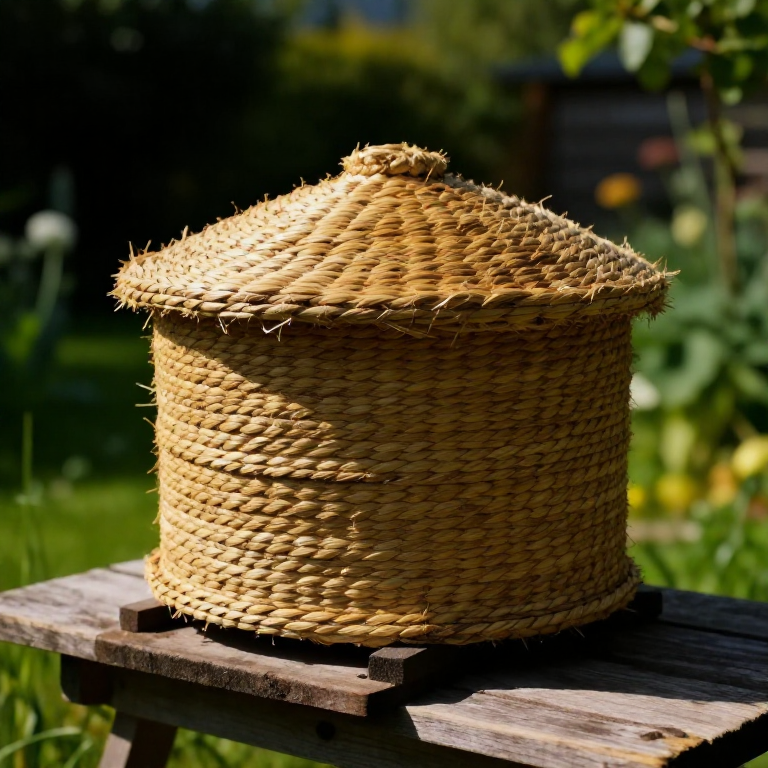
Making a Coiled-Straw Bee Skep — The Traditional Beehive Before Wooden Boxes
Інструкції
Harvest and clean long rye straw
Harvest and clean long rye straw
Матеріали для цього кроку:
 Rye Straw1 пучок
Необхідні інструменти ({count})
 Knife
KnifeSplit and soak the binding cane
Split and soak the binding cane
Матеріали для цього кроку:
 Split Cane1 пучок
 Water3 літрів
Необхідні інструменти ({count})
KnifeMake the girth gauge
Make the girth gauge
Необхідні інструменти ({count})
 Skep Girth Gauge
Bind the crown
Bind the crown
Матеріали для цього кроку:
Rye Straw1 пучокSplit Cane1 метрНеобхідні інструменти ({count})
 Awl
AwlFeed straw into an even rope
Feed straw into an even rope
Матеріали для цього кроку:
Rye Straw1 пучокНеобхідні інструменти ({count})
Skep Girth GaugeSew the first coils to the crown
Sew the first coils to the crown
Матеріали для цього кроку:
Split Cane1 метрНеобхідні інструменти ({count})
AwlSpiral outward to start the dome
Spiral outward to start the dome
Матеріали для цього кроку:
Rye Straw1 пучокSplit Cane1 метрНеобхідні інструменти ({count})
AwlBuild the domed wall downward
Build the domed wall downward
Матеріали для цього кроку:
Rye Straw1 пучокSplit Cane1 метрНеобхідні інструменти ({count})
AwlSkep Girth GaugeKeep the courses even
Keep the courses even
Матеріали для цього кроку:
Rye Straw1 пучокНеобхідні інструменти ({count})
AwlWiden to the finished base
Widen to the finished base
Матеріали для цього кроку:
Rye Straw1 пучокSplit Cane1 метрНеобхідні інструменти ({count})
AwlCut the flight entrance
Cut the flight entrance
Необхідні інструменти ({count})
KnifeFinish and lock the base coil
Finish and lock the base coil
Матеріали для цього кроку:
Split Cane1 метрНеобхідні інструменти ({count})
AwlTrim the skep clean
Trim the skep clean
Необхідні інструменти ({count})
KnifeClom the outside for weatherproofing
Clom the outside for weatherproofing
Матеріали для цього кроку:
 Cow Dung2 кг
 Ball Clay1 кг
Cure the finished skep
Cure the finished skep
Матеріали
6- 7 пучківЗаповнювач
- 1 пучокЗаповнювач
- 3 літрівЗаповнювач
- 6 метрівЗаповнювач
- 2 кгЗаповнювач
- 1 кгЗаповнювач
Матеріали з пов'язаних креслень
Пов'язані креслення
Ці креслення діляться знаннями — техніки, матеріали або принципи
Related blueprints
Other builds that share materials, tools, or techniques with this one.


CC0 Суспільне надбання
Це креслення випущено під ліцензією CC0. Ви можете вільно копіювати, змінювати, поширювати та використовувати цю роботу для будь-яких цілей без запиту дозволу.
Підтримайте мейкера, купуючи продукти через його креслення, де він отримує Комісію мейкера встановлену вендорами, або створіть нову ітерацію цього креслення та включіть його як зв'язок у власне креслення для розподілу доходу.