Співпраця
МИСТЕЦТВО
КРАСА ТА ЗДОРОВ'Я
РЕМЕСЛО
КУЛЬТУРА ТА ІСТОРІЯ
РОЗВАГИ
СЕРЕДОВИЩЕ
ЇЖА ТА НАПІЇ
ЗБОРНА ІНЖЕНЕРІЯ
НАУК
СПОРТ
ТЕХНОЛОГІЯ
НОСИМО
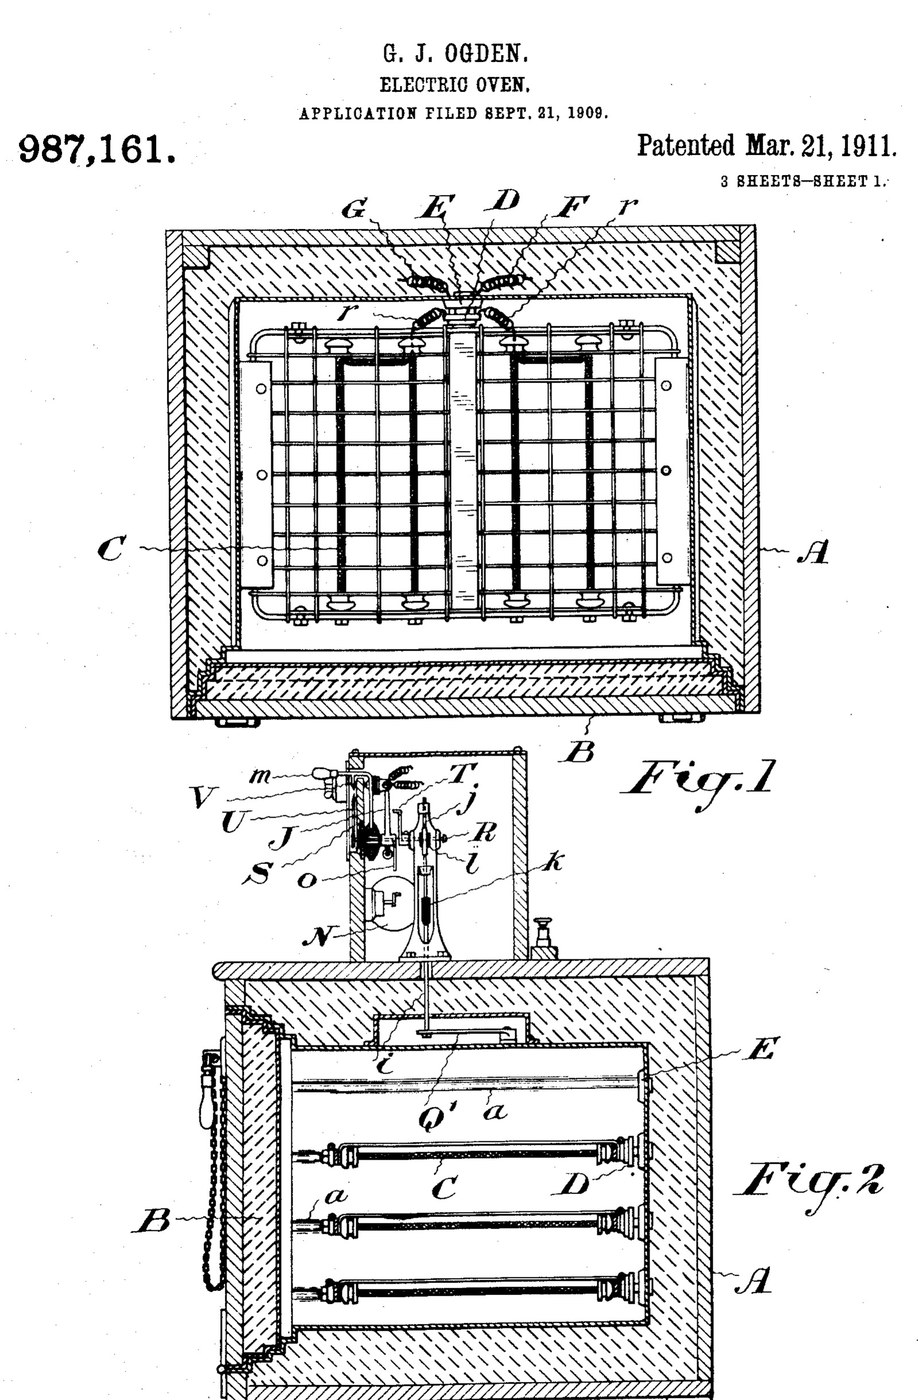


Oven: Insulated Electric Oven with Plug-In Grid Heaters and a Thermostat (Ogden, US 987,161, 1911)
An electric oven built to waste as little heat as possible: a double-walled, packed box with a packed door that seals like a strong-room door. Grid-shaped heating elements slide into grooves in the walls and plug into sockets at the back, and the food rests on them. A thermostat cuts the current when the set temperature is reached and switches it on again as the oven cools.
Result: an oven that bakes, roasts or dries at a set temperature with any number of heating grids.
Source: G. J. Ogden, US 987,161 (1911). Unknown: sizes, metals, packing and temperatures. Picture: the patent drawing.
Просунутий
Unknown
Інструкції
1
1
Build the insulated casing and door
Build the insulated casing and door
Make the oven chamber as a double-walled casing with packing between the walls, and grooves on the inner side walls to take the heating grids. Fit a door that closes like a fire-proof vault door, also packed, so the casing seals closely. Ours: mild steel sheet. Not given: sizes, the packing.
Матеріали для цього кроку:
 Лист маловуглецевої сталі1 inner and outer walls, door
 Невідомий ізоляційний матеріал1 packing
Необхідні інструменти ({count})
 Ножиці по металу
 Свердлильний верстат
 Невідомі розміри
2
2
Make the plug-in heating grids
Make the plug-in heating grids
Make heating elements in the form of grids that slide into the grooves and on which the food can rest. Fix a porcelain plug to each, carrying spring fingers that push into a socket with matching spring fingers in the back wall. Wire the sockets so all the elements are in parallel; use as many as the temperature and amount of food need. Ours: nichrome wire. Not given: the element type.
Матеріали для цього кроку:
 Ніхромовий дріт1 heating grids
 Невідомий матеріал1 porcelain plugs and sockets
 Пружинний сталевий дріт1 spring fingers
 Монтажний провід1 circuit wiring
Необхідні інструменти ({count})
 Паяльник
3
3
Fit the thermostat control
Fit the thermostat control
Put a thermostat that bends with heat inside the oven, working a contact finger that plays between two contacts a few degrees above and below the set temperature. A switch-changing device, a small rotary motor, throws the main switch off and on as the finger touches one contact or the other. Mount a setting arm with a pointer over a scale marked in degrees, and a second pointer driven by the thermostat. Add a hand switch to turn the current on or off independently, and a lamp with its own switch to light the oven. Ours: a bimetal strip, toggle switches. Not given: temperatures.
Матеріали для цього кроку:
 Біметалева пластина1 thermostat
 Електродвигун1 switch-changing motor
 Тумблер3 main, hand and lamp switches
 Невідомий метал1 contacts, arm, scaleНевідомий матеріал1 incandescent oven lamp
Необхідні інструменти ({count})
Паяльник Термометр
Матеріали
10- 1 inner and outer walls, doorЗаповнювач
- 1 packingЗаповнювач
- 1 heating gridsЗаповнювач
- 1 incandescent oven lampЗаповнювач
- 1 spring fingersЗаповнювач
- Заповнювач
- 1 thermostatЗаповнювач
- 1 switch-changing motorЗаповнювач
- Заповнювач
- 1 contacts, arm, scaleЗаповнювач
Матеріали з пов'язаних креслень

За цим кресленням виготовляють

CC0 Суспільне надбання
Це креслення випущено під ліцензією CC0. Ви можете вільно копіювати, змінювати, поширювати та використовувати цю роботу для будь-яких цілей без запиту дозволу.
Підтримайте мейкера, купуючи продукти через його креслення, де він отримує Комісію мейкера встановлену вендорами, або створіть нову ітерацію цього креслення та включіть його як зв'язок у власне креслення для розподілу доходу.