
МИСТЕЦТВО
КРАСА ТА ЗДОРОВ'Я
РЕМЕСЛО
КУЛЬТУРА ТА ІСТОРІЯ
РОЗВАГИ
СЕРЕДОВИЩЕ
ЇЖА ТА НАПІЇ
ЗБОРНА ІНЖЕНЕРІЯ
НАУК
СПОРТ
ТЕХНОЛОГІЯ
НОСИМО
Push Button: Normally Open Momentary Switch with a Cushioned Contact (De Reamer, GE 1939)
Ed

Створено

Ed

28. жовтень 2026FI
0
0
0
0
0

Push Button: Normally Open Momentary Switch with a Cushioned Contact (De Reamer, GE 1939)

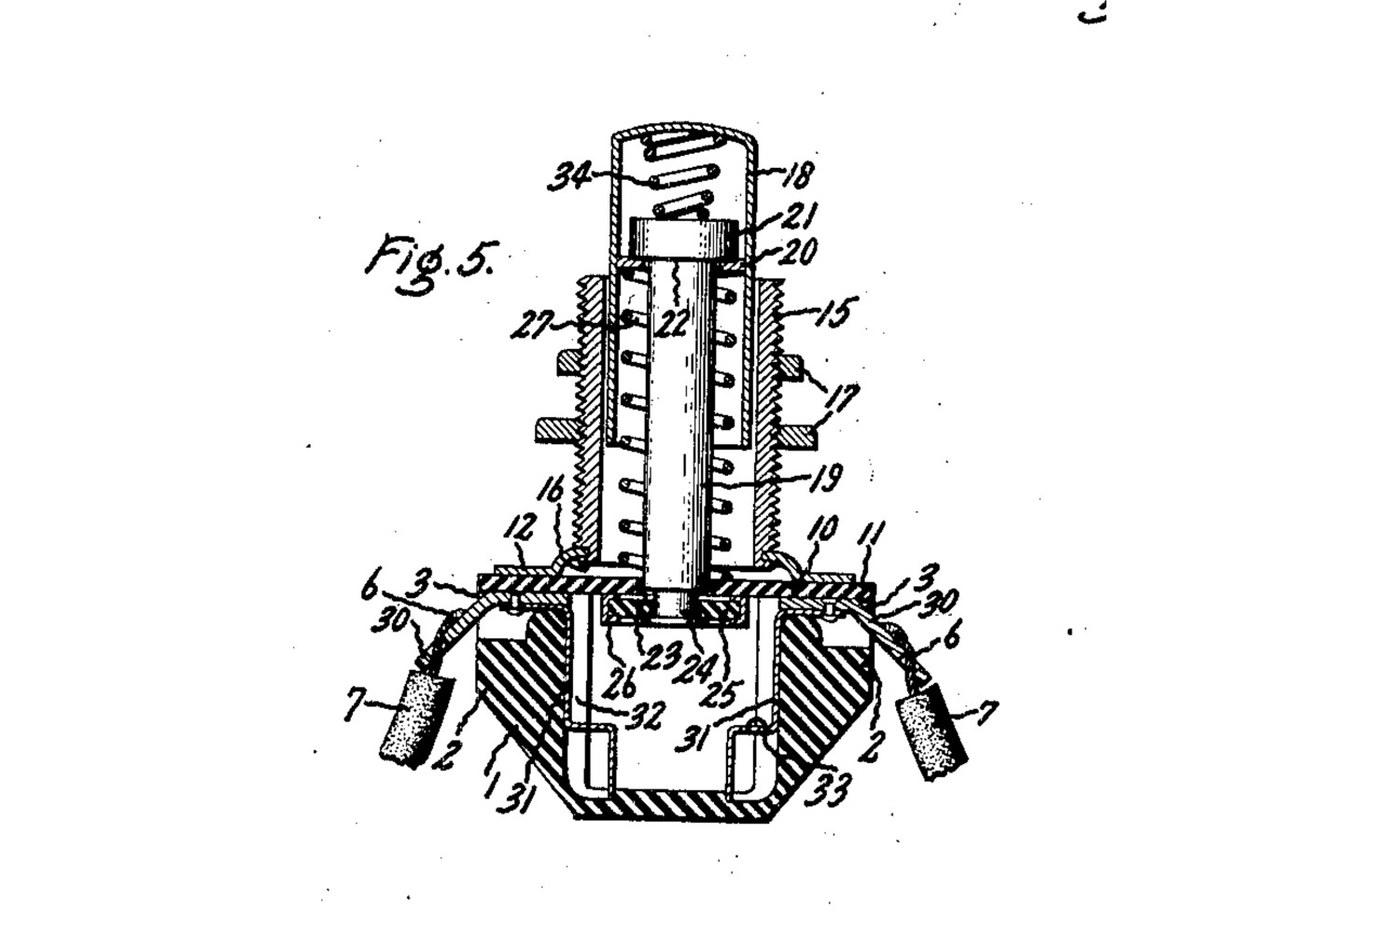
A panel push button that closes a circuit only while you press it. A spring holds the button out, and a metal rim on the end of its rod sits clear of two contacts. Press it and the rim bridges both contacts. A second spring inside the button lets the rod give, so the contacts never take more than that spring's force. Source: Frank C. De Reamer, US 2,166,803 (General Electric, 1939), Fig. 5. Unknown: the insulating material, the metals and every size. De Reamer gives none of them, so they are linked to unknown heads. The tools are ours. Picture: the patent's Fig. 5.
Просунутий
2 days

Інструкції

1

Mould the housing

Mould a cup-shaped housing of insulating material, with a boss on each of two opposite sides, a recess in the top of each boss, a groove inside below each boss, and a bead round the top. Unknown: the material, the sizes and the moulding.

Матеріали для цього кроку:

Невідомий ізоляційний матеріалНевідомий ізоляційний матеріал1 as required

Необхідні інструменти ({count})

Компресійна прес-формаКомпресійна прес-форма
Невідомі розміриНевідомі розміри
2

Make the terminals and contacts

Bend two angled metal strips. The upper end of each sits in a boss recess, and the lower end is a solder lug. Fix each upper end to a contact that fits the groove inside the housing, stepped at its bottom end. Unknown: the metal.

Матеріали для цього кроку:

Невідомий металНевідомий метал1 as required

Необхідні інструменти ({count})

Ножиці по металуНожиці по металу
ПлоскогубціПлоскогубці
Невідомі розміриНевідомі розміри
3

Make the sleeve, plate and cover

Turn a threaded sleeve and cut its thread. Spin its lower end over onto a metal plate with tangs. Cut a cover of insulating sheet with ears that reach over the bosses and a hole in the middle to guide the rod.

Матеріали для цього кроку:

Невідомий металНевідомий метал1 as required
Невідомий ізоляційний матеріалНевідомий ізоляційний матеріал1 as required

Необхідні інструменти ({count})

Токарний верстат по металуТокарний верстат по металу
Набір токарних різців по дереву (HSS)Набір токарних різців по дереву (HSS)
ПлашкотримачПлашкотримач
Ножиці по металуНожиці по металу
ШтангенциркульШтангенциркуль
Невідомі розміриНевідомі розміри
4

Make the push button

Make a drawn metal tube closed at the top, and a rod with a head. Put a small coil spring in the top of the tube, then the rod's head. Wedge a washer into the tube under the head. Leave clearance so the rod can swivel a little. Turn the rod's lower end down to a smaller diameter. Unknown: the metal.

Матеріали для цього кроку:

Невідомий металНевідомий метал1 as required
Набір пружин стискуНабір пружин стиску1 spring

Необхідні інструменти ({count})

Токарний верстат по металуТокарний верстат по металу
Набір токарних різців по дереву (HSS)Набір токарних різців по дереву (HSS)
ШтангенциркульШтангенциркуль
Невідомі розміриНевідомі розміри
5

Assemble

Set the terminals in their recesses and the contacts in their grooves. Slide the button into the sleeve, with a coil spring round the rod between the cover and the wedged washer. Pass the rod's end through the cover's hole. Put on it a loose insulating washer with a metal rim round its edge. Hammer the rod's end over into a flange. Lay the cover on the housing, so its ears clamp the terminals, and bend the plate's tangs over the bead.

Матеріали для цього кроку:

Невідомий ізоляційний матеріалНевідомий ізоляційний матеріал1 as required
Невідомий металНевідомий метал1 as required
Набір пружин стискуНабір пружин стиску1 spring

Необхідні інструменти ({count})

Слюсарні лещатаСлюсарні лещата
Слюсарний молоток із кульковим бойкомСлюсарний молоток із кульковим бойком
ПлоскогубціПлоскогубці
Захисні окуляриЗахисні окуляри
6

Mount and wire it

Put the sleeve through a hole in the panel and clamp the panel between two nuts on the thread. Solder the bared wire ends to the two lugs.

Матеріали для цього кроку:

Шестигранна гайкаШестигранна гайка2 pcs
Дріт припоюДріт припою1 as required

Необхідні інструменти ({count})

ПаяльникПаяльник
ПлоскогубціПлоскогубці
7

Check it

At rest, the rim sits against the underside of the cover and the circuit is open. Pressed, the rim meets the stepped ends of both contacts and closes it. The checking is ours: the meter reads open, then closed while pressed.

Необхідні інструменти ({count})

МультиметрМультиметр

Матеріали

5

Необхідні інструменти

13

За цим кресленням виготовляють

Пов'язані креслення

Ці креслення діляться знаннями — техніки, матеріали або принципи
CC0 Суспільне надбання

Це креслення випущено під ліцензією CC0. Ви можете вільно копіювати, змінювати, поширювати та використовувати цю роботу для будь-яких цілей без запиту дозволу.

Підтримайте мейкера, купуючи продукти через його креслення, де він отримує Комісію мейкера встановлену вендорами, або створіть нову ітерацію цього креслення та включіть його як зв'язок у власне креслення для розподілу доходу.

Обговорення

(0)

Увійти щоб приєднатися до обговорення

Завантаження коментарів...