
Співпраця
МИСТЕЦТВО
КРАСА ТА ЗДОРОВ'Я
РЕМЕСЛО
КУЛЬТУРА ТА ІСТОРІЯ
РОЗВАГИ
СЕРЕДОВИЩЕ
ЇЖА ТА НАПІЇ
ЗБОРНА ІНЖЕНЕРІЯ
НАУК
СПОРТ
ТЕХНОЛОГІЯ
НОСИМО
Small Series-Wound Electric Motor with Laminated Field and 12-Slot Ring Armature (Robertson, Boy Mechanic 1913)
Volt

Створено

Volt

14. листопад 2026SE
7
0
0
0
0

Small Series-Wound Electric Motor with Laminated Field and 12-Slot Ring Armature (Robertson, Boy Mechanic 1913)

A real workshop-built DC motor: a field of riveted sheet-iron plates bored to 2-3/4 in, a 12-slot laminated ring armature on a brass spider, a 12-segment brass commutator insulated with mica, gauze brushes, and series windings of cotton-covered magnet wire.
Просунутий
Several weekends

Інструкції

1

Read the Boy Mechanic

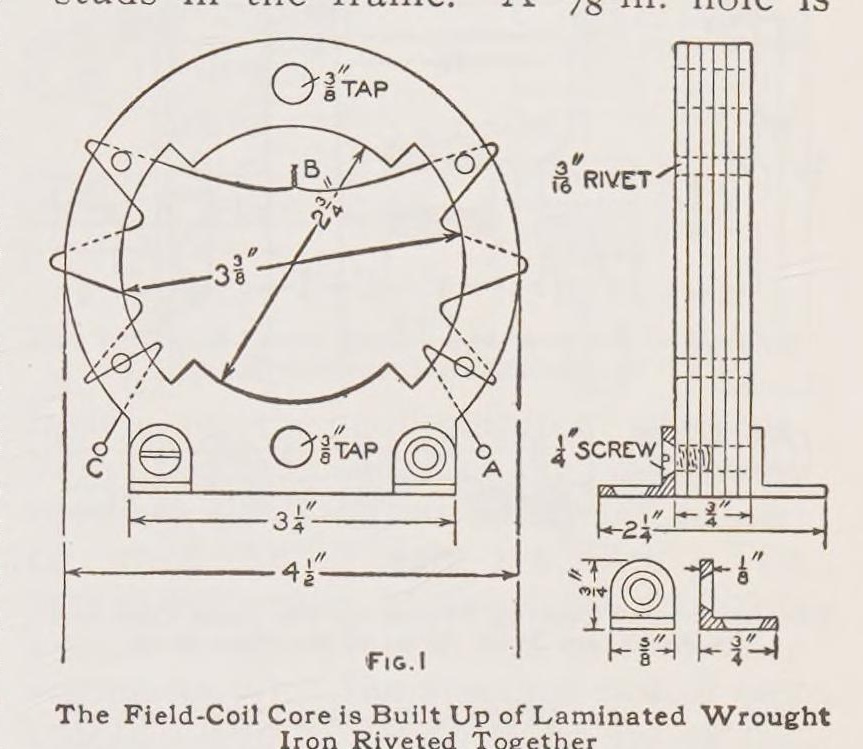
"The field frame of the motor, Fig. 1, is composed of wrought sheet iron."
2

Field frame

Mark a template 1/16 in larger than Fig. 1, cut enough sheet-iron plates to make 3/4 in, drill four rivet holes and rivet them. Mark the bore with dividers set at 1/8 in, drill 1/4 in holes round it and file to shape. Bore to 2-3/4 in on a lathe; mark the field core at 3-3/8 in and the outside at 4-1/2 in and finish to the marks.

Матеріали для цього кроку:

Лист маловуглецевої сталіЛист маловуглецевої сталі1 штука
Сталеві заклепкиСталеві заклепки1 штука

Необхідні інструменти ({count})

РисувалкаРисувалка
Розмічальний циркульРозмічальний циркуль
Ручний дрильРучний дриль
Напилки (ручний напилок)Напилки (ручний напилок)
Токарний верстат по металуТокарний верстат по металу
МолотокМолоток
3

Studs, lugs and bearings

Drill and tap two 3/8 in holes 3-5/8 in apart for the bearing studs (Fig. 2) and 1/4 in holes for feet bent from 1/8 in brass or iron. Make the bearing supports from 1/8 in brass with a 5/8 in hole and a 5/8 in brass rod soldered in and drilled for the shaft. Fit them after the armature is made: wrap paper round the armature, set it in the field, slip the bearings on and solder them, then check it turns freely.

Матеріали для цього кроку:

Латунний листЛатунний лист1 штука
Латунний прутокЛатунний пруток1 штука
Круглий пруток з маловуглецевої сталіКруглий пруток з маловуглецевої сталі1 штука

Олов'яно-свинцевий припійОлов'яно-свинцевий припій1 штука

Необхідні інструменти ({count})

Набір мітчиків і плашокНабір мітчиків і плашок
Токарний верстат по металуТокарний верстат по металу
ПаяльникПаяльник
Ручний дрильРучний дриль
4

Armature core

Cut two 1/8 in wrought-iron outer plates and enough No. 24 sheet iron to make over 3/4 in (Fig. 5), drill six 1/8 in holes and rivet. Anneal at cherry red and cool in ashes. Bore to 1-11/16 in, fit a brass spider turned from 3/4 in brass on the machine-steel shaft with a setscrew, solder, turn the outside and face it to 3/4 in. File 12 slots 1/4 in deep and 7/16 in wide.

Матеріали для цього кроку:

Лист маловуглецевої сталіЛист маловуглецевої сталі1 штука
Сталеві заклепкиСталеві заклепки1 штука
Латунний прутокЛатунний пруток1 штука
Круглий пруток з маловуглецевої сталіКруглий пруток з маловуглецевої сталі1 штука

Необхідні інструменти ({count})

Кувальне горноКувальне горно
Токарний верстат по металуТокарний верстат по металу
Напилки (ручний напилок)Напилки (ручний напилок)
Ручний дрильРучний дриль
5

Commutator

Turn a piece of 3/4 in i.d. brass pipe to 3/4 in long, chamfer both ends at 60 deg, divide into 12, drill and tap a 1/8 in hole in each segment for a brass pin, turn the pins to 1-1/4 in outside and slit them for the wires. Saw it into 12 bars, fit them on turned fibre ends with 12 mica strips between, clamp with the nut and true up.

Матеріали для цього кроку:

Латунна трубкаЛатунна трубка1 штука
Латунний прутокЛатунний пруток1 штука
Фібра листова (вулканізована)Фібра листова (вулканізована)1 штука
Лист слюдиЛист слюди1 штука

Необхідні інструменти ({count})

Токарний верстат по металуТокарний верстат по металу
Набір мітчиків і плашокНабір мітчиків і плашок
Ножівка по металуНожівка по металу
6

Brushes

Make the brush holder of fibre (Fig. 8) and studs of 5/16 in brass rod (Fig. 9). Roll brass or copper wire gauze and flatten it to 1/8 x 1/4 in, solder one end, and fit the holder on the bearing with a setscrew.

Матеріали для цього кроку:

Фібра листова (вулканізована)Фібра листова (вулканізована)1 штука
Латунний прутокЛатунний пруток1 штука
Ткана сіткаТкана сітка1 штука
Олов'яно-свинцевий припійОлов'яно-свинцевий припій1 штука

Необхідні інструменти ({count})

ПаяльникПаяльник
Напилки (ручний напилок)Напилки (ручний напилок)
7

Wind the field

Insulate the field cores with 1/64 in fibre and end washers 1-1/8 x 1-1/2 in (softened in warm water, then glued). Wind each side with four layers (about 50 ft) of No. 18 double-cotton-covered wire, A to B and C to B, and join the ends at B.

Матеріали для цього кроку:

Фібра листова (вулканізована)Фібра листова (вулканізована)1 штука
Мідний дріт в емалевій ізоляціїМідний дріт в емалевій ізоляції1 штука
Столярний клейСтолярний клей1 штука
8

Wind the armature

Line the ring and spider with 1/16 in fibre and the slots with 1/64 in fibre channels. Wind each slot with about 12 ft of No. 21 wire, 40 turns in four layers of 10, shellacking each layer, leaving 2 in ends. Join each coil's start to the next coil's finish and solder the joints to the commutator pins.

Матеріали для цього кроку:

Фібра листова (вулканізована)Фібра листова (вулканізована)1 штука
Мідний дріт в емалевій ізоляціїМідний дріт в емалевій ізоляції1 штука
Шелаковий лакШелаковий лак1 штука
Олов'яно-свинцевий припійОлов'яно-свинцевий припій1 штука

Необхідні інструменти ({count})

ПаяльникПаяльник
9

Mount and wire

Screw the motor to a wood base 8 x 6 x 1 in with two terminals and a switch. Wire it in series: field end A to a terminal, field end C to one brush stud, the other brush through the switch to the other terminal.

Матеріали для цього кроку:

Дошка з твердої деревиниДошка з твердої деревини1 штука
Клема-барашокКлема-барашок1 штука
ТумблерТумблер1 штука
Шурупи по деревуШурупи по дереву1 штука

Необхідні інструменти ({count})

Коловорот із перкоюКоловорот із перкою
10

Troubleshooting

Motor troubleshooting.

Flow

Loading...
11

History and honest limits

From W. A. Robertson in **The Boy Mechanic, Book 1** (Popular Mechanics, 1913), pp. 345-347 (checked on the archive.org scan boymechanic0000unse_n5a8). Sizes not in the text are in his Figs. 1-9; enamelled wire for cotton-covered and the low-voltage advice are ours.

Матеріали

17

Необхідні інструменти

11

За цим кресленням виготовляють

Пов'язані креслення

Ці креслення діляться знаннями — техніки, матеріали або принципи
CC0 Суспільне надбання

Це креслення випущено під ліцензією CC0. Ви можете вільно копіювати, змінювати, поширювати та використовувати цю роботу для будь-яких цілей без запиту дозволу.

Підтримайте мейкера, купуючи продукти через його креслення, де він отримує Комісію мейкера встановлену вендорами, або створіть нову ітерацію цього креслення та включіть його як зв'язок у власне креслення для розподілу доходу.

Обговорення

(0)

Увійти щоб приєднатися до обговорення

Завантаження коментарів...