МИСТЕЦТВО
КРАСА ТА ЗДОРОВ'Я
РЕМЕСЛО
КУЛЬТУРА ТА ІСТОРІЯ
РОЗВАГИ
СЕРЕДОВИЩЕ
ЇЖА ТА НАПІЇ
ЗБОРНА ІНЖЕНЕРІЯ
НАУК
СПОРТ
ТЕХНОЛОГІЯ
НОСИМО
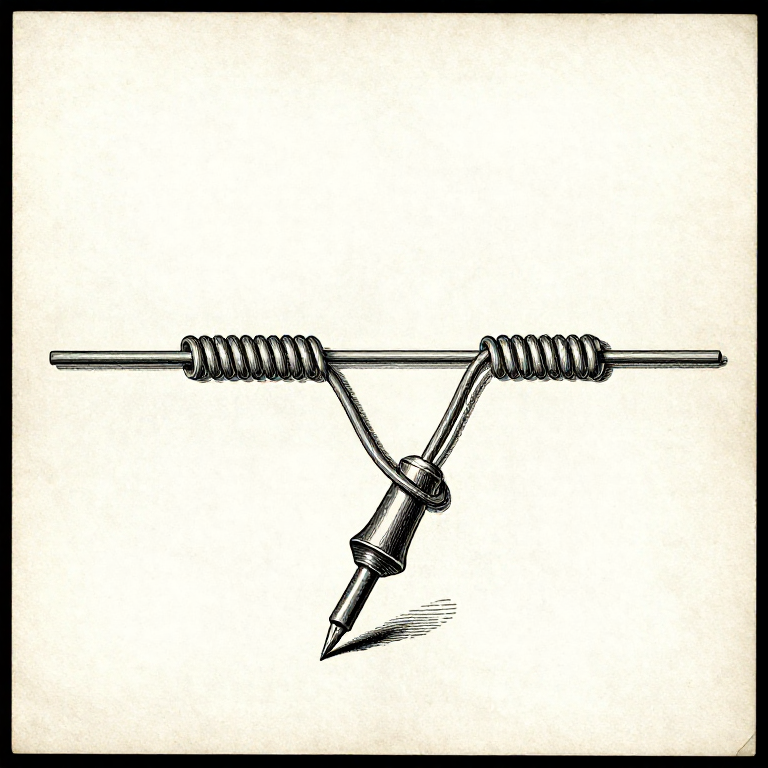


Soldering a Wire Joint: Not the Same Job as Soldering a Board
A board joint is held still by the board. A wire joint is held by nothing, joins two things that both move, and has to survive being flexed for years.
So the technique differs in three ways: the wires must be mechanically joined before any solder arrives, the joint must be supported while it cools, and it must end up FLEXIBLE at the point where the wire leaves it — which is the opposite of what solder naturally does.
The published through-hole soldering rung covers the heat, the flux and the wetting. Everything there still applies; this rung is what is different once there is no board.
Середній
3 hours
Інструкції
1
1
Mechanical first: the joint must hold before it is soldered
Mechanical first: the joint must hold before it is soldered
Solder is a conductor and an adhesive, not a structural material. A joint relying on solder for its strength will fail, and it will fail at the worst moment.
Make the connection hold on its own first. Hook each stripped end into a small J, link them, and squeeze flat. Or lay the two ends alongside each other and wrap the strands together — the Western Union splice, which was designed for telegraph wire that had to survive weather and tension.
Then solder it, and the solder's only job is to fill the gaps and exclude air. Tug the joint before soldering: if it comes apart in your fingers, solder will not save it.
Матеріали для цього кроку:
 Монтажний провід2 штук
 Дріт припою1 штука
Необхідні інструменти ({count})
 Паяльник
 Інструмент для знімання ізоляції
 Важкі слюсарні лещата
2
2
Heat the joint, feed from the far side, and do not move it
Heat the joint, feed from the far side, and do not move it
Put the iron on one side of the twisted joint and feed solder in from the OTHER side. When the joint is hot enough, the solder melts on contact with the wire rather than the iron and flows right through the strands.
Melting solder onto the iron and carrying it over gives a joint that looks filled and is not — the solder sits on top of cold copper. That is the same cold joint the board rung warns about, and on a wire it is harder to spot because there is no shiny fillet to judge.
Hold everything still until the solder has visibly gone dull and solid. A joint moved while freezing has a fractured crystal structure: it is grey and grainy rather than smooth, and it is weak. Helping hands or a vice are worth using for this reason alone.
Матеріали для цього кроку:
Дріт припою1 штука Флюс-паста для паяння (каніфольна)1 штука
Необхідні інструменти ({count})
ПаяльникВажкі слюсарні лещата Ювелірна лупа
3
3
Keep the solder OUT of the flex zone
Keep the solder OUT of the flex zone
Solder wicks along stranded wire under the insulation, and wherever it goes the wire becomes rigid. The boundary between the stiff soldered section and the flexible wire is then a hinge, and the wire breaks exactly there.
Keep the joint short, use just enough solder, and do not let it creep back under the insulation. A little flux and quick work help; a big blob and a long dwell guarantee wicking.
This is the same reason the crimp rung says never to solder a crimp. Wherever a wire must flex, it must be copper doing the flexing — not a stiff soldered section with a stress concentration at its end.
Матеріали для цього кроку:
Дріт припою1 штукаМонтажний провід1 штукаНеобхідні інструменти ({count})
ПаяльникЮвелірна лупа4
4
Insulate it, and choose heat shrink over tape
Insulate it, and choose heat shrink over tape
Slide the heat shrink on BEFORE you solder — far enough down the wire that the iron will not shrink it prematurely — then bring it over the finished joint and warm it evenly.
Heat shrink grips the wire on both sides of the joint, so it adds real strain relief as well as insulation. Adhesive-lined shrink seals against moisture too, which matters for anything outdoors or in an engine bay.
Electrical tape is a temporary answer. It unwinds in heat, its adhesive creeps, and a taped joint in a loom will be found hanging open years later. Use it for a test, not for a build.
Матеріали для цього кроку:
 Термоусадочна трубка1 штука
 Ізоляційна стрічка1 штука
Необхідні інструменти ({count})
ПаяльникЮвелірна лупаМатеріали
5- 3 штукЗаповнювач
- 3 штукЗаповнювач
- Заповнювач
- 1 штукаЗаповнювач
- 1 штукаЗаповнювач
За цим кресленням виготовляють
Пов'язані креслення
Ці креслення діляться знаннями — техніки, матеріали або принципи

CC0 Суспільне надбання
Це креслення випущено під ліцензією CC0. Ви можете вільно копіювати, змінювати, поширювати та використовувати цю роботу для будь-яких цілей без запиту дозволу.
Підтримайте мейкера, купуючи продукти через його креслення, де він отримує Комісію мейкера встановлену вендорами, або створіть нову ітерацію цього креслення та включіть його як зв'язок у власне креслення для розподілу доходу.