Співпраця
МИСТЕЦТВО
КРАСА ТА ЗДОРОВ'Я
РЕМЕСЛО
КУЛЬТУРА ТА ІСТОРІЯ
РОЗВАГИ
СЕРЕДОВИЩЕ
ЇЖА ТА НАПІЇ
ЗБОРНА ІНЖЕНЕРІЯ
НАУК
СПОРТ
ТЕХНОЛОГІЯ
НОСИМО
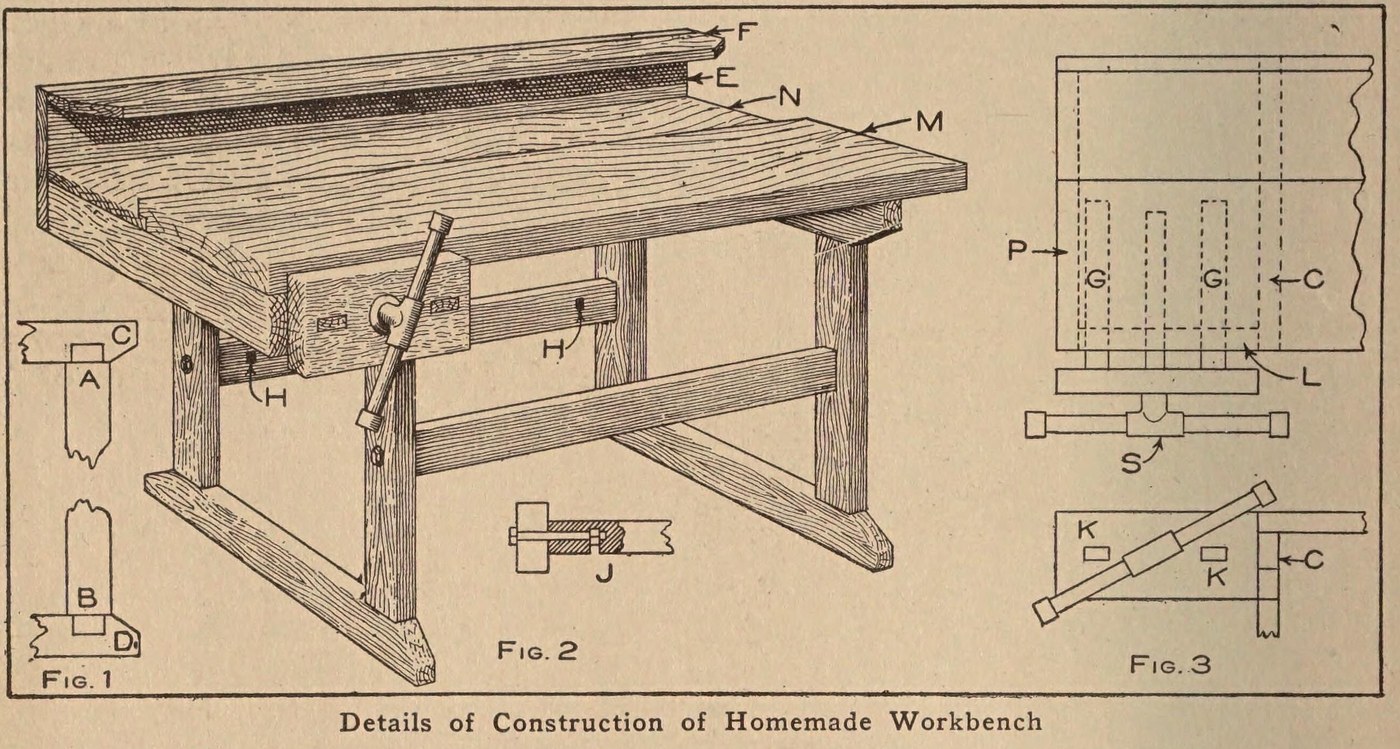


Workbench: a Pine Bench with a Laminated Maple Top and Vise (Boy Mechanic, 1913)
The same pine bench with a harder top: 14 maple strips set on edge, glued and screwed together, with a back board, a tool rack and a wooden vise on an iron bench screw.
Source: C. E. McKinney, Jr., 'Homemade Workbench', The Boy Mechanic, Book 1 (1913), pp. 442-443. Picture: Figs. 1-3 of the book.
Середній
Unknown
Інструкції
1
1
Make the two leg frames
Make the two leg frames
Cut four 2 x 4 in pine legs 23 in long with a tenon on each end 1/2 in thick, 3 1/2 in wide and 1 1/2 in long (Fig. 1, A and B). Cut four crosspieces of the same stock 20 in long, mortised in the narrow edge 1 1/4 in from each end, and slope their corners from the leg out to the middle. Fit each pair of legs to a pair of crosspieces to make the two supports.
Матеріали для цього кроку:
 Сосновий пиломатеріал1 2 x 4 in: legs, crosspieces
Необхідні інструменти ({count})
 Ручна пилка
 Долото для гнізд
 Молоток
2
2
Brace them together
Brace them together
Join the supports with two 2 x 4 in braces 24 in long, ends sawn square. Bore through each leg and 4 in into the centre of each brace end, bore an intersecting hole on the back of each brace for the nut, and draw each joint tight with a 3/8 x 6 in bolt (Fig. 2, J). A cross brace on the back stops rocking when planing.
Матеріали для цього кроку:
Сосновий пиломатеріал1 2 x 4 in: braces Болт із півкруглою головкою4 3/8 x 6 in
Необхідні інструменти ({count})
Ручна пилка Коловорот із перкою
 Розвідний ключ
3
3
Build up the maple top
Build up the maple top
Make the main top M of 14 maple strips 7/8 in thick, 2 in wide and 3 1/2 ft long, set on edge, each glued and screwed to the next, all with the grain one way so it planes smooth. Rabbet its back edge 1/2 in to take a back board N of the same length, 8 1/2 in wide and 7/8 in thick. Screw the top to the top crosspieces with long screws.
Матеріали для цього кроку:
 Невідомий матеріал14 maple strips 7/8 x 2 in x 3 1/2 ft
 Столярний клей1 штука
 Соснова дошка1 back board
 Шурупи по дереву1 штука
Необхідні інструменти ({count})
Ручна пилка Обдирний струг
 Викрутка пласка
4
4
Add the tool rack
Add the tool rack
Nail a board E 10 in wide to the back of the bench and fasten a 2 1/2 in board F on top of it at right angles; both 7/8 in thick and 3 1/2 ft long. Bore holes or cut notches in F to hold tools.
Матеріали для цього кроку:
Соснова дошка2 7/8 in, 3 1/2 ft Цвяхи1 штука
Необхідні інструменти ({count})
Коловорот із перкоюРучна пилкаМолоток5
5
Fit the vise
Fit the vise
Fasten an iron bench screw in a 2 x 6 in block 12 in long. Mortise two guide rails 7/8 x 1 1/2 in and 20 in long into the block; they slide in mortises in a 2 x 4 piece L bolted under the top, which holds the bench-screw nut between the two mortises. Nail L to a top crosspiece and to a 2 x 4 piece P bolted under the top at the end (Fig. 3).
Матеріали для цього кроку:
Сосновий пиломатеріал1 2 x 6 block, 2 x 4 pieces, guide rails Верстатний гвинт для різьблення по дереву1 штукаБолт із півкруглою головкою1 for L and PЦвяхи1 штука
Необхідні інструменти ({count})
Ручна пилкаДолото для гніздКоловорот із перкоюРозвідний ключМолотокМатеріали
8- 1 2 x 6 block, 2 x 4 pieces, guide railsЗаповнювач
- 1 for L and PЗаповнювач
- 14 maple strips 7/8 x 2 in x 3 1/2 ftЗаповнювач
- 1 штукаЗаповнювач
- 2 7/8 in, 3 1/2 ftЗаповнювач
- 1 штукаЗаповнювач
- 2 штукЗаповнювач
- Заповнювач
За цим кресленням виготовляють

CC0 Суспільне надбання
Це креслення випущено під ліцензією CC0. Ви можете вільно копіювати, змінювати, поширювати та використовувати цю роботу для будь-яких цілей без запиту дозволу.
Підтримайте мейкера, купуючи продукти через його креслення, де він отримує Комісію мейкера встановлену вендорами, або створіть нову ітерацію цього креслення та включіть його як зв'язок у власне креслення для розподілу доходу.