Collaboration
ART
BEAUTY & WELLNESS
CRAFT
CULTURE & HISTORY
ENTERTAINMENT
ENVIRONMENT
FOOD & DRINKS
REVERSE ENGINEERING
SCIENCES
SPORTS
TECHNOLOGY
WEARABLES
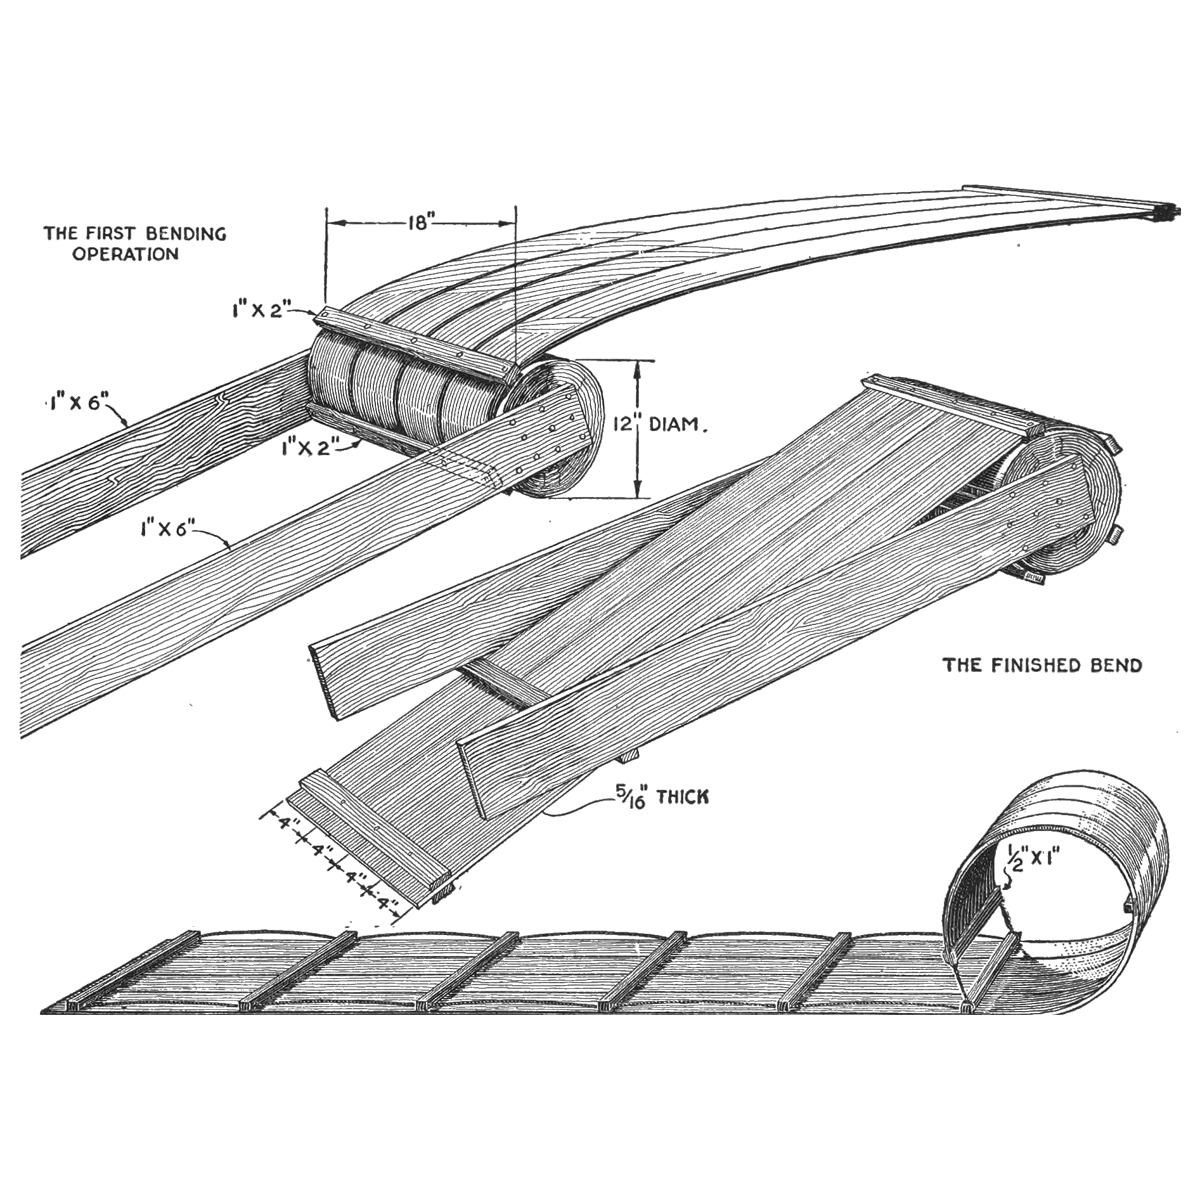


Coasting Toboggan: Four Steamed Hardwood Boards Bent Over a Log Form (Boy Mechanic, 1919)
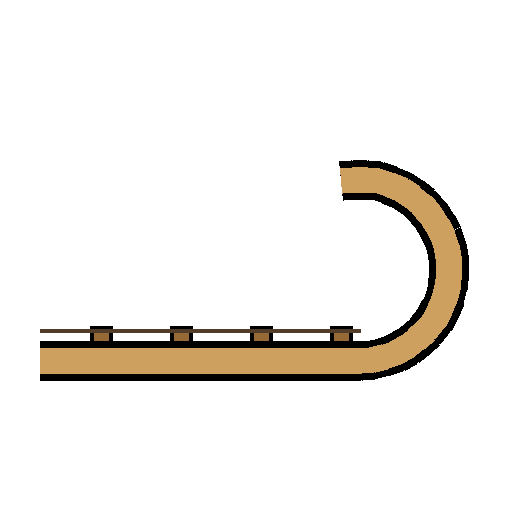
A. M. Parker's toboggan from The Boy Mechanic, Book 3 (1919), 7-1/2 ft long and 16 in wide: four 5/16 in hardwood boards steamed at one end and bent round a 12 in log on a simple form, held by notched cross cleats, the curl riveted and wired, and a rope run along the sides.
Intermediate
About 1 week (four days drying)
Instructions
1
1
His mill bill in centimetres
His mill bill in centimetres
Loading Jupyter Notebook...
2
2
Read The Boy Mechanic, Book 3
Read The Boy Mechanic, Book 3
"Essentials of a good toboggan, whether for coasting or use in transportation, are strength and lightness." Woods in order of merit: hickory, birch and oak (not quarter-sawed).
3
3
Prepare the boards and cleats
Prepare the boards and cleats
Choose four 5/16 by 4 in by 10 ft boards straight in grain and free from knots. Plane the running side and bevel the edges so that, together, they form a wide V joint half the depth of the boards. Notch the seven 1 by 1 in cross cleats on one side, 1 in from each end, for the side ropes.
Materials for this step:
 Hardwood Board4 pieces
Tools needed:
 Hand Plane
 Hand Saw
 Chisels
 Pencil
 Tape Measure
4
4
Build the bending form
Build the bending form
Bore a gimlet hole through the centre of each 1 by 2 by 18 in piece and two more 4-1/4 in each side of it. Nail one 6 ft common board to each end of the 12 in by 18 in log block so their ends run parallel. With 3 in nails fix one bored cleat to the block between them, held out 1/2 in by a temporary spacer.
Materials for this step:
 Pine Board2 pieces
 Nails1 piece
Tools needed:
Hand Saw Hand Drill
 Hammer
5
5
Steam and bend
Steam and bend
Steam about 3 ft of the board ends, or boil them in a tank. Clamp or nail the dry ends together edge to edge between two of the 1 by 2 in pieces, about 1/4 in apart. Push the steamed ends under the cleat on the block (its nails slip between the boards), bear down and nail on another bored cleat as far as the floor allows. Turn it over and bend the boards round the block, nailing on more cleats, until the clamped end lies between the 6 ft boards; hold it with a piece nailed across. The closer the cleats, the less risk of splitting.
Materials for this step:
Nails1 pieceTools needed:
 Large Cooking PotHammer
 Bar Clamp
6
6
Fit the cleats and finish
Fit the cleats and finish
Dry at least four days on the form. Clamp the two 1/2 by 1 in pieces on each side of the bow ends, drill through and rivet them. Rivet a 1 by 1 in crossbar inside the bow at the extreme front and another under the end of the curl, and wire them together to hold the bend. Put the tail crossbar not nearer than 2-1/2 in from the board ends and space the rest evenly, notched side down. Trim, scrape and sandpaper the bottom, finish with oil, and run a 3/8 in rope through the notches under the cleat ends.
Materials for this step:
Hardwood Board1 piece Steel Rivets1 piece
 Iron Wire1 piece
 Linseed Oil1 piece
 Sandpaper1 piece
 Cotton Rope1 piece
Tools needed:
Hand DrillHammerHand Saw Steel Scraper
 Flat-Nose Pliers
7
7
Troubleshooting
Troubleshooting
Toboggan troubleshooting.
Flow
Loading...
8
8
History and honest limits
History and honest limits
From "Making a Coasting Toboggan" by A. M. Parker, in **The Boy Mechanic, Book 3**, Popular Mechanics, 1919 (Project Gutenberg 71856; checked on the archive.org scan boymechanic0003unse, pp. 11-13). The tools and metric figures are ours.
Materials
8- 4 piecesPlaceholder
- 2 piecesPlaceholder
- 2 piecesPlaceholder
- 1 piecePlaceholder
- 1 piecePlaceholder
- 1 piecePlaceholder
- 1 piecePlaceholder
- 1 piecePlaceholder
Tools Required
11- Placeholder
- Placeholder
- Placeholder
- 1 vendor sell this, none ship to you yetPlaceholder
- 1 vendor sell this, none ship to you yetPlaceholder
- Placeholder
- Placeholder
- Placeholder
- Placeholder
- Placeholder
- Placeholder
This blueprint makes
Related Blueprints
These blueprints share knowledge with this one — techniques, materials, or principles that connect them in the learning graph.
CC0 Public Domain
This blueprint is released under CC0. You are free to copy, modify, distribute, and use this work for any purpose, without asking permission.
Support the Maker by purchasing products through their Blueprint where they earn a Maker Commission set by Vendors, or create a new iteration of this Blueprint and include it as a connection in your own Blueprint to share revenue.