Collaboration
ART
BEAUTY & WELLNESS
CRAFT
CULTURE & HISTORY
ENTERTAINMENT
ENVIRONMENT
FOOD & DRINKS
REVERSE ENGINEERING
SCIENCES
SPORTS
TECHNOLOGY
WEARABLES
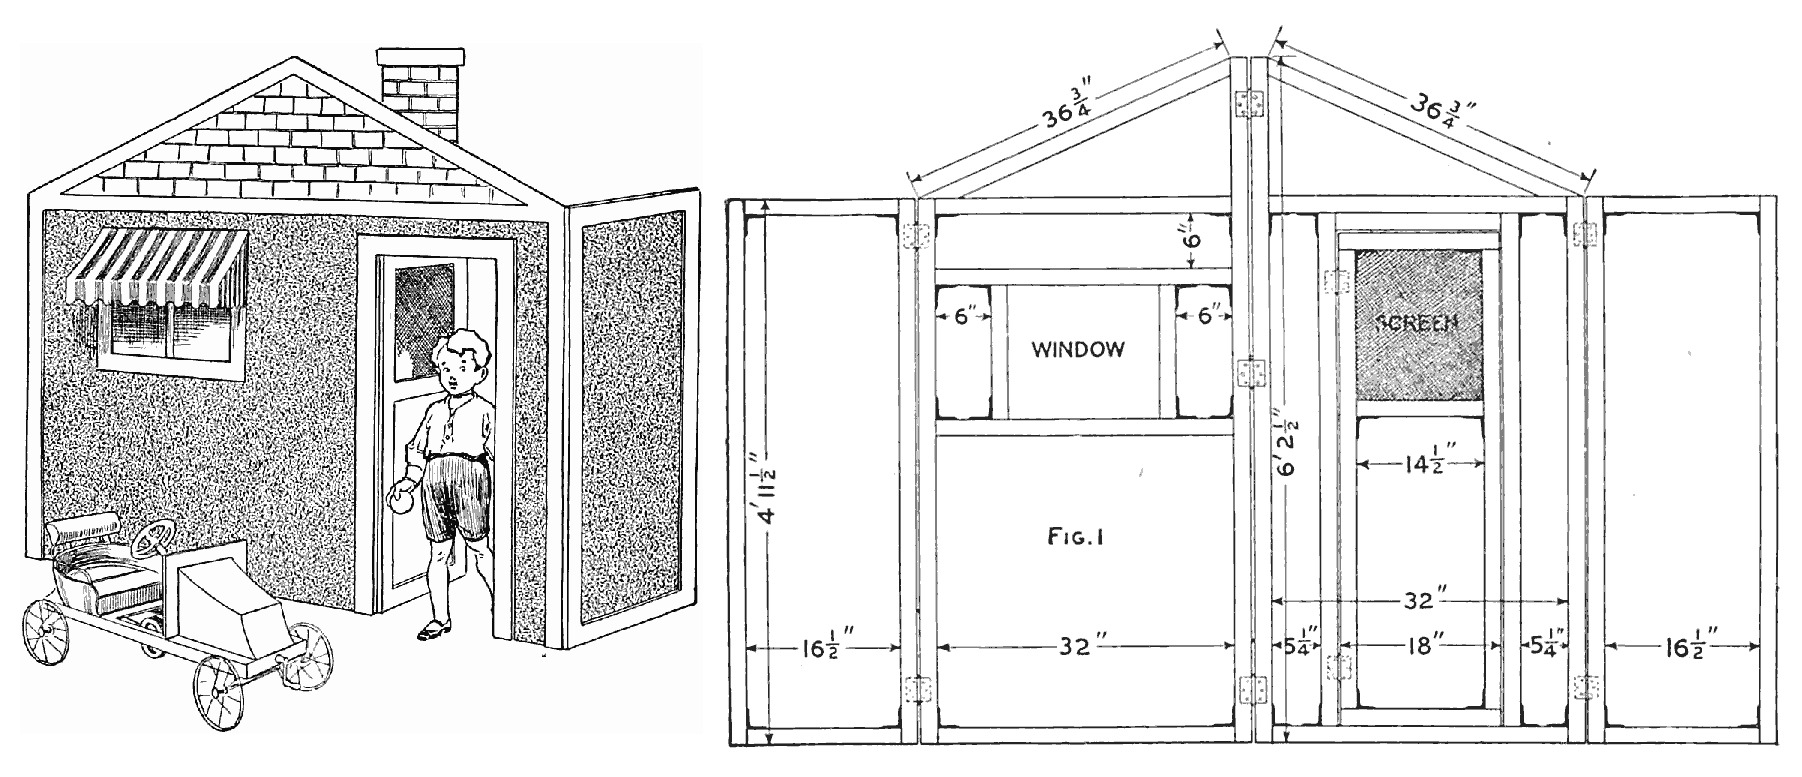


Folding Child's Playhouse: Hinged Frames Covered With Burlap, a Screened Door and a Window (Boy Mechanic, 1915)
A large, inexpensive playhouse for indoors or out, from The Boy Mechanic, Book 2 (1915): four light frames held with iron brackets, covered with coloured burlap and hinged so the house folds flat. One front has a window, the other a door with a wire-screen panel.
Sizes are read from the book's Fig. 1.
Intermediate
About 2 days
Instructions
1
1
Sizes from Fig. 1
Sizes from Fig. 1
Loading Jupyter Notebook...
2
2
Read The Boy Mechanic
Read The Boy Mechanic
"The child's playhouse is an expensive luxury, if it is purchased ready to set up, but by following the instructions given herewith a large and inexpensive one may be constructed."
3
3
Cut the frames
Cut the frames
Get about 100 ft of 1-3/4 by 1-1/2 in boards and saw out the pieces for four frames as in Fig. 1: two side wings 16-1/2 in wide and 4 ft 11-1/2 in high; a window front and a door front, each 32 in wide, rising with their gable members (36-3/4 in) to 6 ft 2-1/2 in at the ridge.
Materials for this step:
 Softwood Batten1 piece
Tools needed:
 Hand Saw
 Try Square
 Tape Measure
 Pencil
4
4
Join them with brackets
Join them with brackets
Join the corners with iron brackets instead of nails: easier than mortising and nailing or gluing, and stronger. In the window front, set rails to leave 6 in panels above and at each side of the window. In the door front, frame an 18 in door between 5-1/4 in stiles, with a 14-1/2 in screen panel in its upper part.
Materials for this step:
 Corner Bracket1 piece
 Wood Screws1 piece
Tools needed:
 Screwdriver - FlatTry Square
5
5
Cover the sections
Cover the sections
Tack burlap on each section before hinging them together; green, red or brown look best. Turn the edges under before tacking them down, so they do not unravel. Leave the window and the door's screen panel open.
Materials for this step:
 Burlap / Hessian1 piece
 Lasting Tacks1 piece
Tools needed:
 Hammer
 Scissors
6
6
Fit the door screen
Fit the door screen
Coat a piece of wire screen (an old piece will do) with black or dark-green paint and tack it on the inside of the door.
Materials for this step:
 Woven Wire Screen Cloth1 piece
 Black Paint1 pieceLasting Tacks1 piece
Tools needed:
 Wide Paint BrushHammerScissors
7
7
Hinge it so it folds
Hinge it so it folds
Fasten the parts together with hinges, nine in his drawing: on the inside of the side wings and on the outside of the two front pieces, so the house folds into a small space. Hang the door on two of them.
Materials for this step:
 Butt Hinge9 piecesWood Screws1 piece
Tools needed:
Screwdriver - Flat8
8
Trim and finish
Trim and finish
Trim the door and window frames with white paint along their edges. He finished his with roller shades on the door and window (and a small awning and an electric door bell, not made here).
Materials for this step:
 White Exterior Paint1 piece
 Roller Blind2 pieces
Tools needed:
Wide Paint BrushScrewdriver - Flat9
9
Troubleshooting
Troubleshooting
Playhouse troubleshooting.
Flow
Loading...
10
10
History and honest limits
History and honest limits
From **The Boy Mechanic, Book 2**, edited by H. H. Windsor, Popular Mechanics, Chicago, 1915 (Project Gutenberg 44585), "A Child's Playhouse"; all sizes are read from his Fig. 1. Not made here: the awning (his Figs. 2-3) and the electric bell. The screws, tacks, tools and metric figures are ours.
Materials
10- 1 piecePlaceholder
- 1 piecePlaceholder
- 2 piecesPlaceholder
- 1 piecePlaceholder
- 1 piecePlaceholder
- 1 piecePlaceholder
- 1 piecePlaceholder
- 9 piecesPlaceholder
- 1 piecePlaceholder
- 2 piecesPlaceholder
This blueprint makes
Related Blueprints
These blueprints share knowledge with this one — techniques, materials, or principles that connect them in the learning graph.

CC0 Public Domain
This blueprint is released under CC0. You are free to copy, modify, distribute, and use this work for any purpose, without asking permission.
Support the Maker by purchasing products through their Blueprint where they earn a Maker Commission set by Vendors, or create a new iteration of this Blueprint and include it as a connection in your own Blueprint to share revenue.