
Collaboration
ART
BEAUTY & WELLNESS
CRAFT
CULTURE & HISTORY
ENTERTAINMENT
ENVIRONMENT
FOOD & DRINKS
REVERSE ENGINEERING
SCIENCES
SPORTS
TECHNOLOGY
WEARABLES
Four-Passenger Coasting Bobsled: Iron-Shod Ash Runners, Hinged Rear Sled and Hoop Steering Wheel (Boy Mechanic, 1915)
Woody

Created by

Woody

13. November 2026NO
1
0
0
0
0

Four-Passenger Coasting Bobsled: Iron-Shod Ash Runners, Hinged Rear Sled and Hoop Steering Wheel (Boy Mechanic, 1915)

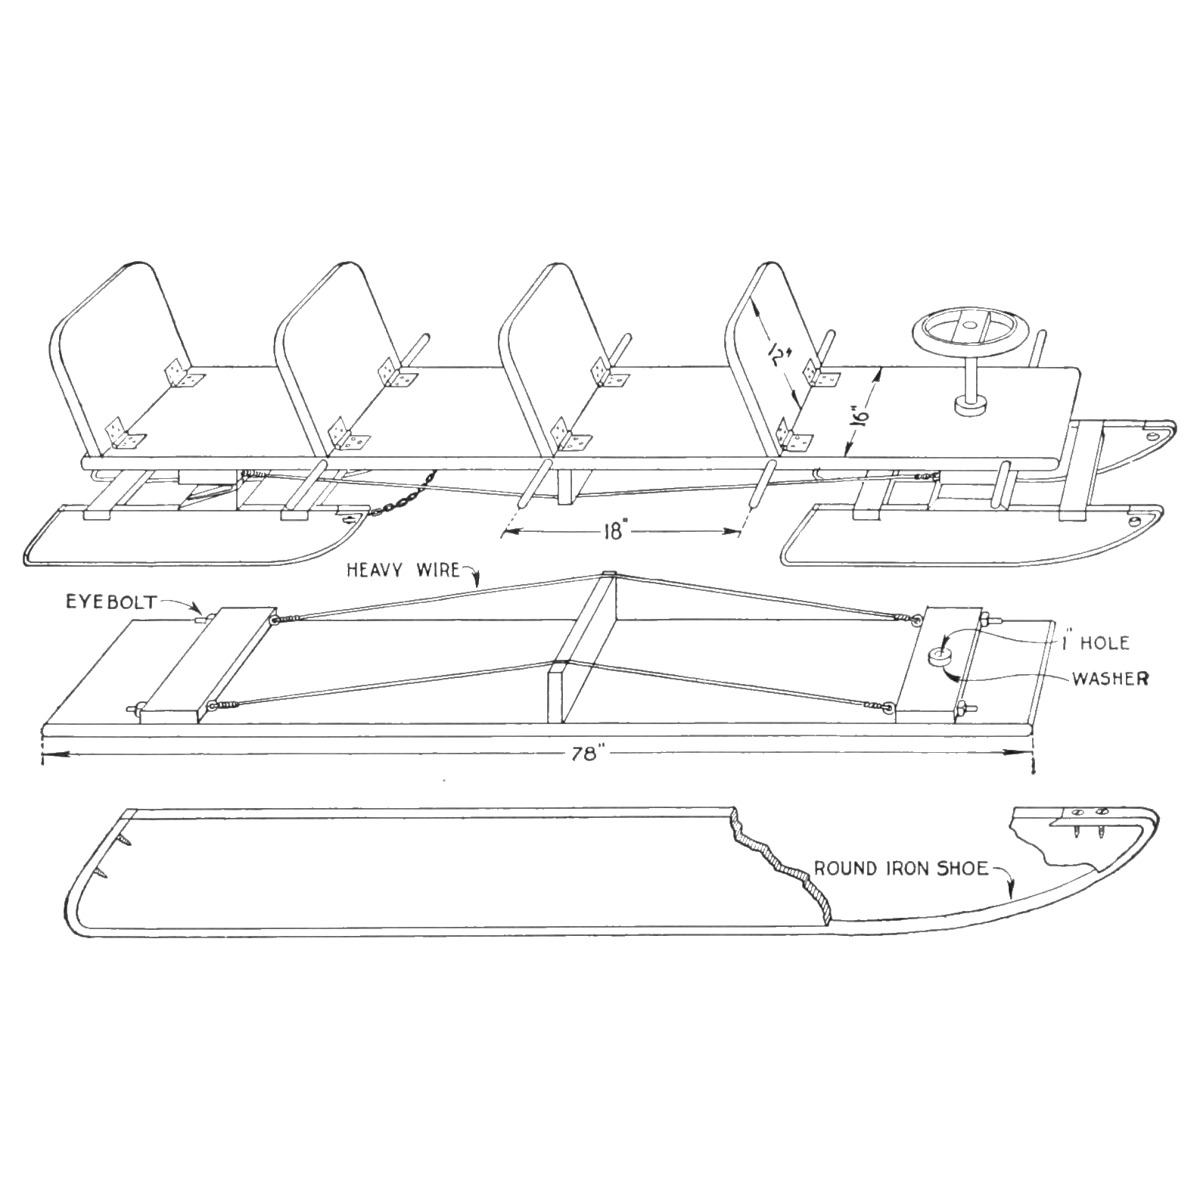
R. H. Allen's four-passenger coasting bob from The Boy Mechanic, Book 2 (1915): a 6-1/2 ft top board with four hinged seat backs, carried on two short sleds with ash runners shod in 5/8 in round iron. The rear sled rocks on a wedge and hinges to follow the ground; the front sled steers by a broom-handle post and a wheel made from a nail-keg hoop. Every size is his.
Intermediate
About 3 days

Instructions

1

His list of materials in centimetres

Loading Jupyter Notebook...
2

Read The Boy Mechanic, Book 2

"Any wood may be used for the sled, except for the runners, which should be made of ash." His list of materials: 1 top 6-1/2 ft x 16 in x 1-1/4 in; 4 runners 22 x 4 x 1 in; 4 crosspieces 16 x 3 x 1 in; 3 pieces 16 x 5 x 2 in; 1 piece 16 x 5 x 1 in; 1 shore 16 x 3 x 1 in; 4 seat backs 12 x 16 x 1 in; 1 dowel 3 ft x 1 in; 4 rods 5/8 in x 30 in; 4 eyebolts 1/2 x 6 in; 3 hinges 5 in strap; 8 hinges 3 in strap.
3

Shape and shoe the runners

Cut one ash runner to shape and use it as the pattern for the other three. Cut a groove about 1/4 in deep along the under edge to take the curve of a 5/8 in round iron rod. Bend each rod to fit in the groove, up the back of the runner and over the top at the front; flatten the ends and drill two holes in each for wood screws (a blacksmith can flatten them, he says). Screw the irons on.

Materials for this step:

Hardwood BoardHardwood Board1 piece
Iron RodIron Rod4 pieces
Wood ScrewsWood Screws1 piece

Tools needed:

Hand SawHand Saw

Coping SawCoping Saw
ChiselsChisels
Coal ForgeCoal Forge
AnvilAnvil
Blacksmith HammerBlacksmith Hammer
Bench ViseBench Vise
Hand DrillHand Drill
PencilPencil
4

Build the two sleds

Notch the top edges of each pair of runners for the 16 x 3 in crosspieces, near the ends, so the crosspieces lie flush with the runner tops and the notches of each pair line up. Fit them snugly, fasten with long, slim wood screws, and stiffen each joint inside with a small metal brace.

Materials for this step:

Pine BoardPine Board1 piece
Wood ScrewsWood Screws1 piece
Corner BracketCorner Bracket8 pieces

Tools needed:

Hand SawHand Saw
ChiselsChisels
Hand DrillHand Drill
5

Make the rocking rear joint

Cut a heavy 2 x 5 in crosspiece sloping across its width, from 2 in thick at one edge to a feather edge at the other. Fix the three large strap hinges to the sloping face, and fasten the piece solidly on the rear sled's runners with its centre 8 in from their front ends. This lets the rear sled rock but not turn sideways.

Materials for this step:

Pine BoardPine Board1 piece
Iron Strap HingeIron Strap Hinge3 pieces
Wood ScrewsWood Screws1 piece

Tools needed:

Hand SawHand Saw
Hand PlaneHand Plane
Hand DrillHand Drill
6

Mount the front sled crosspiece

Fasten the supporting crosspiece on top of the front sled's runners with its centre 11 in from their front ends.

Materials for this step:

Pine BoardPine Board1 piece
Wood ScrewsWood Screws1 piece

Tools needed:

Hand DrillHand Drill
Tape MeasureTape Measure
7

Brace the top board

Round both ends of the top board and plane it smooth. Underneath, fit two crosspieces, each with two 1/2 in holes bored through its width near the ends for the eyebolts: one with its centre 12 in from the rear end, the other 8 in from the front. Screw them on. Set the shore in the centre of the board, run wires over it between the eyebolts, and draw the eyebolts up until the wire is taut over the shore, so the long board cannot sag.

Materials for this step:

Pine BoardPine Board1 piece
Eye BoltEye Bolt4 pieces
Iron WireIron Wire1 piece
Wood ScrewsWood Screws1 piece

Tools needed:

Hand SawHand Saw
Hand PlaneHand Plane
Brace and BitBrace and Bit
Tape MeasureTape Measure
8

Fit the seat backs and foot rests

Round the top corners of the four backs and cut the bottom ends at a slight angle for a slant. Hinge them to the top board with the small strap hinges every 18 in, starting at the rear. Bore 1 in holes about 1 in deep in the edges of the top board every 18 in, beginning about 5 in from the front, and drive in pins 4 in long cut from the dowel, as foot rests.

Materials for this step:

Pine BoardPine Board1 piece
Iron Strap HingeIron Strap Hinge8 pieces
Hardwood DowelsHardwood Dowels1 piece
Wood ScrewsWood Screws1 piece

Tools needed:

Hand SawHand Saw
Brace and BitBrace and Bit
Tape MeasureTape Measure
9

Make the steering

Cut a broom handle to 18 in and fasten one end in a hole bored centrally in the 5 in crosspiece of the front sled. Bore a hole in the top board through the centre of the crosspiece underneath; put two metal washers on the stick and run it up through the hole, then fasten a hardwood collar to it just above the board so the top cannot lift off the sled. For the wheel, fasten a piece of wood across a nail-keg hoop, cover the hoop with garden hose and wrap it with twine; bore the centre of the crosspiece to fit the broom handle and screw it on.

Materials for this step:

BroomBroom1 piece
Flat WasherFlat Washer2 pieces
Hardwood BoardHardwood Board1 piece
Iron HoopIron Hoop1 piece
Rubber HoseRubber Hose1 piece
Jute TwineJute Twine1 piece
Wood ScrewsWood Screws1 piece

Tools needed:

Hand SawHand Saw
Brace and BitBrace and Bit
Hand DrillHand Drill
10

Join the sleds and fit the ropes

Fasten the rear sled to the top board with screws through the free wings of the hinges into the crosspiece. Bore holes in the front ends of all runners and attach a chain or rope: the rear one's loop to the underside of the top board, the front one for drawing the sled.

Materials for this step:

Wood ScrewsWood Screws1 piece
Iron ChainIron Chain1 piece

Tools needed:

Brace and BitBrace and Bit
Hand DrillHand Drill
11

Troubleshooting

Bobsled troubleshooting.

Flow

Loading...
12

History and honest limits

From "Four-Passenger Coasting Bobsled" by R. H. Allen, in **The Boy Mechanic, Book 2**, Popular Mechanics, 1915 (Project Gutenberg 44585; checked on the archive.org scan boymechanicbook200chic2, pp. 24-26). The runner shape comes from his drawing, not from figures. The scan calls the steering collar a hardwood collar; the Gutenberg text drops "hardwood". The tools and metric figures are ours.

Materials

15

Tools Required

12

This blueprint makes

Related Blueprints

These blueprints share knowledge with this one โ€” techniques, materials, or principles that connect them in the learning graph.
CC0 Public Domain

This blueprint is released under CC0. You are free to copy, modify, distribute, and use this work for any purpose, without asking permission.

Support the Maker by purchasing products through their Blueprint where they earn a Maker Commission set by Vendors, or create a new iteration of this Blueprint and include it as a connection in your own Blueprint to share revenue.

Discussion

(0)

Log in to join the discussion

Loading comments...