ART
BEAUTY & WELLNESS
CRAFT
CULTURE & HISTORY
ENTERTAINMENT
ENVIRONMENT
FOOD & DRINKS
REVERSE ENGINEERING
SCIENCES
SPORTS
TECHNOLOGY
WEARABLES
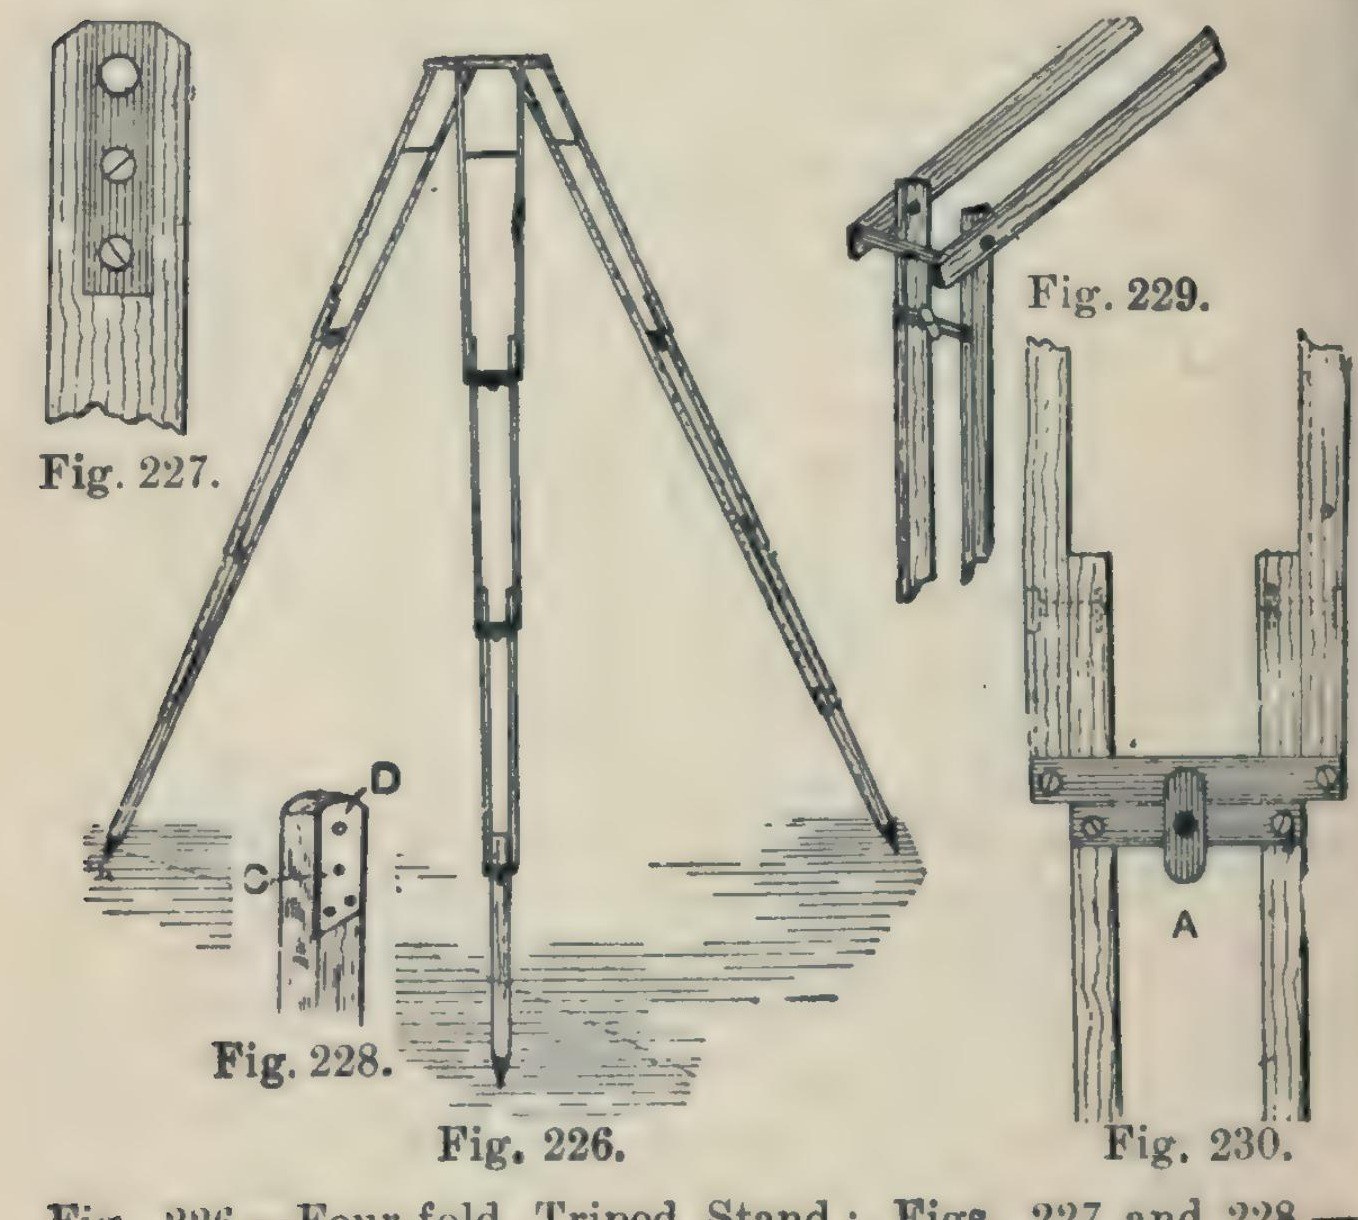


Camera Tripod: a Four-Fold Ash Tripod Stand (Hasluck, 1902)
A light, compact folding camera stand: three legs, each of seven ash laths riveted so it folds in four, locked open by brass buttons, on a triangular ash top with brass pins and a hole for the camera screw.
Hasluck says the same method makes stands that fold in three or two.
Source: Paul N. Hasluck, Photographic Cameras and Accessories (1902), pp. 153-157. Picture: Figs. 226-230 of the book.
Intermediate
Unknown
Instructions
1
1
Cut the ash laths
Cut the ash laths
Cut laths of good ash, true and square or the stand won't be rigid, and round the edges slightly: six 17 1/4 x 5/8 x 3/8 in, six 16 x 5/8 x 3/8 in, six 15 1/2 x 5/8 x 3/8 in, and three 14 x 5/8 x 5/8 in.
Materials for this step:
 Ash Board1 21 laths
Tools needed:
 Tenon Saw
 Block Plane (Low-Angle)
2
2
Fit the top ends and stretcher
Fit the top ends and stretcher
On each 17 1/4 in lath let in flush a 1/16 in brass plate, 1 1/4 in long, with a 3/16 in hole 1/4 in from the top, held by two countersunk brass screws; bore the wood to match and take off the top corners. On one lath of each pair cut a groove inside, about 3/16 in deep and 3 1/2 in long, starting 2 in from the top, and hinge a 1/8 in brass rod stretcher in it on a pin. On the other lath cut a curved groove 1 1/2 in long, 3/16 in wide, with a small hole at the bottom where the rod catches.
Materials for this step:
 Brass Sheet1 1/16 in plates
 Wood Screws1 small brass screws
 Brass Rod1 1/8 in stretcher
Tools needed:
 Hacksaw Frame with Blades
 Metal File
 Hand Drill
 Chisels
 Screwdriver - Flat
3
3
Bore and rivet the legs
Bore and rivet the legs
Bore the rivet holes: in the long laths 1 3/4 in from the lower end, counterbored so the copper rivet head sits flush, then 1/8 in through; in the 16 in and 15 1/2 in laths 1/2 in and 1 3/4 in from the ends; in each 14 in piece 1/2 in from one end, and taper its other end for a pointed iron shoe or a steel point and ferrule. Rivet the 21 laths into three legs with 1/8 in copper rivets and washers: a 16 in lath inside each 17 1/4 in one, a 15 1/2 in lath inside that, the 14 in foot between the last pair. Rivets flush, just tight enough to fold but not loose.
Materials for this step:
 Copper Rivets1 1/8 in, with washers
 Unknown Metal3 iron shoes or steel points
Tools needed:
 Brace and BitHand Drill
 Riveting Hammer
4
4
Add cross strips and lock buttons
Add cross strips and lock buttons
Screw 1/16 in brass strips across the bottom ends of each pair of laths (Fig. 229). Under them screw strips carrying a small brass button riveted at the centre; turned, the button hooks over the strip above and locks the joint open (Fig. 230).
Materials for this step:
Brass Sheet1 cross strips, buttonsWood Screws1 pieceTools needed:
Hacksaw Frame with BladesMetal FileScrewdriver - FlatRiveting Hammer5
5
Make the top
Make the top
Plane ash to 1/2 in and draw an equilateral triangle with 8 1/2 in sides. Bisect the angles; 2 in from each corner draw a line at right angles, go 1/2 in in along the sides, and mark three rectangles 2 7/8 x 3/4 in; cut the outline (Fig. 231). Fix a 3/16 in brass rod, one end tapered, across each rectangle, bored 3/8 in from the outer edge and projecting about 1/2 in, for the legs to hang on. Bore a 1/4 in hole in the centre for the camera screw and glue felt on top.
Materials for this step:
Ash Board1 topBrass Rod3 3/16 in pins Wool Felt1 piece
 Animal Glue1 piece
Tools needed:
Block Plane (Low-Angle)Tenon SawBrace and BitHand Drill6
6
Finish
Finish
Glasspaper and varnish the wood, and lacquer the brass.
Materials for this step:
 Shellac Varnish1 varnish
 Unknown Material1 brass lacquer
Tools needed:
 Sandpaper
Materials
10- 1 topPlaceholder
- 1 cross strips, buttonsPlaceholder
- 1 piecePlaceholder
- 3 3/16 in pinsPlaceholder
- 1 1/8 in, with washersPlaceholder
- 3 iron shoes or steel pointsPlaceholder
- 1 piecePlaceholder
- 1 piecePlaceholder
- 1 varnishPlaceholder
- 1 brass lacquerPlaceholder
Tools Required
10- Placeholder
- Placeholder
- Placeholder
- Placeholder
- Placeholder
- Placeholder
- Placeholder
- Placeholder
- Placeholder
- Placeholder
This blueprint makes

CC0 Public Domain
This blueprint is released under CC0. You are free to copy, modify, distribute, and use this work for any purpose, without asking permission.
Support the Maker by purchasing products through their Blueprint where they earn a Maker Commission set by Vendors, or create a new iteration of this Blueprint and include it as a connection in your own Blueprint to share revenue.