ART
BEAUTY & WELLNESS
CRAFT
CULTURE & HISTORY
ENTERTAINMENT
ENVIRONMENT
FOOD & DRINKS
REVERSE ENGINEERING
SCIENCES
SPORTS
TECHNOLOGY
WEARABLES
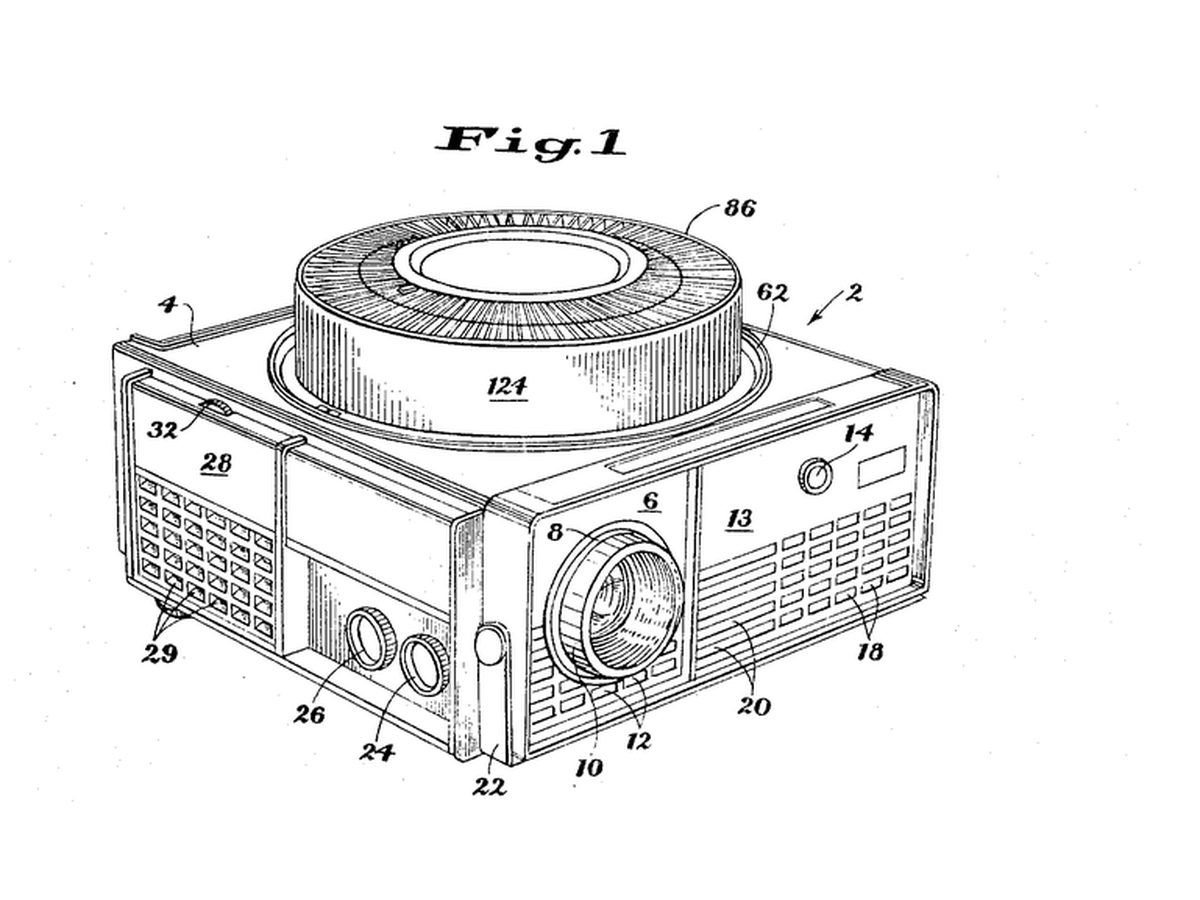


Rotary Gravity Slide Projector
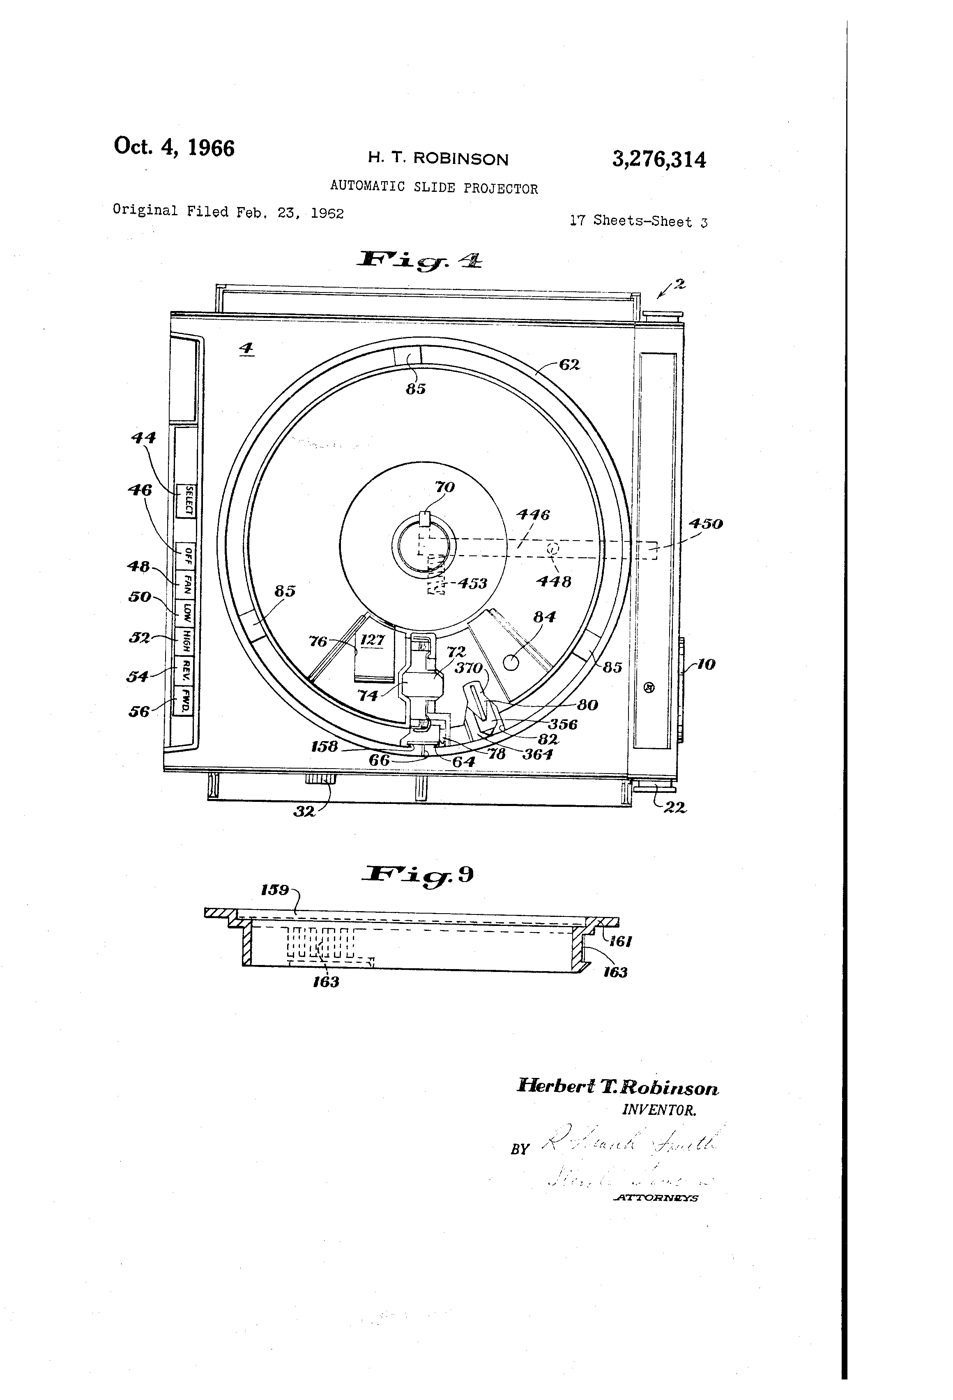
Straight slide magazines pushed slides sideways and jammed. Kodak's round tray, designed by David E. Hansen, stood the slides on edge in a ring above the projector: each one fell into the gate by gravity when it reached the drop point and was lifted back when the tray moved on, so nothing had to push a slide sideways.
**US 3,276,314**, "Automatic slide projector", Herbert T. Robinson, assigned to Eastman Kodak, filed 1. June 1965 (continuing an application of 23. February 1962), granted 4. October 1966: a tray of two relatively movable portions with a passageway "through which the slides are adapted to pass substantially vertically, one at a time, in coordination with relative movement of the portions".
**You build the mechanism**: a 12-slot tray turned by a stepper, a servo that lifts each slide back, a torch and a lens to project it.
Advanced
6 hours
Instructions
1
1
Make twelve slides
Make twelve slides
Cut 50 x 50 mm frames from black card with a 36 x 24 mm window. Draw or print images on transparency film and tape one behind each window. Number them 0 to 11.
Materials for this step:
 Black Card Stock2 sheets
 Inkjet Transparency Film2 sheets
Tools needed:
 Craft Knife
 Permanent Marker
 Steel Ruler
2
2
Build the tray
Build the tray
Glue two 240 mm foam-board discs together. Cut 12 radial slots 4 mm wide and 55 mm long, 30 degrees apart, open underneath so a slide can fall through. Glue a hub on the motor shaft and the tray on the hub.
Materials for this step:
 Model Building Foam Board2 sheets
 Stepper Motor1 piece
Tools needed:
Craft Knife Hot Glue Gun
3
3
Base, gate and lift
Base, gate and lift
On a plywood base cut one drop slot under the tray. Below it, build a foam-board gate channel that holds a dropped slide upright between the torch and a 100 mm convex lens. Mount the servo so its arm, raised, pushes the slide back up into the tray.
Materials for this step:
 Plywood Sheet1 piece
 SG90 Micro Servo Motor (5-Pack)1 pack
 Convex Lens Set (Assorted Focal Lengths)1 set
Tools needed:
 Hand SawHot Glue Gun
 LED Inspection Flashlight
4
4
Wire and flash
Wire and flash
EasyDriver STEP to D3, DIR to D4, motor coils to A and B, 12 V supply to its power input, GND shared with the Uno. Servo signal D9. Button between D2 and GND. Set the EasyDriver current adjuster low - the tray is light. Turn the tray by hand so slot 0 is over the gate before powering up.
rotary_slide_tray.inocpp
Materials for this step:
 Stepper Motor Driver1 piece
 Microswitch (Lever Actuated)1 piece
 Dupont Jumper Wire Set (M-F)1 set
Tools needed:
 Arduino Uno R3
 DC Power Supply
 Breadboard
 USB-B Cable
5
5
Why the steps must not drift
Why the steps must not drift
Loading Jupyter Notebook...
6
6
Show
Show
Load the slides upside down and reversed (a projector inverts the image). Darken the room, focus the lens on a wall, and press to advance. Count misfeeds over two full turns.
Tools needed:
 Tape Measure
7
7
History & Context
History & Context
**What the patent specifies:** a projector for a tray of two relatively movable portions, slides passing substantially vertically through a passageway one at a time in step with the tray's movement. **Modern build (derived):** foam-board tray, stepper, servo lift and a torch.
Kodak made Carousel projectors from 1961 until 2004; a round tray held 80 slides. The limits: bent or thick mounts jam the gate, and the gravity drop needs the projector level.
Materials
10- 2 sheetsPlaceholder
- 2 sheetsPlaceholder
- 2 sheetsPlaceholder
- Placeholder
- 1 piecePlaceholder
- Placeholder
- 1 setPlaceholder
- Placeholder
- 1 piecePlaceholder
- Placeholder
Tools Required
11- Placeholder
- Placeholder
- Placeholder
- Placeholder
- Placeholder
- Placeholder
- 1 vendor sell this, none ship to you yetPlaceholder
- Placeholder
- 1 vendor sell this, none ship to you yetPlaceholder
- 1 vendor sell this, none ship to you yetPlaceholder
- 1 vendor sell this, none ship to you yetPlaceholder
Related Blueprints
These blueprints share knowledge with this one — techniques, materials, or principles that connect them in the learning graph.

CC0 Public Domain
This blueprint is released under CC0. You are free to copy, modify, distribute, and use this work for any purpose, without asking permission.
Support the Maker by purchasing products through their Blueprint where they earn a Maker Commission set by Vendors, or create a new iteration of this Blueprint and include it as a connection in your own Blueprint to share revenue.