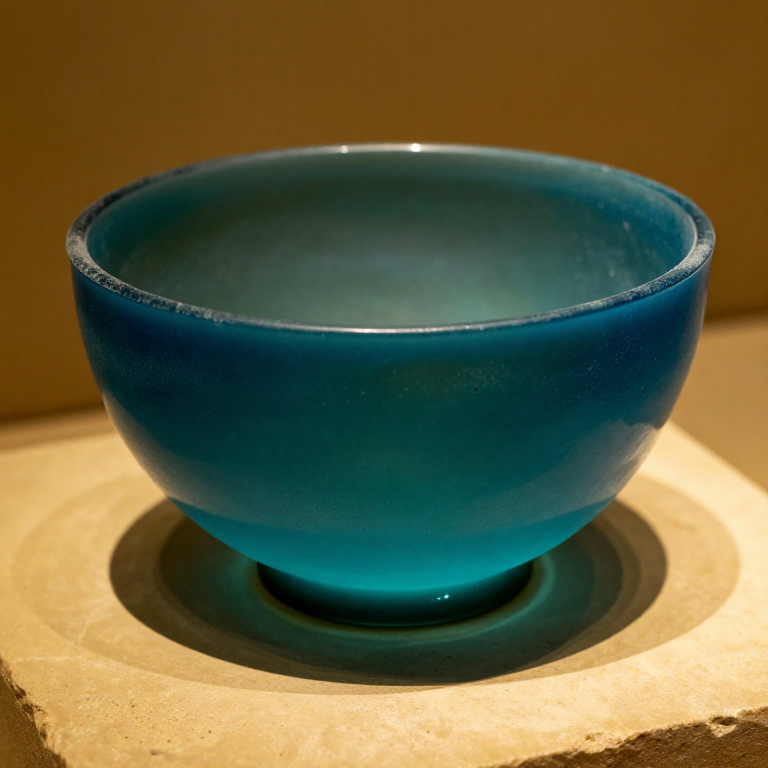
Shaping a Core-Formed Glass Vessel — The Oldest Glassworking Technique
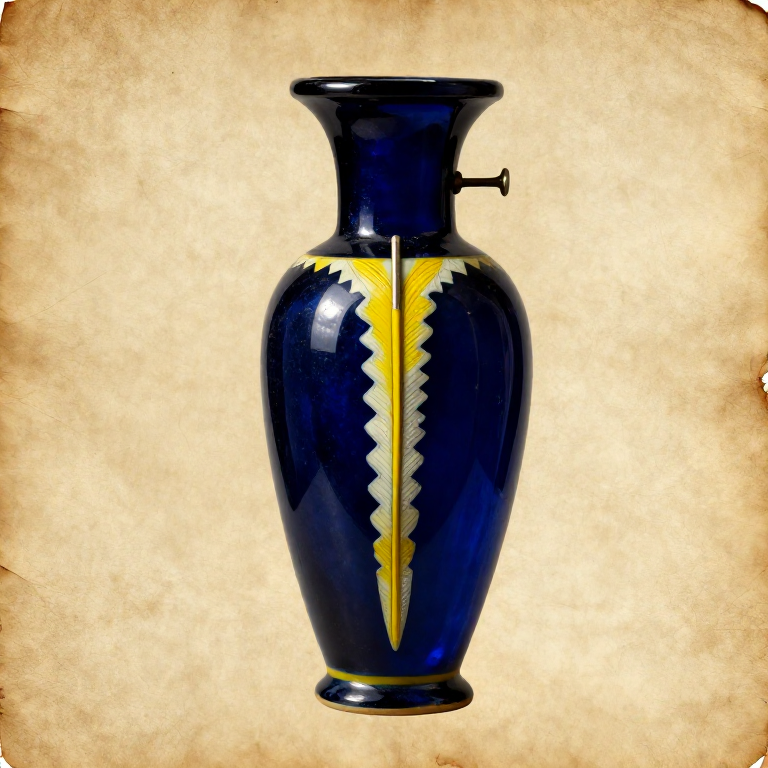
Core-forming is the oldest method of making hollow glass vessels, predating glassblowing by over 1,500 years. Developed in Mesopotamia and Egypt around 1500 BCE, the technique involves building a glass vessel around a removable clay-and-dung core attached to a metal rod. The glassworker trails molten glass threads around the core, then marvels the surface smooth — creating elegant perfume bottles, kohl containers, and ceremonial vessels prized across the ancient Mediterranean world.
The technique requires no blowing — the craftsperson works entirely with molten glass trails wound around the shaped core. Decorative patterns are created by trailing threads of contrasting colored glass onto the still-hot surface and dragging them with a pointed tool to create feathered, zigzag, or wave patterns. The colors came from metallic oxides: cobalt for deep blue, copper for turquoise, manganese for purple, and antimony for opaque yellow.
Core-formed vessels were luxury goods — the labor-intensive process meant each piece took hours to complete. When the Romans invented glassblowing around 50 BCE, production costs dropped dramatically and core-forming gradually fell out of use. But the technique's 1,500-year run makes it one of the most enduring craft technologies in human history, and the surviving vessels in museums worldwide demonstrate a level of decorative sophistication that glassblowing took centuries to match.
Instructions
Shape the removable core
Shape the removable core
The core is a temporary form around which the glass vessel is built — it must be removed after the glass cools, so it is made from a mixture that crumbles easily. Mix clay with animal dung and chopped straw or grass in approximately equal parts by volume. The dung provides organic matter that burns out during heating, making the core porous and easy to scrape out later. The straw adds structural strength during shaping.
Mold the mixture around a metal rod (iron or bronze, 6-8 mm diameter) into the shape of the desired vessel interior — typically an elongated flask or bottle form, 8-15 cm long and 3-5 cm at the widest point. Smooth the surface carefully — every bump and irregularity in the core will be replicated on the inside of the finished glass vessel. Allow the core to dry completely, then pre-fire it gently over charcoal to harden the surface.
Materials for this step:
 Clay500 g
Tools needed:
 Sharp Knife
Prepare the glass batch
Prepare the glass batch
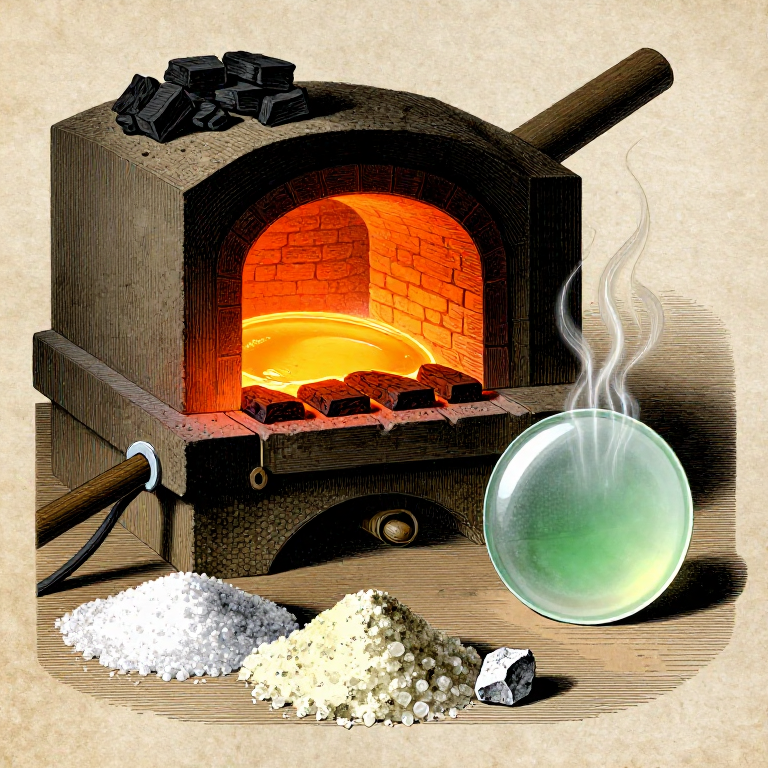
Ancient Egyptian and Mesopotamian glass used the soda-lime formula: approximately 70% silica sand (crushed quartz), 15% soda (natron from dry lake beds, or plant ash), and 15% lime (ground limestone or crushed seashells). Soda lowers the melting point of silica from over 1700°C to approximately 1050-1100°C — achievable in a charcoal-fired clay crucible.
For colored glass, add metallic oxide colorants: cobalt oxide (0.1-0.5% by weight) for deep blue, copper oxide (2-3%) for turquoise, manganese dioxide (1-2%) for purple, or antimony trioxide (3-5%) for opaque yellow-white. Prepare at least two contrasting colors — one for the vessel body and one for decorative trailing. Mix each batch thoroughly and place in separate clay crucibles.
Materials for this step:
 Fine Sand500 g
 Natron100 g
 Cobalt Oxide5 g
Tools needed:
 Stone Mortar and Pestle (large)
Melt the glass in crucibles
Melt the glass in crucibles
Place the filled crucibles into a charcoal-fired furnace and raise the temperature to approximately 1050-1100°C. This requires sustained bellows operation for 4-6 hours as the raw batch slowly fuses into molten glass. The melt passes through several stages: first the soda fluxes and froths, then the mixture clarifies as trapped gas bubbles rise to the surface, and finally it becomes a smooth, viscous liquid.
The glass is ready when a metal rod dipped into the crucible draws out a smooth, continuous thread without lumps or bubbles. Ancient glassworkers judged readiness entirely by color and viscosity — a deep, saturated color with a honey-like consistency. Keep the furnace at working temperature throughout the core-forming process, as the glass must remain fluid enough to trail and fuse.
Materials for this step:
 Charcoal10 kg
Tools needed:
 Bellows
 Chemical Splash Goggles
Trail glass threads around the core
Trail glass threads around the core
Heat the clay core in the furnace opening until it glows red-hot — cold cores cause the glass to crack on contact. Dip a metal rod into the crucible of body-color glass and gather a small amount of molten glass. Holding the core rod horizontally, trail the gathered glass in a tight spiral around the core, starting from the base and working upward.
Each trail of glass must fuse to the previous one while both are still hot. Work quickly but steadily — if a trail cools before the next one is applied, the junction will be weak. Build up 2-3 mm of glass thickness across the entire surface of the core. The spiral trailing creates the characteristic slightly ridged texture visible on surviving core-formed vessels before marvelling smooth.
Tools needed:
 Crucible Tongs (long-handled)
Marvel the surface smooth
Marvel the surface smooth
While the trailed glass is still hot and pliable, roll the vessel on a flat stone slab (a 'marver') to smooth the ridged surface into a uniform wall. The term 'marvering' comes from this ancient technique and is still used by glassblowers today. Press gently and roll evenly — too much pressure will deform the shape; too little will leave the trailing ridges visible.
Reheat the vessel in the furnace opening between marvering passes. The glass must be uniformly soft for effective smoothing. Two or three marvering passes are typically needed to achieve a smooth, even surface. The wall thickness should be approximately 2-3 mm — thick enough to be strong but thin enough to show the translucent color of the glass.
Tools needed:
 Grinding Stone
Apply decorative glass trails
Apply decorative glass trails
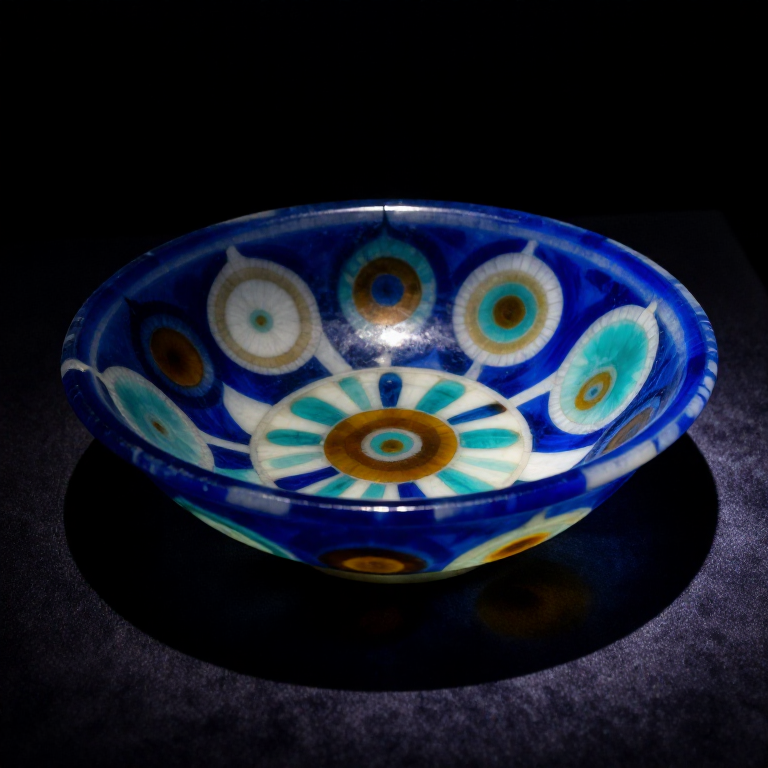
The hallmark of core-formed vessels is their striking decorative patterns. While the body glass is still hot, gather a contrasting color of molten glass on a thin metal rod and trail it in thin lines around the vessel — horizontal bands, zigzags, or spirals. The classic Egyptian pattern uses opaque yellow and white trails on a dark blue body.
For the characteristic 'feather drag' pattern: trail horizontal lines of contrasting glass around the vessel, then immediately drag a pointed metal tool vertically through the trails while they are still soft. Dragging in alternating directions creates the distinctive zigzag feathered pattern seen on thousands of surviving ancient vessels. Work quickly — the decoration trails must be applied and dragged while both the body and decoration glass are above 600°C.
Tools needed:
 Awl
AwlForm the rim and handles
Form the rim and handles
Shape the vessel rim by gathering additional glass and trailing it around the top opening, building up a flared lip. While the rim glass is still hot, use a flat metal tool to press and shape it into an even, slightly outward-flaring edge. The rim must be smooth — ancient perfume vessels needed a clean lip for controlled pouring.
For handles (common on larger vessels), gather a small amount of glass on a metal rod and draw it into a thin trail. While still pliable, attach one end to the vessel body near the rim and loop it down to attach the other end near the shoulder. Press the attachment points firmly to ensure a strong bond. Reheat the vessel to equalize the temperature between the handle and body — thermal stress at the junction is the most common point of failure.
Anneal and remove the core
Anneal and remove the core
Place the completed vessel (still on its metal rod) into the furnace and reduce the temperature slowly over 4-6 hours. This annealing process relieves internal stresses in the glass that would otherwise cause it to crack as it cools. Ancient workers simply moved the vessel progressively further from the furnace opening over several hours, then left it to cool overnight in the warm ash.
Once completely cool, extract the metal rod by twisting and pulling gently. Then scrape out the clay-dung core from inside the vessel using a long hooked wire tool. The pre-fired core mixture crumbles easily, especially since the organic matter (dung and straw) has burned away during the glass-forming process, leaving a porous, friable residue. Clean the interior thoroughly — the finished vessel should be hollow and translucent when held up to light, revealing the layered colors of body and decoration glass.
Materials
5- 5 gPlaceholder
Connected Blueprint Materials
Related Blueprints
These blueprints share knowledge with this one — techniques, materials, or principles that connect them in the learning graph.
Related blueprints
Other builds that share materials, tools, or techniques with this one.

CC0 Public Domain
This blueprint is released under CC0. You are free to copy, modify, distribute, and use this work for any purpose, without asking permission.
Support the Maker by purchasing products through their Blueprint where they earn a Maker Commission set by Vendors, or create a new iteration of this Blueprint and include it as a connection in your own Blueprint to share revenue.