Collaboration
ART
BEAUTY & WELLNESS
CRAFT
CULTURE & HISTORY
ENTERTAINMENT
ENVIRONMENT
FOOD & DRINKS
REVERSE ENGINEERING
SCIENCES
SPORTS
TECHNOLOGY
WEARABLES
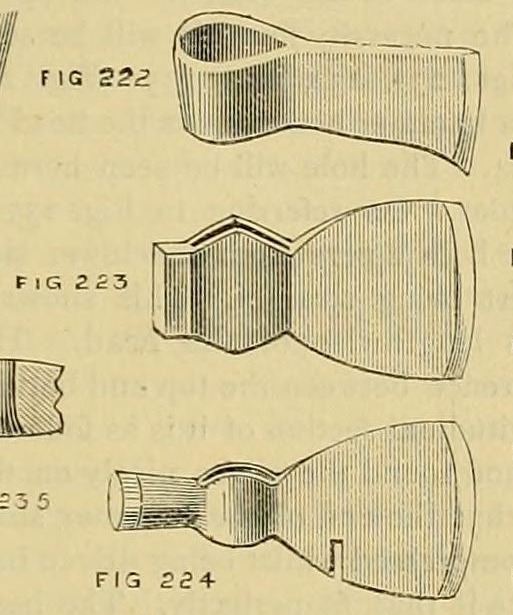


Steel-Laid Axe and Hatchet: Iron Folded Round a Mandrel, Shear Steel Welded Between the Leaves (Edwinson, 1886)
How axes and hatchets were made of iron and shear steel, from George Edwinson's smithing series (Amateur Work, 1886): a flat iron bar folded round a tapering mandrel to make the eye, the leaves welded, and a thin slice of steel welded between them so the ground edge is always steel.
Advanced
A day at the forge
Instructions
1
1
Read Edwinson
Read Edwinson
"By this means a layer of steel is enclosed between two layers of iron, and a steel edge is always ensured to the tool."
2
2
Fold the eye
Fold the eye
Take flat iron of the width and thickness you want, twice the length of the blade. Heat it and bend it over a tapering mandrel the same section as the handle (his fig. 225).
Materials for this step:
 Wrought Iron Bar1 piece
Tools needed:
 Blacksmith Forge
 Anvil
 Sledgehammer
 Blacksmith Tongs
 Drift
3
3
Close and shape the eye
Close and shape the eye
Weld the two leaves together where they meet near the eye. Reheat and forge the eye to shape on the mandrel, then drive the mandrel in the other way to open the inner edge of the eye slightly.
Materials for this step:
 Borax Powder1 piece
Tools needed:
Blacksmith ForgeAnvil HammerDrift
4
4
Lay in the steel
Lay in the steel
Put a thin slice of shear steel, as wide as the axe, between the two leaves. Bring both to a welding heat and forge them down together to the thickness and width wanted.
Materials for this step:
 Shear Steel Plate1 pieceBorax Powder1 piece
Tools needed:
Blacksmith ForgeAnvilSledgehammerBlacksmith Tongs5
5
Hatchet hammer (variant)
Hatchet hammer (variant)
For a carpenter's hatchet (fig. 223) weld a rectangular piece of steel to the back of the eye and forge it down with it as the hammer. The miner's hatchet (fig. 224) has a massive ear, a bar-steel hammer and a slit in the blade for drawing nails. Do not make a woodman's axe square-headed: men drive wedges with the back and spoil it.
Materials for this step:
 Crucible Steel1 piece
Tools needed:
Blacksmith ForgeAnvilHammer Hot Chisel
6
6
Pare and smooth
Pare and smooth
Pare the rough forging to shape with hot chisels (his setts) while hot. Hammer the sides well at a low red heat until smooth.
Tools needed:
Blacksmith ForgeHot ChiselAnvilHammer7
7
Harden, temper and grind
Harden, temper and grind
Harden and temper the blade, then grind it on a grindstone to sharpen the edge and polish the blade.
Tools needed:
Blacksmith Forge Quench Bucket
 Grindstone
8
8
Hang the head (ours)
Hang the head (ours)
He does not cover the handle. Ours: fit a hickory handle blank to the eye and wedge it.
Materials for this step:
 Wooden Axe Handle Blank (Hickory)1 piece
 Wooden Wedges1 piece
Tools needed:
 DrawknifeHammer
9
9
Troubleshooting
Troubleshooting
Axe troubleshooting.
Flow
Loading...
10
10
History and honest limits
History and honest limits
From George Edwinson, "Smithing and Forging" (part X), **Amateur Work, Illustrated**, vol. VI (Ward, Lock & Co., 1886-87), pp. 211-214 (checked on the archive.org scan amateurworkillus06lond), p. 212 and figs. 222-225. He gives no temper colour for axes, no sizes and no handle: those are ours.
Materials
6- 1 piecePlaceholder
- 1 piecePlaceholder
- 1 piecePlaceholder
- 1 piecePlaceholder
- Placeholder
- 1 piecePlaceholder
This blueprint makes

Related Blueprints
These blueprints share knowledge with this one — techniques, materials, or principles that connect them in the learning graph.
CC0 Public Domain
This blueprint is released under CC0. You are free to copy, modify, distribute, and use this work for any purpose, without asking permission.
Support the Maker by purchasing products through their Blueprint where they earn a Maker Commission set by Vendors, or create a new iteration of this Blueprint and include it as a connection in your own Blueprint to share revenue.