Collaboration
ART
BEAUTY & WELLNESS
CRAFT
CULTURE & HISTORY
ENTERTAINMENT
ENVIRONMENT
FOOD & DRINKS
REVERSE ENGINEERING
SCIENCES
SPORTS
TECHNOLOGY
WEARABLES
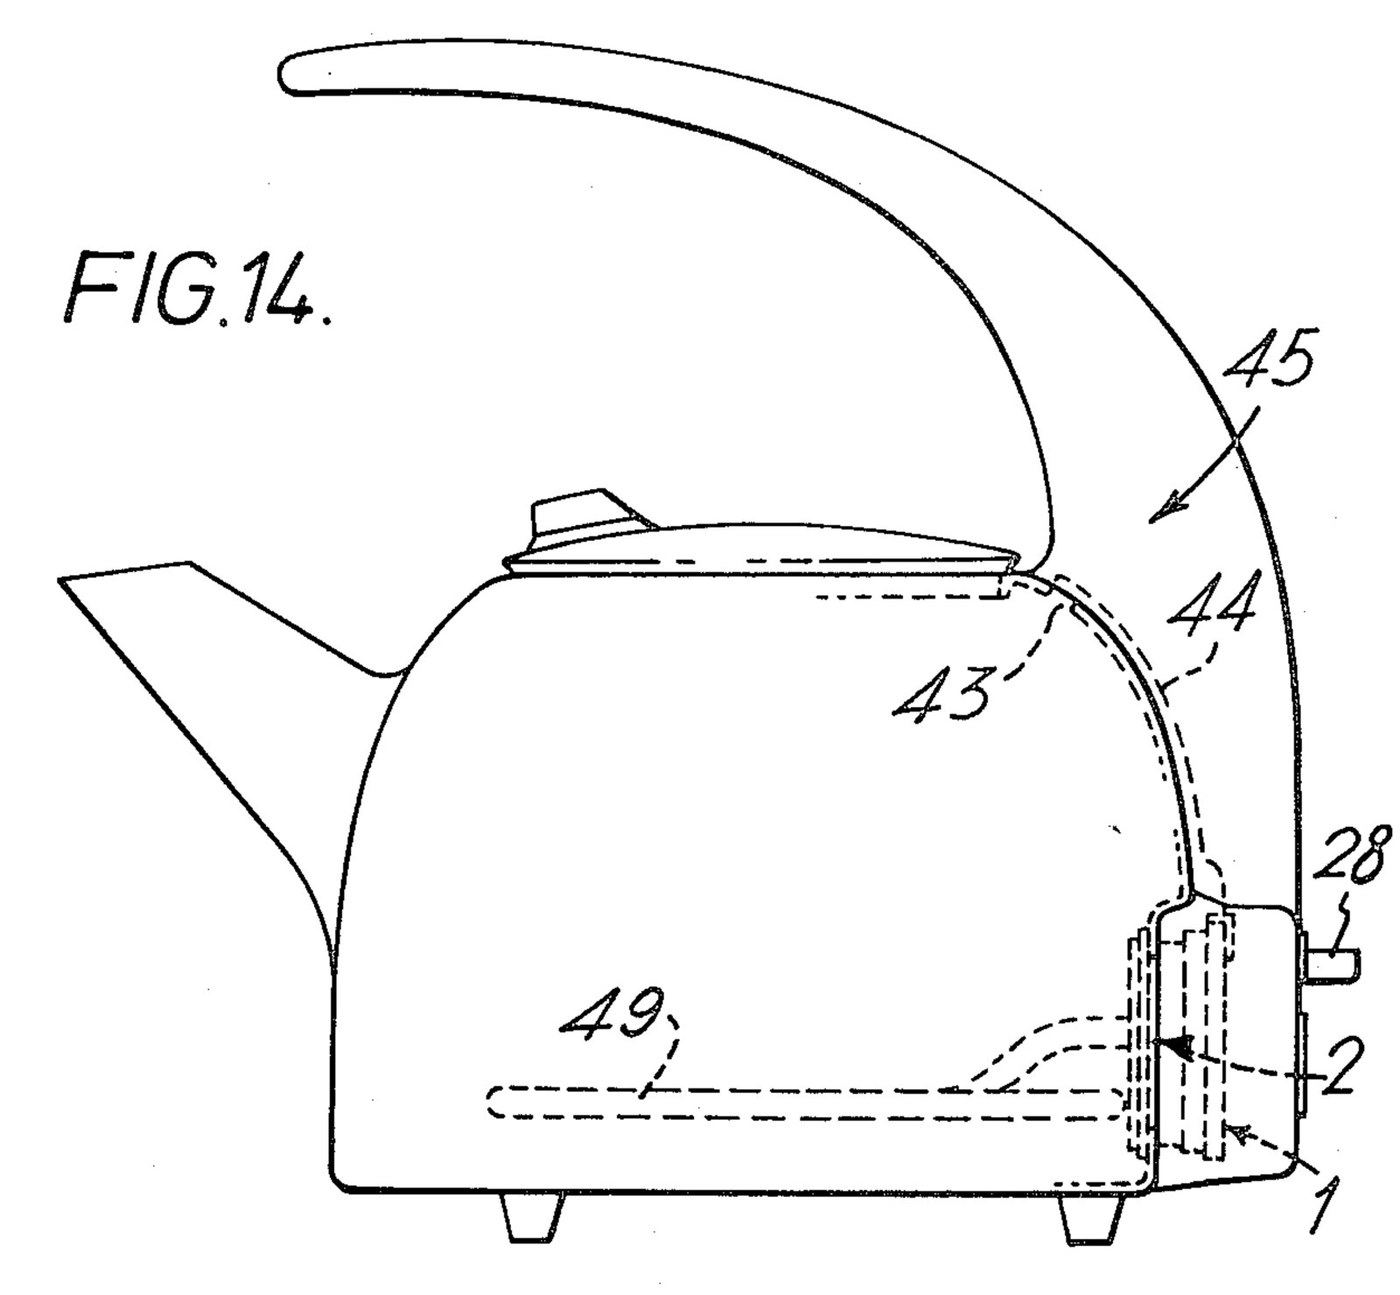


Electric Kettle: Immersion Heater with a Steam and Switch-On-Dry Cut-Out (Taylor, US 4,358,666)
An automatic electric kettle boils water with an immersion heater and switches itself off. J. C. Taylor (US 4,358,666, 1982) mounts one control on the heater's head: a bimetal disc touching the hot head cuts the power if the kettle is switched on dry, and a second bimetal disc in the steam trips an over-centre lever that cuts it when the water boils.
In his kettle (Fig. 14) the steam leaves through a hole high in the wall and runs down a passage between the handle and the wall to the control. A knob resets it.
Source: J. C. Taylor, US Patent 4,358,666 (filed 1980, granted 1982). Picture: its Fig. 14.
Advanced
Unknown
Instructions
1
1
Read Taylor
Read Taylor
"The effect is that when the water boils, the lever 16 is tripped by the actuator 22 from its first to its second position, thus interrupting the supply of electricity to the heating element."
2
2
Fit the immersion heater
Fit the immersion heater
Make the kettle body with a spout, lid and handle, an opening low in the back wall for the heater head and a hole high in the wall under the handle for steam. Fix the immersion heater's head watertight in the low opening, with its element low in the kettle and its hot return brazed to the head so the head heats up if the element runs dry. Form a steam passage between the handle and the wall from the high hole down to the head. Body material, size and heater rating are not given.
Materials for this step:
 Unknown Metal1 kettle body
 Heating Element1 immersion heater
Tools needed:
 Brazing Torch
 Drill Press
 Drill Bit Set
 Unknown Forming Method
 Unknown Dimensions
3
3
Build the switch-on-dry unit
Build the switch-on-dry unit
On the head mount a switch unit with three pins (line, neutral and earth) for the kettle lead's socket. Wire the line pin to one cold end of the element through a movable contact on a springy conductive strip and a fixed contact. Rivet the tongue of a snap-acting bimetal disc to a pillar so its body touches the head. Fit a sliding link that the disc pushes: at about 120 °C (Taylor: "say 120° C.") the disc snaps over and the link parts the contacts.
Materials for this step:
 Unknown Insulating Material1 switch unit bodyUnknown Metal1 pins, contacts and strip
 Bimetallic Strip1 dry-switch disc
Tools needed:
Drill PressDrill Bit Set4
4
Make the steam unit
Make the steam unit
Press a disc of sheet bimetal into a domed die, with a cut-out that leaves a tongue in the middle, so it snaps over when steam heats it. Mount it by its rim on a lever that rocks on two knife edges in notches of a body seated over the switch unit, held by two over-centre C-springs, with a shroud round the pins and a steam opening sealed by an O-ring. A finger of the lever passes through the sliding link; a knob on the lever comes out through the housing. The trip temperature and bimetal grade are not given.
Materials for this step:
Bimetallic Strip1 steam discUnknown Insulating Material1 steam unit body and lever Spring2 C-springs
 O-Ring1 piece
Tools needed:
Unknown Forming Method5
5
Close up and use
Close up and use
Screw the outer housing over both units into the threaded pillars, the knob through its opening and the steam passage meeting the steam unit's channel. Fill, plug in the lead and press the knob down to close the contacts. When the water boils, steam reaches the disc, the lever snaps over and the power goes off; switched on dry, the head heats and the other disc cuts it and holds the lever off. Press the knob to reset.
Materials for this step:
Unknown Insulating Material1 outer housing Flexible Cord with Plug1 kettle lead with socket
Materials
7- 1 pins, contacts and stripPlaceholder
- 1 immersion heaterPlaceholder
- 1 outer housingPlaceholder
- 1 steam discPlaceholder
- 2 C-springsPlaceholder
- 1 piecePlaceholder
- 1 kettle lead with socketPlaceholder
Tools Required
5- Placeholder
- Placeholder
- Placeholder
- Placeholder
- Placeholder
This blueprint makes

CC0 Public Domain
This blueprint is released under CC0. You are free to copy, modify, distribute, and use this work for any purpose, without asking permission.
Support the Maker by purchasing products through their Blueprint where they earn a Maker Commission set by Vendors, or create a new iteration of this Blueprint and include it as a connection in your own Blueprint to share revenue.