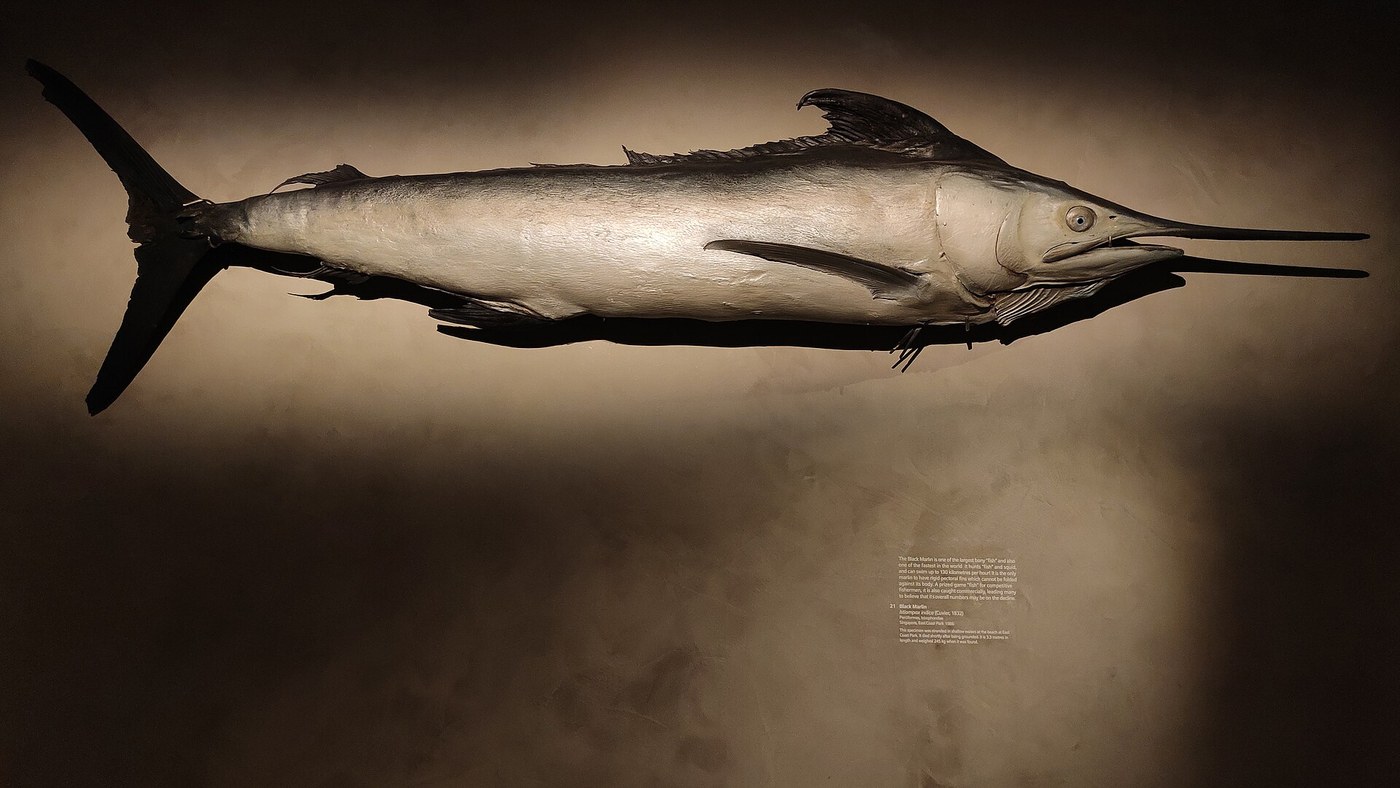


Fish Skin Mount
A fish skin mount is the fish's own skin, fins and head dried over a shaped body and repainted. It is the oldest method of keeping a fish, and it is harder than mounting a mammal for one reason: fish colour lives in cells that die. The blues and greens of a fresh perch are structural and pigmentary effects in living tissue, and they are gone within days of death no matter what you do.
So the craft splits in two. The first half is preservation — skinning, degreasing, borax, drying flat and true. The second half is painting back a colour you can only know if you recorded it while the fish was fresh. A mount made without reference photographs is a guess with scales on.
Before anything else: the law. Take only a fish you have caught legally, within season, above the size limit, on a valid licence, and never a protected species. In many jurisdictions possession of a protected fish is an offence regardless of how it died.
Instructions
Confirm the fish is legal to keep
Confirm the fish is legal to keep
Check species, season, size limit and your licence before the fish leaves the water. Protected and out-of-season fish are returned, photographed only.
Photograph the colours immediately
Photograph the colours immediately
Photograph both sides, the head and the fins within minutes of landing, in daylight, with no flash. These photographs are the only accurate colour record you will ever have — the fish starts fading at once.
Measure length and girth
Measure length and girth
Measure nose to tail fork and the greatest girth, and write both down. The body form you build later is made to these two numbers.
Tools needed:
 Measuring Ruler
Wrap and freeze if not working at once
Wrap and freeze if not working at once
Wrap the fish in a wet cloth, then in a bag with the fins folded flat against the body, and freeze it. Dry-frozen fins go brittle and snap off during skinning.
Choose the display side
Choose the display side
Pick the better side to show and cut on the other. Every mount has a good side and a seam side; that decision is made once and cannot be changed later.
Open the skin along the seam side
Open the skin along the seam side
Cut a single line along the seam side from behind the gill cover to the tail, through skin only. Cutting deep opens the body cavity and floods the skin with fluid.
Tools needed:
 Scalpel
Skin from the cut toward the back
Skin from the cut toward the back
Work the skin away from the flesh with the scalpel almost flat, keeping the blade against the meat rather than the skin. Fish skin is thin and a nicked scale row shows in the finished mount.
Cut the fin roots from inside
Cut the fin roots from inside
Cut each fin free at its base from the inside, leaving the fin attached to the skin with its supporting bones. Fins removed and reattached later never sit right.
Remove flesh, gills, eyes and brain
Remove flesh, gills, eyes and brain
Take out all flesh, the gill arches, the eyes and the brain tissue through the skull opening. Anything organic left behind will rot, smell and attract insects for the life of the mount.
Scrape the skin clean
Scrape the skin clean
Scrape the inner surface until no red tissue remains, working from the middle outward. Rushing here is the commonest cause of a mount that greases through the paint years later.
Degrease oily species thoroughly
Degrease oily species thoroughly
Wash the skin in cool water with a little degreasing detergent, several changes, and press dry. Salmon, trout, mackerel and eels carry heavy fat in the skin itself.
Borax the wet skin
Borax the wet skin
Rub dry borax over the whole inner surface and into the head and fin roots while the skin is still damp. Applied wet, it works into the tissue; sprinkled on a dried skin it does nothing.
Materials for this step:
 Taxidermy Borax (5 lb)100 g
Tools needed:
 Nitrile Gloves
Carve the body form to your measurements
Carve the body form to your measurements
Carve a body from balsa or rigid foam to the recorded length and girth, slightly under size. An oversize form stretches the skin and splits the seam as it dries.
Materials for this step:
 Balsa Wood Sheet1 piece
Fit the skin and stitch the seam
Fit the skin and stitch the seam
Fit the skin over the form, work out the wrinkles from head to tail, and stitch the seam closed with fine thread in small stitches.
Materials for this step:
 Cotton Thread2 meters
Pin every fin between card
Pin every fin between card
Spread each fin fully and clamp it between two pieces of card pinned through. Fins dry in whatever shape they are held, and a fin dried folded stays folded permanently.
Materials for this step:
 Card Stock2 sheets
Dry slowly for two to three weeks
Dry slowly for two to three weeks
Dry in a cool, airy place out of sunlight. Heat drives the skin to shrink faster than it can relax and it tears along the seam.
Fill the shrinkage
Fill the shrinkage
When dry, fill the hollows that have appeared around the gill covers, eye socket and fin bases with a fine modelling filler and sand flush.
Tools needed:
 Sandpaper
Set the glass eye
Set the glass eye
Bed a glass eye of the right size in filler in the socket. Eye size and set are what the viewer reads first, and an eye a size too large makes the whole fish look wrong without them knowing why.
Materials for this step:
 Glass Eyes Set1 set
Seal before painting
Seal before painting
Give the whole mount a thin sealing coat and let it cure. Paint on bare dried skin sinks in unevenly and dulls.
Repaint from your reference photographs
Repaint from your reference photographs
Airbrush the colours back on in thin transparent passes, working from the pale belly upward and finishing with the dark back. Judge every pass against your photographs, not against memory.
Materials for this step:
 Airbrush Paint1 set
Finish with a gloss on the wet areas only
Finish with a gloss on the wet areas only
Gloss the eye, the gill edge and the fin membranes; keep the body satin. A uniformly glossy fish reads as plastic.
History & Context
History & Context
The cased fish. The classic British form is a skin mount in a glazed case with a painted backdrop, reeds and a modelled riverbed. The firm most associated with it is John Cooper & Sons of London, founded by John Cooper — a former watchmaker — in the 1830s, continued by his son after 1872 and trading as J. Cooper & Sons from about 1896 when the third generation joined. Their cases are recognised by bow fronts, gold line trim and gilt lettering, and the earliest ones from around 1840 are flat-fronted, with the bow front and wrapped glass coming later. Pike, chub, salmon, trout, tench, roach and rudd are the usual subjects.
Why the colour has to be painted. Fish colour comes from chromatophores — living pigment cells — and from structural reflectors in the skin. Both depend on tissue that is intact and hydrated. Drying destroys them, so every skin mount ever made, then and now, is repainted. The honest description of the craft is that the sculpture is the fish's and the colour is the taxidermist's, which is exactly why the reference photographs matter more than any other single step.
Skin mount versus replica. Modern trophy work is largely fibreglass replicas cast from a mould and painted to measurements and photographs — the fish is released alive. Replicas do not grease, do not shrink and do not attract insects, and for a protected or released fish they are the only lawful option. The skin mount survives where the specimen itself is the point: museum reference material, historical restoration, and cases where the actual animal matters more than the image of it.
Arsenic, and why it is not in this blueprint. Nineteenth-century taxidermy relied on arsenical soap, which is why antique mounts are handled with care in museums to this day. Borax does the same job of drying and deterring insects without the poison. The historical preparation is described in the literature and is deliberately not given here as a recipe.
Materials
6- Placeholder
- 1 piecePlaceholder
- 2 metersPlaceholder
- 2 sheetsPlaceholder
- 1 setPlaceholder
- 1 setPlaceholder
This blueprint makes
Related Blueprints
These blueprints share knowledge with this one — techniques, materials, or principles that connect them in the learning graph.
CC0 Public Domain
This blueprint is released under CC0. You are free to copy, modify, distribute, and use this work for any purpose, without asking permission.
Support the Maker by purchasing products through their Blueprint where they earn a Maker Commission set by Vendors, or create a new iteration of this Blueprint and include it as a connection in your own Blueprint to share revenue.