ART
BEAUTY & WELLNESS
CRAFT
CULTURE & HISTORY
ENTERTAINMENT
ENVIRONMENT
FOOD & DRINKS
REVERSE ENGINEERING
SCIENCES
SPORTS
TECHNOLOGY
WEARABLES
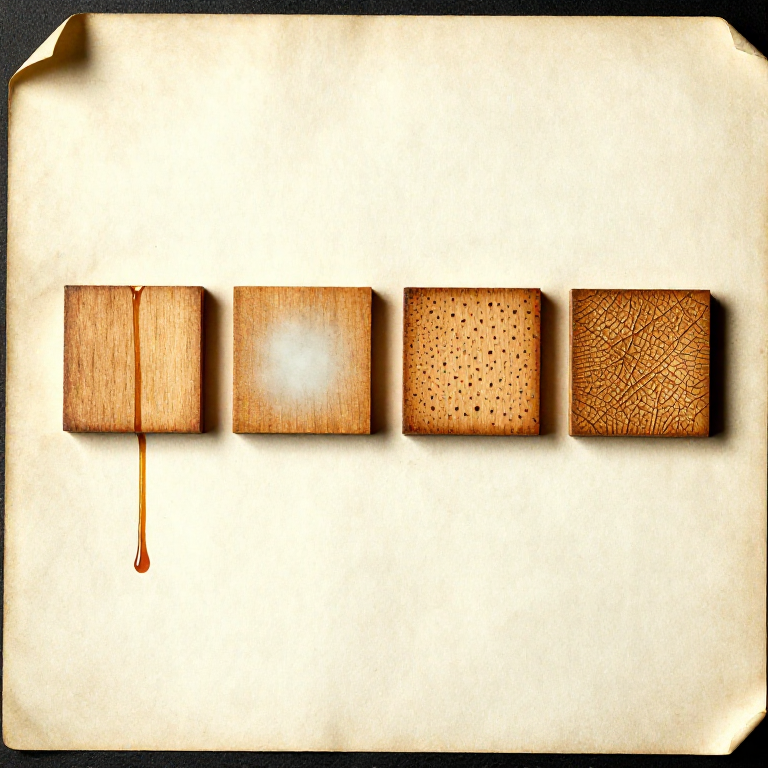


Runs, Nibs, Cloudiness and Fisheye: Fixing a Finish That Went Wrong
Every finish goes wrong sometimes, and almost every fault is repairable if you know what it is. The instinct to strip everything and start again is usually unnecessary.
Each fault has a signature appearance and a specific cause, and the fix follows from the cause rather than from how bad it looks. A run and a wrinkle look equally alarming; one is sanded off in five minutes and the other means the coat has to come off.
This rung is the diagnostic table, in the same spirit as reading a failed glue joint and reading a saw cut that went wrong — look at what the failure is telling you before deciding what to do.
Intermediate
3 hours
Instructions
1
1
Runs, sags and dust nibs: wait, then cut them off
Runs, sags and dust nibs: wait, then cut them off
A RUN or SAG is too much finish in one place. A DUST NIB is a speck that landed while it was wet. Both are lumps on an otherwise sound film, and both are fixed the same way.
Wait until the finish is genuinely hard — days for oil-based polyurethane, not hours. Attacking a run while it is soft drags and smears it into something much worse. Then slice the top off carefully with a sharp blade or sand it flat with a block, and recoat.
Use a block, never fingers. Fingertips follow the lump and leave a dip around it, which is then visible from every angle under a gloss finish.
Tools needed:
 Sanding Block Set (Foam)
 Magnifying Loupe
 Tack Cloth
 Sandpaper Assortment
2
2
Cloudy, white or blushed
Cloudy, white or blushed
A milky haze in the film is usually moisture trapped in it — from applying in high humidity, or in a cold room, or over a surface that was not dry. It is called BLUSHING.
With shellac and lacquer it often clears by re-wetting the surface with the solvent so the moisture can escape as the film re-forms. With polyurethane it generally does not clear and the coat has to come off.
A white RING on a waxed or shellacked surface is the same thing locally — moisture in the finish, not in the wood. It usually responds to gentle heat, or to abrading and re-waxing. A BLACK mark is different: that is water that reached the wood and reacted with tannin, and it has to be bleached or sanded out.
Materials for this step:
 Shellac1 piece
Tools needed:
 Cotton ClothMagnifying Loupe
 Denatured Alcohol
3
3
Fisheye, wrinkling and a finish that never dries
Fisheye, wrinkling and a finish that never dries
FISHEYE is small craters where the finish pulls away from the surface. The cause is contamination — almost always silicone, from a furniture polish or a spray, and it is in the wood rather than on it. The reliable cure is a barrier coat of dewaxed shellac, which sticks where other finishes will not.
WRINKLING means a coat was applied too thickly, or recoated before the one beneath had cured, so the solvent attacked it. It has to come off; there is no way to flatten it.
A finish that NEVER DRIES has three usual causes: oil-based finish over a not-yet-cured oil, stain that was not wiped off, or old shellac past its shelf life. Only the first can wait it out — the other two must be removed.
Materials for this step:
Shellac1 pieceTools needed:
Cotton Cloth Foam BrushMagnifying Loupe
 Mineral Spirits
4
4
Knowing when to strip, and how to avoid it next time
Knowing when to strip, and how to avoid it next time
Strip when the problem is IN the film across the whole surface — wrinkling, widespread fisheye, a coat that will not cure — rather than on it. Local faults are local repairs.
Shellac lifts with alcohol, which is why it is so forgiving. Oil-based varnish needs a chemical stripper or scraping and sanding. Sand as little as possible on shaped work: a moulding sanded to remove a finish loses its crispness, and that is a worse outcome than the finish was.
Most of these faults trace back to three habits, and all three are cheap: test the whole schedule on an offcut of the same board, apply thin coats, and let each one cure before the next. Almost nothing in this rung happens to someone doing those three things.
Materials for this step:
 Hardwood Board1 piece
Tools needed:
Cotton ClothSanding Block Set (Foam) Nitrile Gloves
 Clear Safety GlassesDenatured AlcoholMineral Spirits
Tools Required
10- Sanding Block Set (Foam)10% commissionPlaceholder
- Placeholder
- Placeholder
- Placeholder
- Placeholder
- Placeholder
- Placeholder
- Placeholder
- Placeholder
- Placeholder
Related Blueprints
These blueprints share knowledge with this one — techniques, materials, or principles that connect them in the learning graph.


CC0 Public Domain
This blueprint is released under CC0. You are free to copy, modify, distribute, and use this work for any purpose, without asking permission.
Support the Maker by purchasing products through their Blueprint where they earn a Maker Commission set by Vendors, or create a new iteration of this Blueprint and include it as a connection in your own Blueprint to share revenue.