
Collaboration
ART
BEAUTY & WELLNESS
CRAFT
CULTURE & HISTORY
ENTERTAINMENT
ENVIRONMENT
FOOD & DRINKS
REVERSE ENGINEERING
SCIENCES
SPORTS
TECHNOLOGY
WEARABLES
Cart Crupper, Breeching, Belly-Band and Straps (Hasluck, Harness Making, 1904)
Tex

Created by

Tex

13. November 2026FO
0
0
0
0
0

Cart Crupper, Breeching, Belly-Band and Straps (Hasluck, Harness Making, 1904)

The rest of a cart harness, from Paul N. Hasluck's Harness Making (1904): the crupper that runs from the saddle under the tail, the breeching round the hindquarters with its tugs and loin straps, the belly-band, hame straps and a leading rein. All sizes are his. With the bridle, collar and cart saddle it completes the set.
Advanced
About 3 days

Instructions

1

Cutting list

Loading Jupyter Notebook...
2

Read Harness Making, ch. VII

"To make the breeching, cut the body, if possible, 7 ft. 4 in. long and about 4 in. wide. Turn it down to 4 ft. 10 in. long, the strong end less than the weak."
3

Cut the crupper body and dock

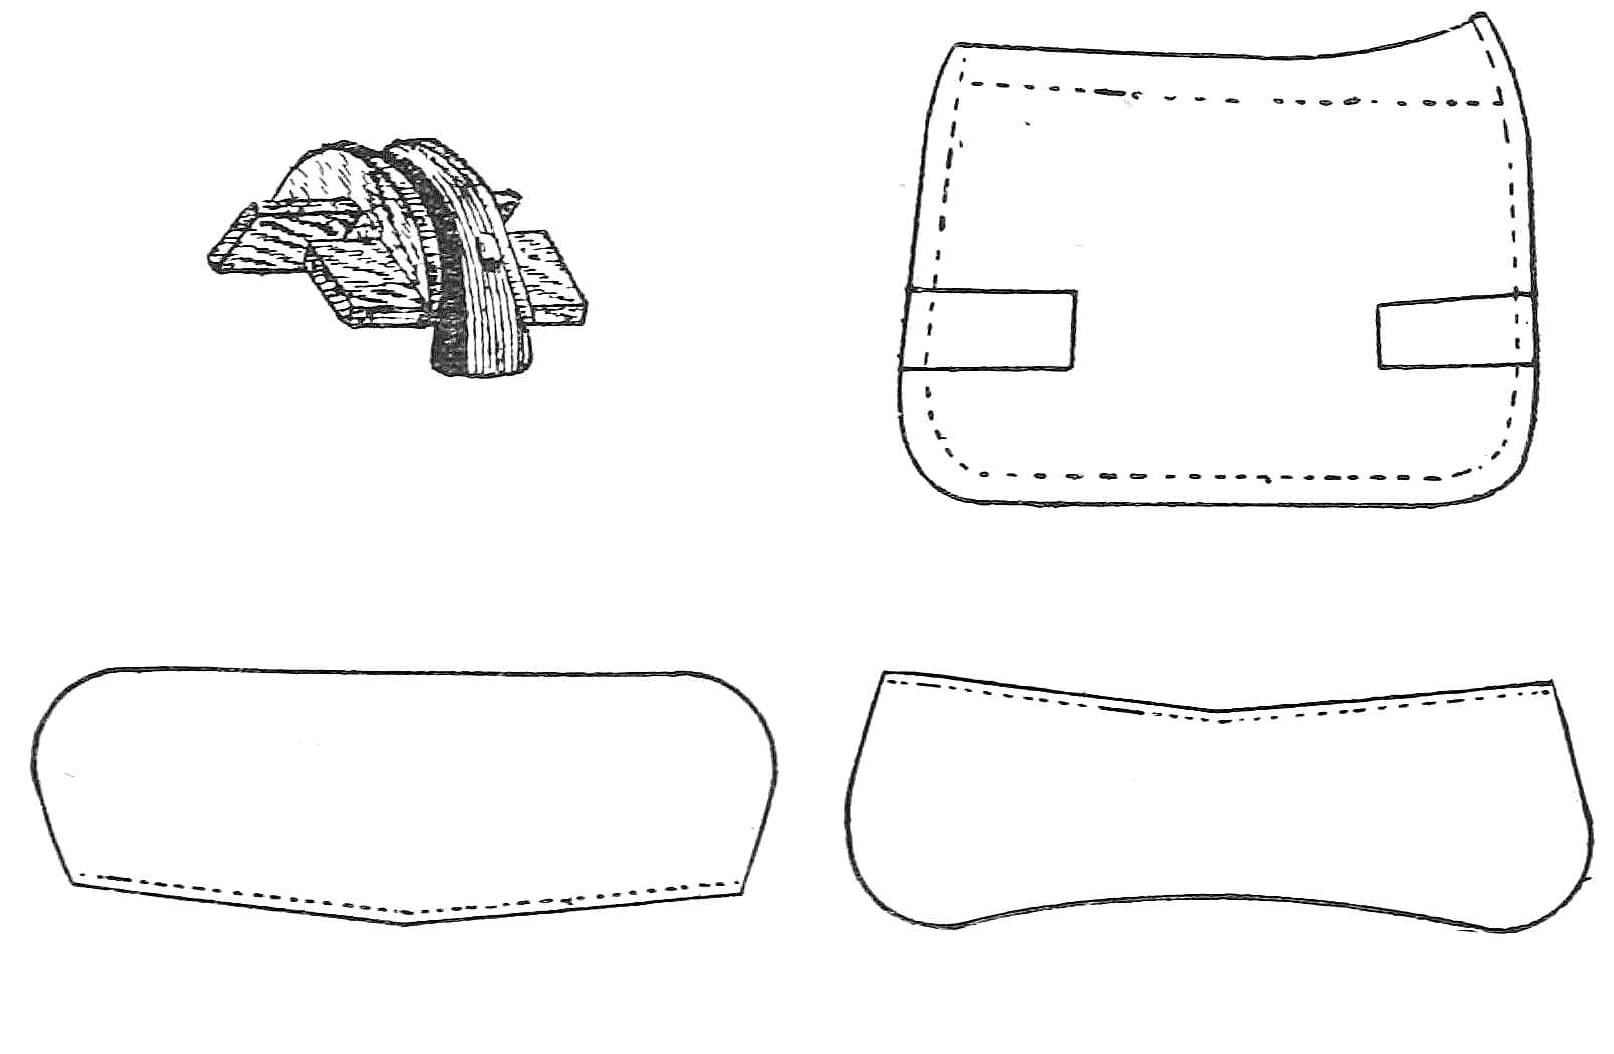
Cut the body 2 ft 6 in or 2 ft 8 in long and 3½ to 4 in wide; cut a semicircle in the centre from the weak end, leaving a point about ¾ in wide each side, and cut an 8 in piece to line this end. Cut a piece ⅞ in wide and 8½ in long, shave its ends, and stitch it edge to edge into a round to within 1½ in of each end, with a cord or strip of leather inside; rub it round, blacken it and flatten both ends with a hammer.

Materials for this step:

Harness LeatherHarness Leather1 piece
Hemp CordHemp Cord1 piece
Leather ThreadLeather Thread1 piece
Leather DyeLeather Dye1 piece

Tools needed:

Leather KnifeLeather Knife
Two Harness NeedlesTwo Harness Needles
AwlAwl
Claw HammerClaw Hammer
4

Finish the crupper body

Point the square end, reducing it to about 2 in. Race it along the sides and ends, edge and black it, and run a hot iron over the creases. Prick it about nine per inch as far as the lining reaches from the semicircle. Put the ends of the round piece under the points, one each side, the lining under them, and stitch all round and across the points with three-cord black-wax thread; trim, black and rub the edges.

Materials for this step:

Leather ThreadLeather Thread1 piece
Leather DyeLeather Dye1 piece

Tools needed:

Leather KnifeLeather Knife
Race CompassRace Compass
Edge BevellerEdge Beveller
Saddler's BevellerSaddler's Beveller
Propane TorchPropane Torch
Pricking IronPricking Iron
AwlAwl
Two Harness NeedlesTwo Harness Needles
Stitching PonyStitching Pony
5

Make the crupper lay

Cut the lay 1 in narrower than the body and 3 ft long; turn in 10 in at the strong end and beat it flat. Turn the other end down 2 in and cut it slanting to 1½ in for a buckle, with a buckle hole. Mark cross lines 2 in from the broad point, ¼ in from the end of the bend underneath, and 2½ in from that toward the buckle. Edge the top only, crease two lines and hot-iron them, with inner lines about ¼ in in. Leave two openings for the hip straps, one in the bend and one in the middle; black and prick the stitched parts. Fix the buckle, lay it on the centre of the body with the broad end reaching the edge of the semicircle, tack and stitch, spotting the three cross lines.

Materials for this step:

Harness LeatherHarness Leather1 piece
Iron Buckle with TongueIron Buckle with Tongue1 piece
Leather ThreadLeather Thread1 piece
Leather DyeLeather Dye1 piece

Tools needed:

Leather KnifeLeather Knife
Edge BevellerEdge Beveller
Creasing ToolCreasing Tool
Saddler's BevellerSaddler's Beveller
Leather Hole PunchLeather Hole Punch
Pricking IronPricking Iron
AwlAwl
Two Harness NeedlesTwo Harness Needles
6

Pad the crupper and fit its strap

Cut thick felt as wide as the body, from the point of the semicircle to 2 in beyond the cross line near the buckle; cover it with basil, coarse-stitch it along the centre, turn the ends over and fasten them, and stitch it in place next the body with four or five stitches here and there, well secured at each corner. Cut a hole through the body opposite the buckle, 1½ in wide. Make a strap 9 in long, pointed one end and shaved the other, crease, black and stitch its shaved end to the narrow end of the body; it goes round the saddle's dock and up through the hole to the buckle on the lay.

Materials for this step:

Wool FeltWool Felt1 piece
Basil LeatherBasil Leather1 piece
Harness LeatherHarness Leather1 piece
Leather ThreadLeather Thread1 piece
Leather DyeLeather Dye1 piece

Tools needed:

Leather KnifeLeather Knife
Leather Hole PunchLeather Hole Punch
AwlAwl
Two Harness NeedlesTwo Harness Needles
7

Make the breeching body

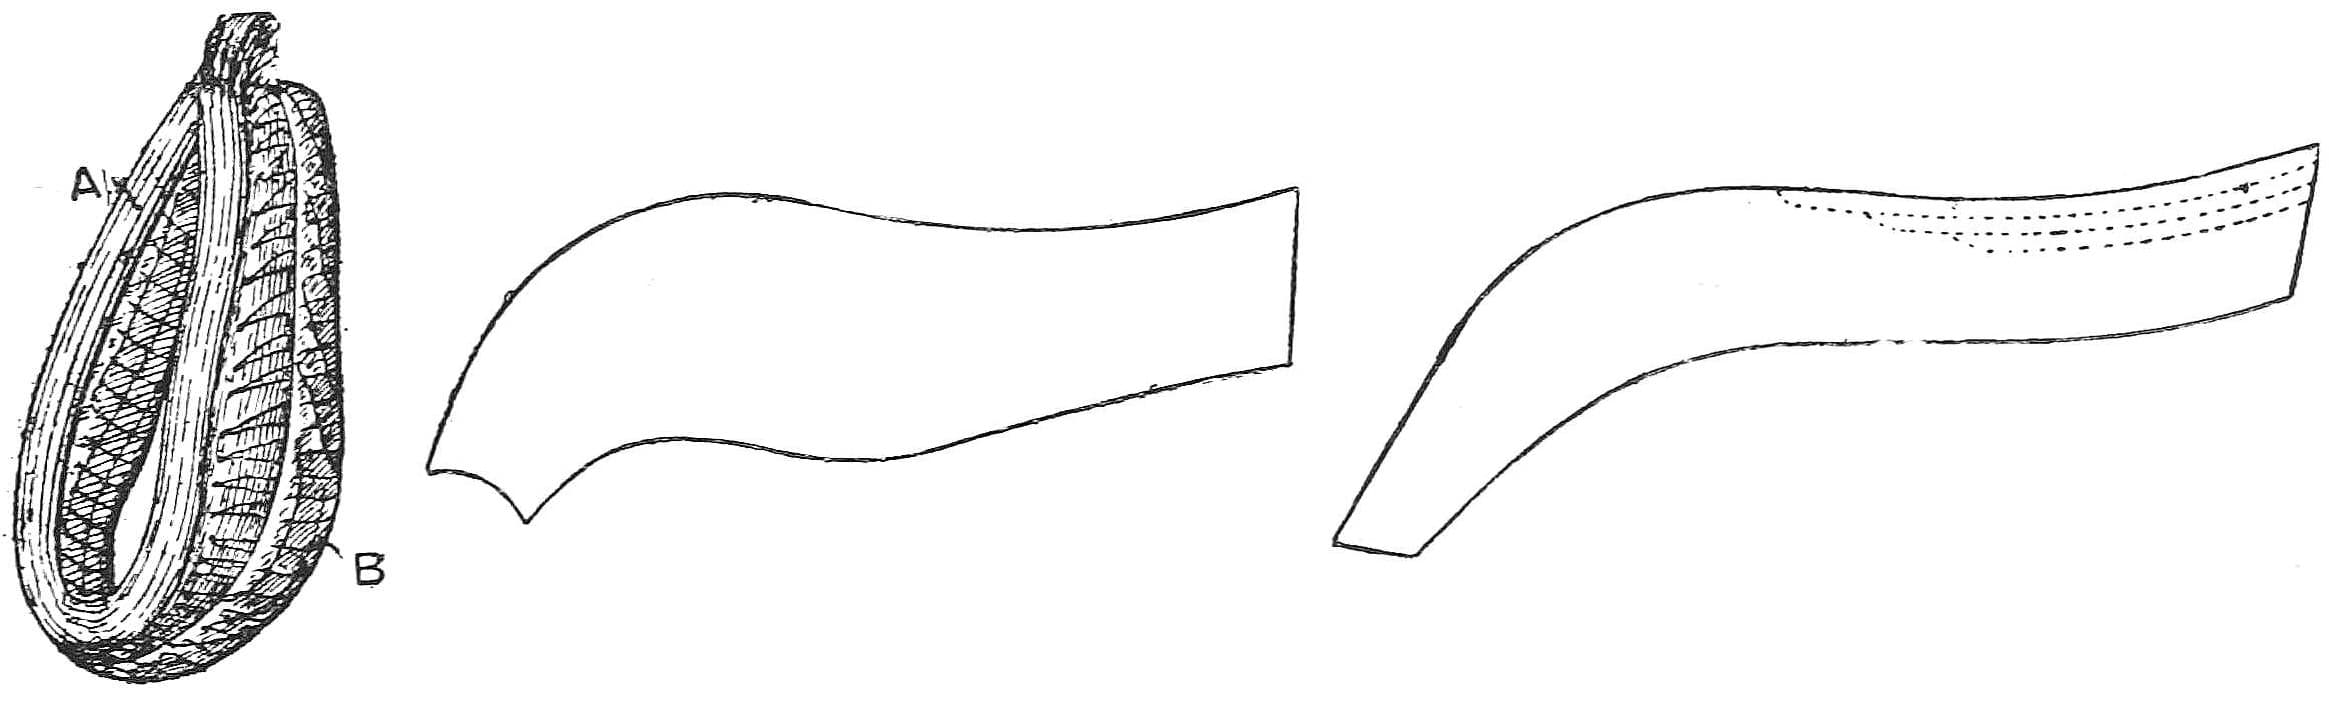
Cut the body 7 ft 4 in x about 4 in and turn it down to 4 ft 10 in, the strong end less than the weak; edge, black and crease two rows along the edges. Mark a cross line about 1½ in from the centre of the bend each side, and at each end. Line the bend with 1 ft pieces bent flesh outward, one end about 1 in shorter; prick, tack and stitch row to row to make the eye for the bridgeband pin. Trim, blacken and rub the bend with tallow and bone; beat it with a wooden mallet if hard, and stitch the double part along ends and sides.

Materials for this step:

Harness LeatherHarness Leather1 piece
Leather ThreadLeather Thread1 piece
Leather DyeLeather Dye1 piece
TallowTallow1 piece

Tools needed:

Leather KnifeLeather Knife
Edge BevellerEdge Beveller
Creasing ToolCreasing Tool
Pricking IronPricking Iron
AwlAwl
Two Harness NeedlesTwo Harness Needles
Bone FolderBone Folder
Wooden MalletWooden Mallet
8

Put on the breeching lay

Cut the lay the same length and 1 in narrower; edge, crease and black it, run another line ¼ in inside the crease, prick the two inner lines nine to the inch and turn it down at both ends as the body. Tack it on the centre of the body, light end against heavy end, and stitch end to end to the cross lines, bulging the cross stitching inward about 1 in at the middle. Punch a large hole where the stitches bulge and cut straight out each side for the chain to catch the pin. Cut a slot for the 1½ in tug 1 ft 4 in from each end.

Materials for this step:

Harness LeatherHarness Leather1 piece
Leather ThreadLeather Thread1 piece
Leather DyeLeather Dye1 piece

Tools needed:

Leather KnifeLeather Knife
Edge BevellerEdge Beveller
Creasing ToolCreasing Tool
Pricking IronPricking Iron
Leather Hole PunchLeather Hole Punch
AwlAwl
Two Harness NeedlesTwo Harness Needles
9

Make the tugs and safes

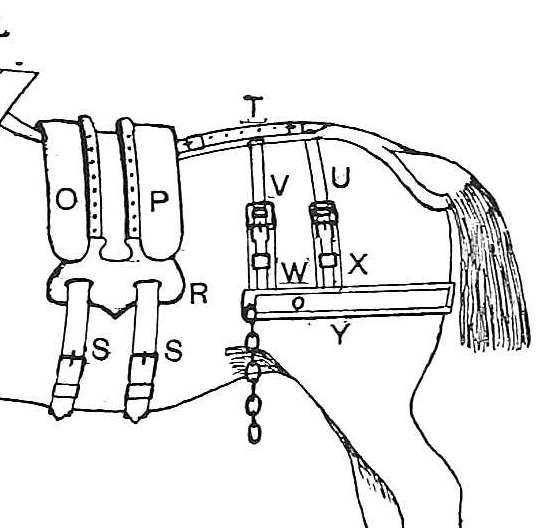
Two hind tugs 1 ft 8 in long, 6 in turned down each end to meet; buckle hole in the weak end; black, crease, rub and prick them. Put the strong end up through the slot from underneath, joint in front under the loop, buckle on the other end; make a loop about 2½ in long round both thicknesses and pull it over the joint. Cut a safe for each from the breeching to an inch beyond the buckle and ½ in wider each side, narrowed and shaved at the bottom, rounded at the top with a loop; finish it on the 1½ in loop-stick, beat it flat and square, nail it from underneath with about five nails each side clinched on the loop-stick, and crease it again with a hot iron. Stitch the safes along the tugs. Make the front tugs for the bridgeband pins the same but shorter, so their length from the breeching equals the hind tugs; fit the pins with their nut and washer.

Materials for this step:

Harness LeatherHarness Leather1 piece
Iron Buckle with TongueIron Buckle with Tongue4 pieces
Breeching PinBreeching Pin2 pieces
NailsNails1 piece
Leather ThreadLeather Thread1 piece
Leather DyeLeather Dye1 piece

Tools needed:

Leather KnifeLeather Knife
Leather Hole PunchLeather Hole Punch
Loop StickLoop Stick
Claw HammerClaw Hammer
Saddler's BevellerSaddler's Beveller
Propane TorchPropane Torch
Creasing ToolCreasing Tool
Pricking IronPricking Iron
AwlAwl
Two Harness NeedlesTwo Harness Needles
Adjustable SpannerAdjustable Spanner
10

Make the loin straps

Cut two loin straps 3 ft 8 in x 1½ in to fasten to the tugs and pass through the openings in the crupper; point each end, crease double each side, edge, black, hot-iron the creases and make six or seven holes in each end.

Materials for this step:

Harness LeatherHarness Leather1 piece
Leather DyeLeather Dye1 piece

Tools needed:

Leather KnifeLeather Knife
Edge BevellerEdge Beveller
Creasing ToolCreasing Tool
Saddler's BevellerSaddler's Beveller
Propane TorchPropane Torch
Leather Hole PunchLeather Hole Punch
11

Make the leading rein and hame straps

Leading rein: a 1 in strap about 8 ft 6 in long in all, with a buckle and a billet 1 ft long at one end and a chain with a spring hook at the other; black and crease it and stitch on buckle, billet and chain. The chain goes through the near bit ring and hooks to the other ring; the billet fastens to the crupper. Hame straps: 1¼ in, about 1 ft 8 in long, buckle and loop at one end, the other pointed with holes.

Materials for this step:

Harness LeatherHarness Leather1 piece
Iron Buckle with TongueIron Buckle with Tongue3 pieces
Iron ChainIron Chain1 piece
Snap HookSnap Hook1 piece
Leather ThreadLeather Thread1 piece
Leather DyeLeather Dye1 piece

Tools needed:

Leather KnifeLeather Knife
Creasing ToolCreasing Tool
Leather Hole PunchLeather Hole Punch
AwlAwl
Two Harness NeedlesTwo Harness Needles
12

Make the belly-band

Cut it 3 in wide and 3 ft 8 in long, narrowed to 2 in for 6 in at both ends, with a buckle hole about 3 in from the point. Make two billets 2 ft 2 in x 2 in and two loops about 1¾ in wide; edge, crease and black everything. Prick the billets six per inch for about 6 in from the shaved end, set the buckle with the billet lapping 3 in over it and the loop about 1 in from the buckle, tack and stitch with six-cord black-wax thread, twice waxed, with two or three stitches in the centre of each end. Open and crease the loops and make four holes in the billets.

Materials for this step:

Harness LeatherHarness Leather1 piece
Iron Buckle with TongueIron Buckle with Tongue2 pieces
Leather ThreadLeather Thread1 piece
Leather DyeLeather Dye1 piece

Tools needed:

Leather KnifeLeather Knife
Edge BevellerEdge Beveller
Creasing ToolCreasing Tool
Pricking IronPricking Iron
Leather Hole PunchLeather Hole Punch
AwlAwl
Two Harness NeedlesTwo Harness Needles
Stitching PonyStitching Pony
13

Troubleshooting

Crupper and breeching troubleshooting.

Flow

Loading...
14

History and honest limits

From **Harness Making**, edited by Paul N. Hasluck, Cassell and Company, 1904, chapter VII, "Cart Saddles, Reins, etc." (Project Gutenberg #70169). All sizes are his. Not made here: the iron-dee crupper he gives as a matter of taste, the ornamental breast-plate, the maker's-name stamp, and the final coat of "Harris's liquid or composition", a trade dressing. The heat source for the iron and the metric figures are ours.

Materials

12

Tools Required

16

CC0 Public Domain

This blueprint is released under CC0. You are free to copy, modify, distribute, and use this work for any purpose, without asking permission.

Support the Maker by purchasing products through their Blueprint where they earn a Maker Commission set by Vendors, or create a new iteration of this Blueprint and include it as a connection in your own Blueprint to share revenue.

Discussion

(0)

Log in to join the discussion

Loading comments...