Collaboration
ART
BEAUTY & WELLNESS
CRAFT
CULTURE & HISTORY
ENTERTAINMENT
ENVIRONMENT
FOOD & DRINKS
REVERSE ENGINEERING
SCIENCES
SPORTS
TECHNOLOGY
WEARABLES
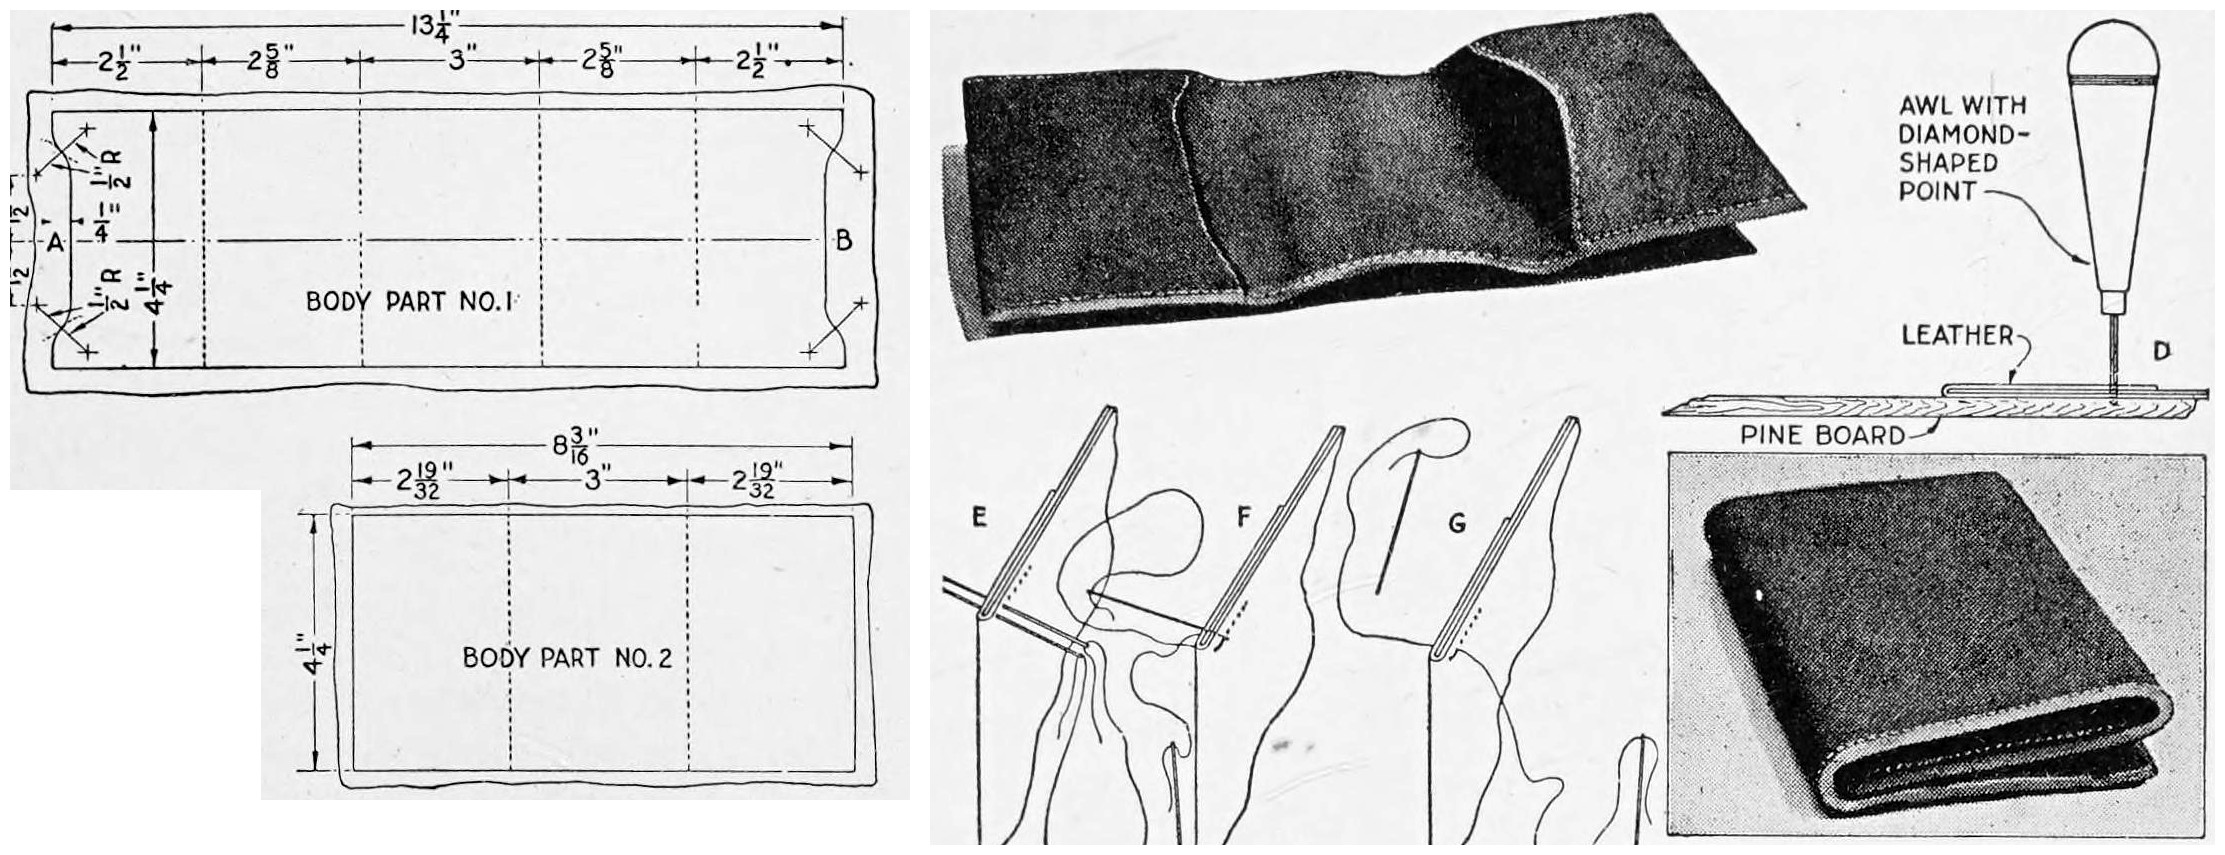


Craftsman Leather Billfold: Two Cardboard Patterns, Silk Lining and Saddle-Stitched Waxed Silk (Boy Mechanic, 1919)
Livingston Haviland's billfold from The Boy Mechanic, Book 3 (1919): two leather body parts cut to stiff-cardboard patterns (13-1/4 and 8-3/16 by 4-1/4 in), lined with skiver or silk moire, folded into two card pockets and a money compartment, glued, and hand-sewn with heavy waxed silk 3/16 in from the edges.
Intermediate
About 1 day
Instructions
1
1
His patterns in centimetres
His patterns in centimetres
Loading Jupyter Notebook...
2
2
Read The Boy Mechanic, Book 3
Read The Boy Mechanic, Book 3
"The making of a billfold is easily within the range of an amateur in leather work, who will observe the instructions carefully." Seal, morocco, pigskin and ooze sheep are all satisfactory.
3
3
Cut the patterns and the leather
Cut the patterns and the leather
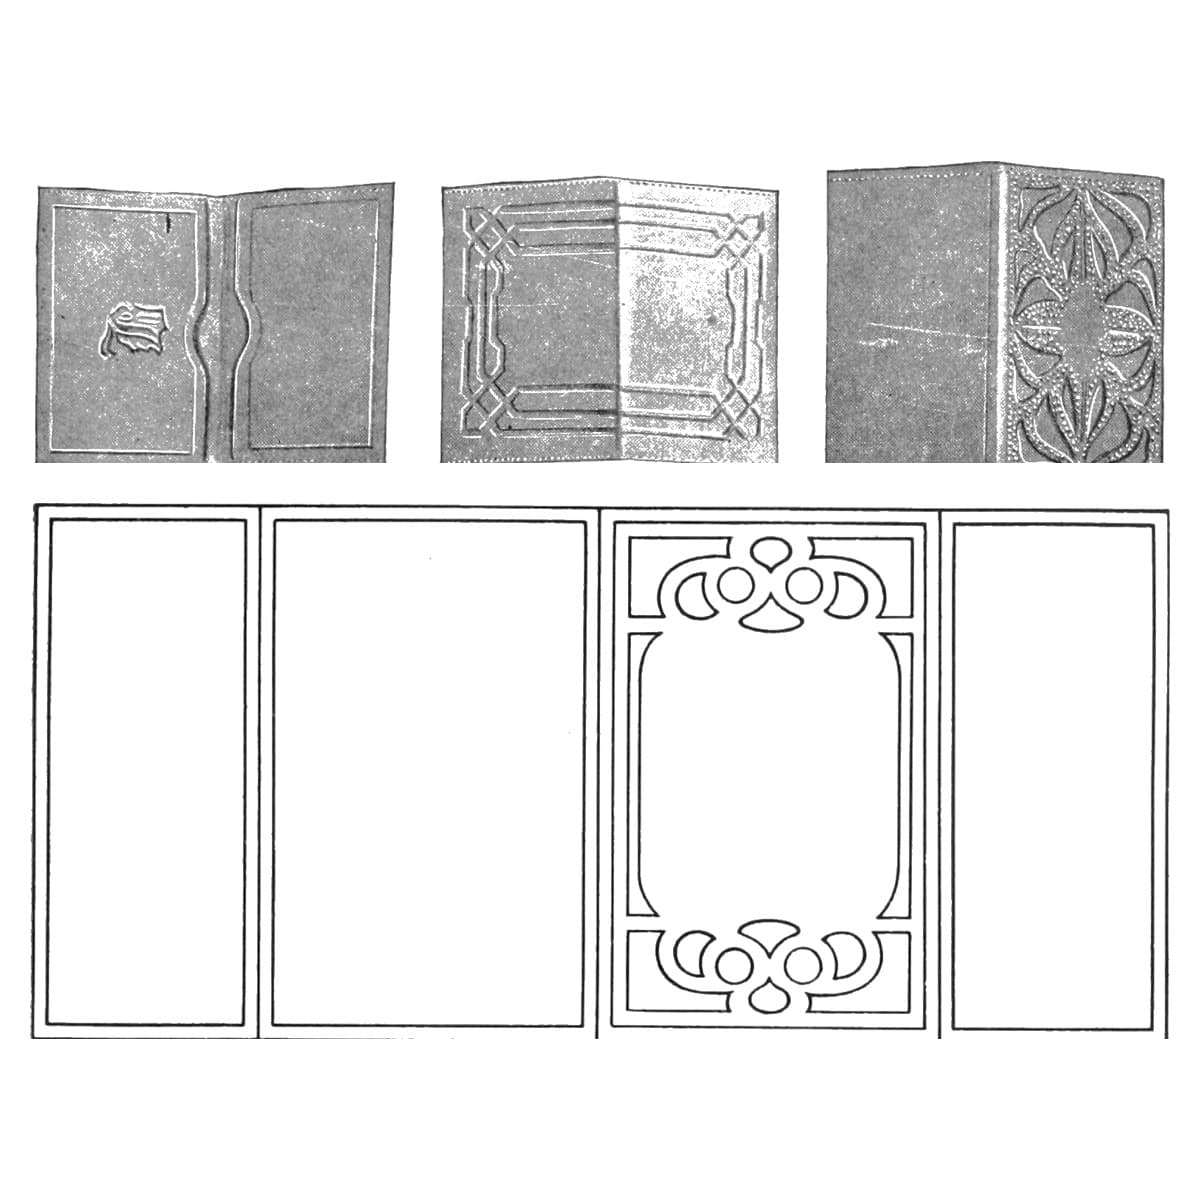
Cut two patterns of stiff cardboard (Fig. 1). Body part No. 1: 13-1/4 by 4-1/4 in, with fold lines at 2-1/2, 2-5/8, 3, 2-5/8 and 2-1/2 in, and each end (A, B) cut in with 1/2 in radius arcs, set in 1/4 in. Body part No. 2: 8-3/16 by 4-1/4 in, with fold lines at 2-19/32, 3 and 2-19/32 in. Lay each pattern on the leather and trim the leather even with it, guiding the knife with a metal straightedge, on a close-grained hardwood board or a piece of sheet zinc.
Materials for this step:
 Pigskin Leather1 piece
 Cardboard Template Sheets1 piece
Tools needed:
 Pencil
 Ruler
 Straightedge
 Craft Knife
 Hardwood Board
 Zinc Sheet
4
4
Line the parts
Line the parts
Cut linings slightly larger than the patterns. Skiver is glued all over with a good, pliable leather glue that will not crack the leather; smooth it on gently without stretching, or the leather may buckle, and dry it under a light weight. Silk moire is glued with a thin stripe round the edges only, left to overhang, and trimmed off neatly when dry.
Materials for this step:
 Silk Fabric1 piece
 Leather Glue1 piece
Tools needed:
 ScissorsCraft Knife
5
5
Glue and fold
Glue and fold
Fold part No. 1 to form the back and the two card pockets. Apply stripes of glue as shown in Fig. 3, drop part No. 2 (the money compartment) into place, and fold the ends of No. 1 over on the dotted lines. Weight the billfold and let the glue dry.
Materials for this step:
Leather Glue1 pieceTools needed:
 Leather Modeling Tool
6
6
Mark and punch the stitching
Mark and punch the stitching
Draw a straight line with a blunt-point tool along the edges to be sewn, 3/16 in from them. Mark the stitch spacing for an inch on a strip of paper and transfer it along the line. Punch the holes on a pine board with a diamond-pointed awl held vertical (D); back the open ends with strips of cardboard while punching.
Tools needed:
Leather Modeling ToolRuler Stitching Awl
 Pine BoardCardboard Template Sheets
7
7
Sew and finish the edges
Sew and finish the edges
Sew with heavy waxed silk matching the leather, by hand or with the work clamped between two boards. Thread a needle on each end, start both from the right side (E), pass the needle from the first hole through the second (F) and, with the needles in position (G), continue this stitch. Tie the ends neatly. Trim the edges and tool them smooth with a suitable metal tool or rod, heated moderately, applying water with the fingertip.
Materials for this step:
 Silk Thread1 piece
 Beeswax1 piece
Tools needed:
 Two Harness NeedlesScissorsCraft Knife
 Mild Steel Round Bar
8
8
Troubleshooting
Troubleshooting
Billfold troubleshooting.
Flow
Loading...
9
9
History and honest limits
History and honest limits
From "A Craftsman Leather Billfold" by Livingston Haviland, in **The Boy Mechanic, Book 3**, Popular Mechanics, 1919 (Project Gutenberg 71856; checked on the archive.org scan boymechanic0003unse, pp. 446-447). He does not give the number of stitches to the inch or what waxes the silk (beeswax is ours). Pigskin is one of his four leathers. The tools and metric figures are ours.
Materials
6- 1 piecePlaceholder
- 1 piecePlaceholder
- 1 piecePlaceholder
- 2 piecesPlaceholder
- 1 piecePlaceholder
- 1 piecePlaceholder
Tools Required
13- 1 vendor sell this, none ship to you yetPlaceholder
- Placeholder
- Placeholder
- Placeholder
- Placeholder
- Placeholder
- Placeholder
- Placeholder
- Placeholder
- Placeholder
- Placeholder
- Placeholder
- Placeholder
This blueprint makes

Related Blueprints
These blueprints share knowledge with this one — techniques, materials, or principles that connect them in the learning graph.
CC0 Public Domain
This blueprint is released under CC0. You are free to copy, modify, distribute, and use this work for any purpose, without asking permission.
Support the Maker by purchasing products through their Blueprint where they earn a Maker Commission set by Vendors, or create a new iteration of this Blueprint and include it as a connection in your own Blueprint to share revenue.