

Kratky Hydroponics
Hydroponics normally means pumps, air stones, timers and electricity. The Kratky method has none of them, and it works because of one observation: as the plant drinks, the water level falls, and the roots left above the water get their oxygen straight from the air.
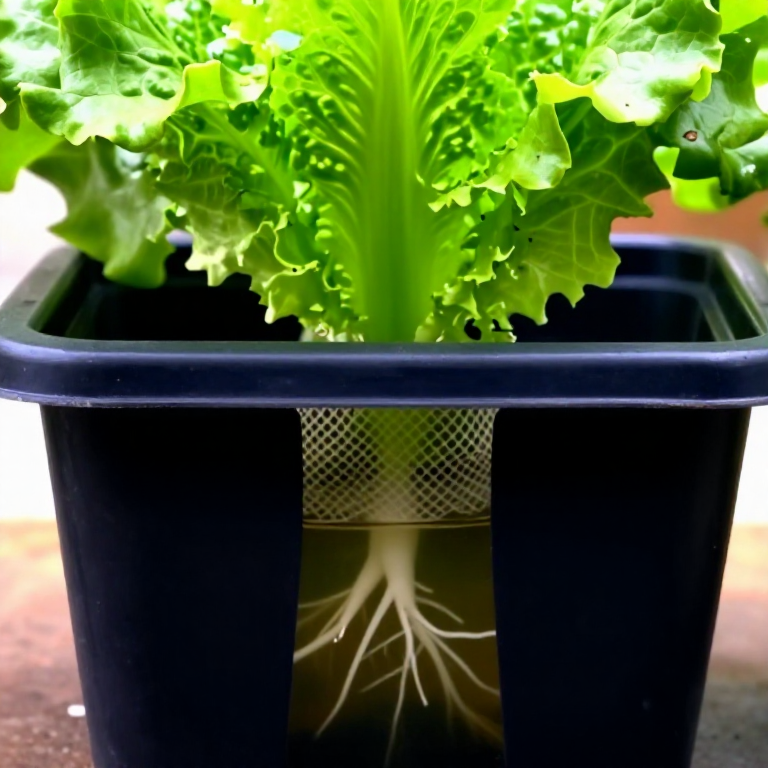
The plant ends up running two root systems at once — lower roots in solution taking up water and nutrients, upper roots in the widening air gap doing the breathing. No circulation is needed because the plant creates the air gap itself, simply by using the water.
Fill the reservoir once at the start and, for a fast leafy crop, do not top it up at all. It is the simplest working hydroponic system there is, and it is a genuinely good measurement project because every variable you care about is visible.
Instructions
Choose an opaque container
Choose an opaque container
Take a 4-10 litre container that light cannot get through, or wrap a clear one. Light in the reservoir grows algae, and algae compete for the nutrients and foul the solution.
Materials for this step:
 Plastic Storage Container1 piece
Cut the lid for a net pot
Cut the lid for a net pot
Cut a hole in the lid so a net pot sits in it with its rim supported and its base hanging below. The lid holds the plant and keeps light out at the same time.
Materials for this step:
 Net Pot1 piece
Tools needed:
 Craft Knife
Germinate seed in an inert plug
Germinate seed in an inert plug
Start lettuce, basil or another fast leafy crop in a rockwool or coir plug until the roots show through. Leafy crops suit this method; fruiting crops drink far more than one filling can supply.
Materials for this step:
 Rockwool Plug1 piece
Mix nutrient solution to the label
Mix nutrient solution to the label
Make up hydroponic nutrient at the stated strength. Plants in water depend entirely on you for every element — this is not fertiliser as a supplement, it is the whole diet.
Materials for this step:
 Hydroponic Nutrient Solution1 liter
Check and adjust the pH
Check and adjust the pH
Test the solution and bring it to about 5.5-6.5. Outside that band, nutrients are chemically present but the plant cannot take them up — deficiency symptoms in hydroponics are usually a pH problem, not a nutrient shortage.
Tools needed:
 pH Test Strips
Fill so the solution just touches the pot base
Fill so the solution just touches the pot base
Fill until the liquid touches the bottom of the net pot — no higher. Submerging the whole plug drowns the young roots before they have anything above water to breathe with.
Tools needed:
 Measuring Ruler
Mark the starting level on the outside
Mark the starting level on the outside
Mark the level and the date on the container. Every measurement afterwards is taken against this line.
Put it somewhere bright and stable
Put it somewhere bright and stable
Give it strong light — a sunny windowsill or a grow light — and a steady temperature. A cold reservoir stalls growth; a hot one loses dissolved oxygen and encourages root rot.
Then leave it alone
Then leave it alone
Do not top the reservoir up. The falling level is the mechanism — refilling it drowns the air roots the plant has just built and defeats the entire method.
Measure the drawdown every few days
Measure the drawdown every few days
Record the water level and the plant's height or leaf count on the same days. You are measuring transpiration directly, and the two curves rise and fall together.
Tools needed:
 Record-Keeping Notebook
Watch the two root systems appear
Watch the two root systems appear
Look into the container as the gap opens. Roots below the line stay fine and pale; roots in the air gap thicken and often develop root hairs. This visible division of labour is the thing worth seeing — one plant, two root environments.
Run a sealed control
Run a sealed control
Set up a second container filled to the brim and topped up whenever it drops. It will grow poorly and may rot at the crown. That failure is the proof of what the air gap does.
Harvest before the reservoir runs dry
Harvest before the reservoir runs dry
Harvest a leafy crop before the solution is gone entirely. A plant that drains the reservoir wilts fast because there is nothing left to draw on.
Weigh the crop against the water used
Weigh the crop against the water used
Weigh the harvest and divide by the litres consumed. Grams of food per litre of water is the number that matters when comparing growing methods, and now you have measured it yourself.
Tools needed:
 Digital Scale
Compendium — what this method does and does not do
Compendium — what this method does and does not do
Where it comes from. The method is named after Bernard Kratky of the University of Hawai'i, who published the non-circulating approach in the horticultural literature. The observation behind it came during a sabbatical in Taiwan in 1985, where he saw farmers growing healthy vegetables in waterlogged fields — the crops survived because part of the root system stayed above the water in raised beds, breathing air. The suspended-pot system is that observation turned into a design.
The air gap is the aeration. Roots need oxygen. Conventional hydroponics supplies it by bubbling air through the solution or by circulating a thin film, both of which need a pump and electricity. Kratky lets the plant open its own air space by drinking, so the upper roots sit in humid air with all the oxygen they need. No pump, no power, no moving parts to fail.
Where it stops working. One filling has to last the whole crop, so this suits fast leafy plants — lettuce, herbs, greens — and not tomatoes or cucumbers, which drink far more over a longer season. Large-scale versions exist, but the constraint is real and it is set by total water demand rather than by the technique.
The honest environmental accounting. Hydroponics uses dramatically less water than field growing because nothing drains away or evaporates from soil, and Kratky adds no electricity at all. Against that: it depends on manufactured nutrient salts, which are mined and shipped, and on plastic containers. It is a genuinely efficient way to grow greens in a small space with no power — and calling it self-sufficient would be wrong, because the fertiliser comes from somewhere.
Why it is a good teaching system. Every variable is visible. You can see the water level fall, see the root systems differentiate, and measure transpiration with a ruler. Very little else in plant science is this legible without instruments.
Materials
4- Placeholder
- 1 piecePlaceholder
- 1 piecePlaceholder
- Placeholder
Tools Required
5- Placeholder
- Placeholder
- Placeholder
- Placeholder
- Placeholder
CC0 Public Domain
This blueprint is released under CC0. You are free to copy, modify, distribute, and use this work for any purpose, without asking permission.
Support the Maker by purchasing products through their Blueprint where they earn a Maker Commission set by Vendors, or create a new iteration of this Blueprint and include it as a connection in your own Blueprint to share revenue.