ART
BEAUTY & WELLNESS
CRAFT
CULTURE & HISTORY
ENTERTAINMENT
ENVIRONMENT
FOOD & DRINKS
REVERSE ENGINEERING
SCIENCES
SPORTS
TECHNOLOGY
WEARABLES
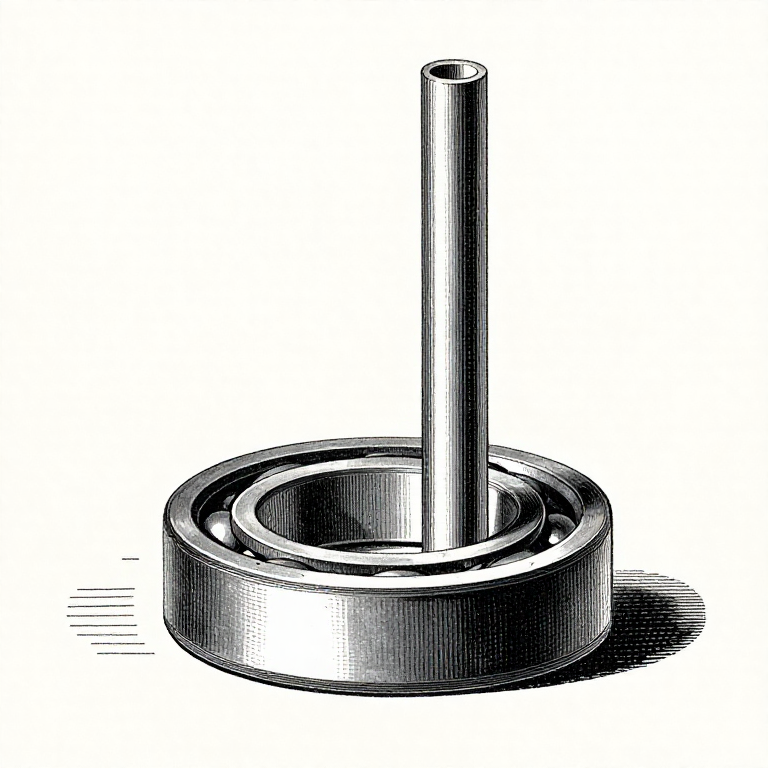


Mounting a Bearing: Press on the Ring That Is Being Fitted, Never Through the Balls
A rolling bearing has a load path: from one ring, through the rolling elements, to the other ring. Mounting force must never take that path, because the balls and the raceways are hardened to carry a rolling load and not a hammer blow.
Press on the inner ring when fitting to a shaft. Press on the outer ring when fitting into a housing. Drive through the wrong ring and the force goes through the balls, leaving tiny dents in the raceway — BRINELLING — that the bearing then runs over thousands of times a minute.
The damage is invisible on the bench and unmistakable in service: a new bearing that rumbles, gets hot, and fails early. It is the commonest way a perfectly good bearing is destroyed before it ever turns.
Intermediate
2 hours
Instructions
1
1
Everything clean, and the bearing last out of its wrapper
Everything clean, and the bearing last out of its wrapper
A bearing's working clearance is measured in microns, so a particle of grit is a boulder. Clean the shaft, the housing, the tools and your hands before the bearing comes out of its packet.
Leave it wrapped until the moment it goes on. The protective oil on a new bearing is there for storage and is compatible with most greases, so it does not need washing off unless the instructions say so — and washing it off usually introduces more contamination than it removes.
Inspect the seat rather than the bearing. Burrs, nicks and old adhesive on a shaft shoulder will hold the bearing crooked, and a bearing that is 0.05 mm out of square is being asked to run misaligned for its whole life.
Materials for this step:
 Degreaser (Citrus-Based)1 piece
Tools needed:
 Nitrile Rubber Gloves
 Vernier Caliper
2
2
Force on the correct ring, square and steady
Force on the correct ring, square and steady
Fitting to a SHAFT: the inner ring is the interference fit, so all force goes on the inner ring. Use a tube or a bearing fitting tool that touches only that ring.
Fitting into a HOUSING: the outer ring is the fit, so all force goes on the outer ring. If a bearing must go onto a shaft and into a housing at the same time, the tool must contact BOTH rings simultaneously.
Press steadily rather than hammering. A press or a threaded drawbar applies an even, square, controlled force; a hammer applies a sudden one at whatever angle it lands. If a hammer is unavoidable, hit a proper fitting tool and never the bearing, and never the balls.
Materials for this step:
 Ball Bearing - Non-Flanged (8mm Bore, 22mm OD)1 piece
 Steel Shaft 30mm1 piece
Tools needed:
 Heavy Bench Vice
 Rubber Mallet
 Straightedge
3
3
Seat it fully against the shoulder, and check
Seat it fully against the shoulder, and check
A bearing that stops a fraction short of its shoulder will be pushed the rest of the way by the first axial load it meets — after everything else has been assembled and set.
Check with a feeler gauge all the way round between the ring and the shoulder. All round matters: a gap on one side only means it is going on crooked, and further pressing will make that worse rather than better.
Then turn it by hand. A correctly mounted bearing turns smoothly with no notches and no tight spots. Roughness at this stage is either contamination, a crooked fit, or an interference so tight that it has squeezed the internal clearance out — and all three are cheaper to fix now than later.
Materials for this step:
Ball Bearing - Non-Flanged (8mm Bore, 22mm OD)1 pieceTools needed:
 Feeler Gauge Set
 Dial IndicatorStraightedge
4
4
Internal clearance: the fit eats it
Internal clearance: the fit eats it
A ball bearing is made with a small gap between the balls and the raceways. Press the inner ring onto an oversized shaft and the ring stretches, closing that gap — a 15 micron interference can remove most of a standard bearing's clearance.
Then the machine warms up. The inner ring is closer to the shaft and usually hotter than the outer, so it expands more and closes the gap further. A bearing with no clearance left is preloaded by accident, runs hot, and fails fast.
That is what the C3 and C4 markings mean: bearings made with extra internal clearance for exactly these situations — tight fits, hot shafts, or both. Choosing one is not a precaution, it is the correct part for the conditions.
Materials for this step:
Ball Bearing - Non-Flanged (8mm Bore, 22mm OD)1 piece Ball Bearings1 piece
Tools needed:
 Digital Caliper 6-InchFeeler Gauge Set
Materials
4- 1 piecePlaceholder
- Ball Bearing - Non-Flanged (8mm Bore, 22mm OD)10% commission1 piece$1.26
- 1 piecePlaceholder
- 1 piecePlaceholder
Tools Required
8- Placeholder
- Placeholder
- Placeholder
- Placeholder
- Placeholder
- Placeholder
- Placeholder
- Placeholder
Estimated Total
What the maker bought. Materials shown without a price are sourced wherever you buy them.
Related Blueprints
These blueprints share knowledge with this one — techniques, materials, or principles that connect them in the learning graph.
CC0 Public Domain
This blueprint is released under CC0. You are free to copy, modify, distribute, and use this work for any purpose, without asking permission.
Support the Maker by purchasing products through their Blueprint where they earn a Maker Commission set by Vendors, or create a new iteration of this Blueprint and include it as a connection in your own Blueprint to share revenue.